rykk
spending too much on rocks

Member since September 2011
Posts: 428 
|
Post by rykk on Jun 18, 2013 20:52:11 GMT -5
Hi, all! Well it took me quite a while to put together but I finally finished building my 14" slab saw. Woohoo! Actually, I finished it back in February and am just now getting around to showing it. Everything works and has hung together through 3 months heavy use. I fabricated every piece except the arbor/flange (~$60 - seller, "butw" on ebay), blade ($63 + $10 shipping - seller, "grbstk" (High Desrt Lapidary) on ebay) motors (feed - ~$30, main 3/4hp ~$70 - ebay) and bearings/rods (~$90 - seller, "irvineman" ebay) from "junk" I had picked up over the years in scrap piles at work. It has both an oil sump AND a Teel pump I picked up unused for $15 on ebay so that I can extend blade life especially when cutting super hard material. The blade speed is digitally selectable from 800rpm to 1075rpm so as not to have to go through the hassle of swapping out pulleys. It also has an autofeed that is adjustable from 5 to 20 inches per hour and a digital readout scaled to display the feed rate in inches/hr. I have around $350 - $400 total in it. I used all stainless steel nuts/bolts/screws since EVERYTHING rusts here in Florida due to it being so blasted humid. Everything except the vise, rods, and blade/arbor is heavy aluminum because - once you analyze the stress points on a saw - those 2-ton cast iron behemoths are WAY overbuilt. Here's a few pix - I'll put a lot more detailed description in the Homemade Equipment section. 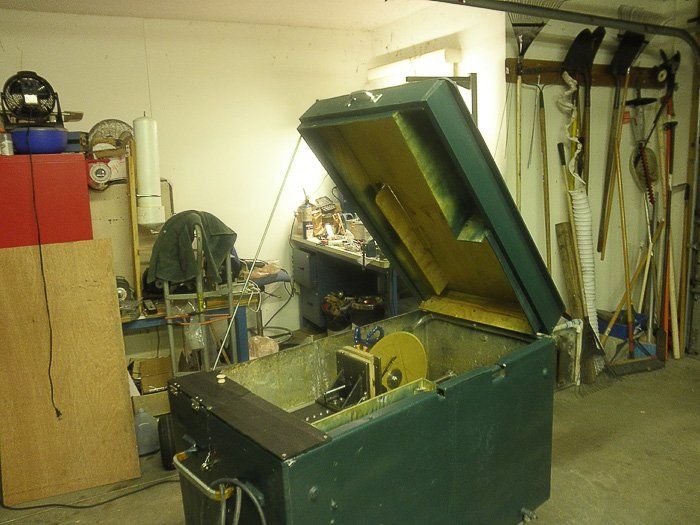 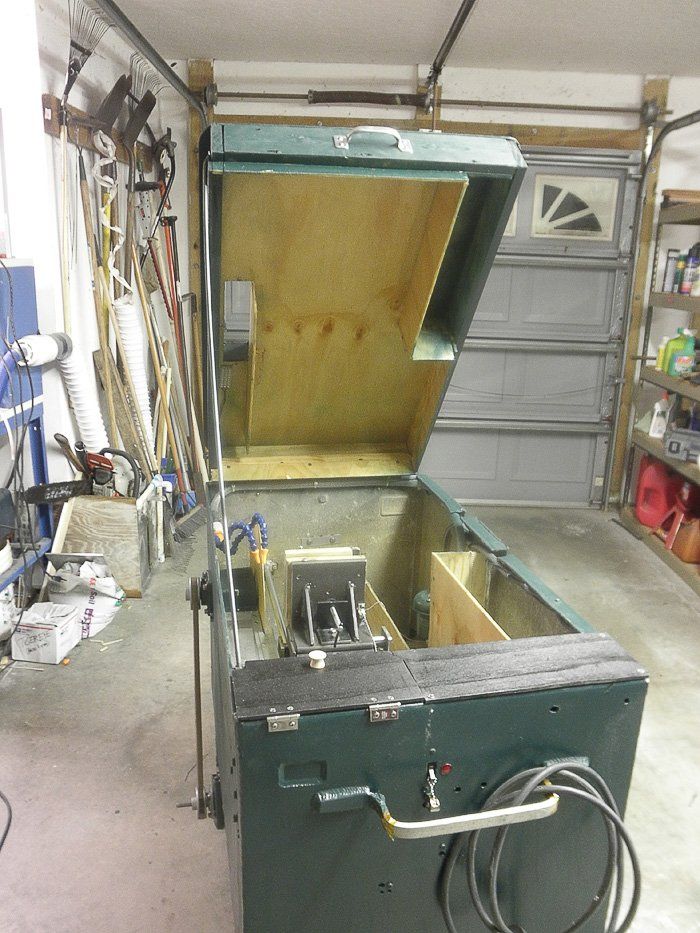 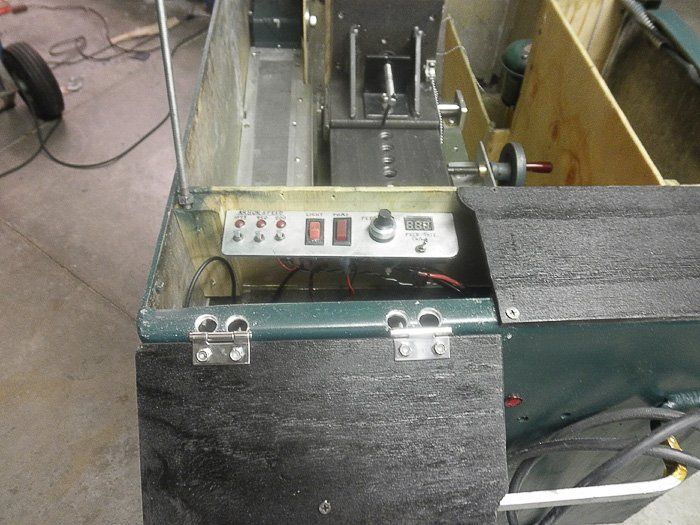 "] Here's a closeup of the spiffy control panel I made. I can digitally select any one of 3 motor speeds and adjust the feed rate. You can also see my split nut solution modeled on the pliers type that Covington has - but a good $95 cheaper with shipping added! Just a battery clip with a sawed in half 3/8-24 brass nut JB welded between the jaws. This pic is early on. What's missing is the on/off switch I added under the readout to turn the feed on/off manually.  Here's a couple of pix of the "hood scoop" viewing port. I made it out of real glass rather than the plastic the manufacturers use that clouds up from oil exposure and scratches when you wipe dusty oil off of it. It's also angled and raised rather than flat so that very little oil splashes onto it to obstruct your view of whats happening inside. 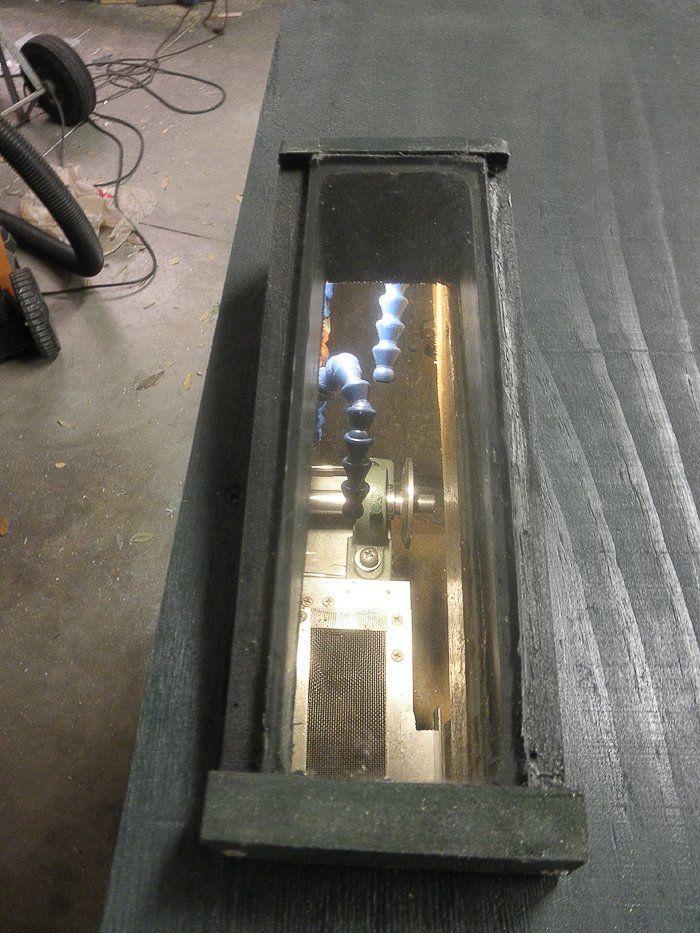 This one shows the oil nozzles flowing while cutting an agate. 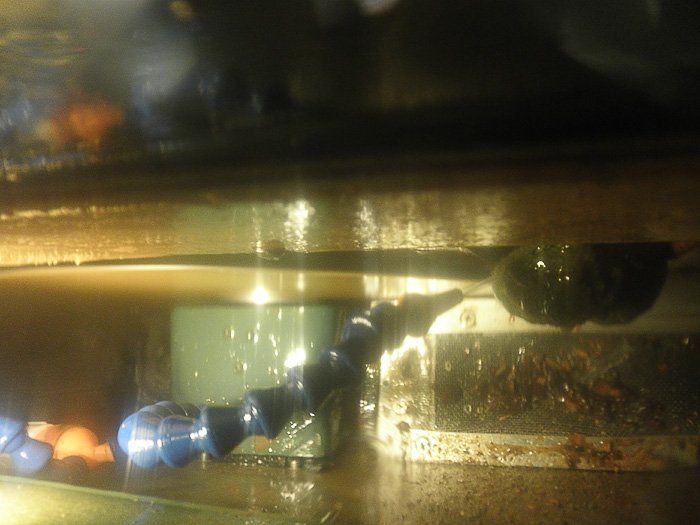 Anyhow, I've been having a blast at long last finally cutting,facing/slabbing all the cool nodules and roughs I've been collecting. Only problems are some oil leaks and saw marks - not deep but visible: Could it be because the blade is a notched one rather than a continuous? C-ya! Rick |
|
Sabre52
Cave Dweller  Me and my gal, Rosie
Member since August 2005
Posts: 20,466
|
Post by Sabre52 on Jun 18, 2013 21:58:48 GMT -5
Wow, awesome job on the saw and coolest thing about it is you know every part that went into it, how each part works, and what you need to do to replace it if it fails...Mel
|
|
|
|
Post by paulshiroma on Jun 18, 2013 22:28:20 GMT -5
EXCELLENT JOB. That is really impressive. I like the idea of the oil pump with the direct spray. Guess I've got another side project this weekend. LOL. Again, awesome job, thanks for sharing the photos and build experience!
|
|
Deleted
Deleted Member
Member since January 1970
Posts: 0
|
Post by Deleted on Jun 18, 2013 22:37:20 GMT -5
GREAT JOB!!!!
How did you engineer the variable speed feed rate? Is it just a gear reduction DC motor with a potentiometer to control the speed?
I have been wanting to upgrade my older HP saw with a variable speed feed rate to speed up the initial cutting and that last 0.5" that always takes for ever. :-)
Tim
|
|
|
|
Post by parfive on Jun 19, 2013 0:06:32 GMT -5
Helluva job, Rick. Lotta good stuff there.
It’s hard to tell from the pics - and you don’t say – if it can handle a bigger blade, but that’s a awful big box for a 14-incher.
|
|
rykk
spending too much on rocks
Member since September 2011
Posts: 428
|
Post by rykk on Jun 19, 2013 2:09:22 GMT -5
Thanks, y'all! To answer some questions:
azrockgeek - The motor is a variable speed gear motor (from France, though seller was American). It will run from 2 to 42rpm, depending on the voltage your give it. Only pulls like 70mA. I was going to build some circuitry to make it return back to its starting point since it's also reversible but settled on just the usual ball chain attached to the main power switch to just have it turn off when it gets done cutting. Got the motor from ebay over a year ago dirt cheap and unused. I just built a variable DC-DC converter with a potentiometer. It runs off of a 12Vdc wall wart I had around that also powers the oil pump and interior LED lights.
parfive - There is a 1" a hole about an inch and a half above the one in use already drilled in case I decide to go with a 16" blade later on. You can't see it because it's covered by the "doghouse" I cludged to cover the arbor shaft and interior bearing and also a 1/4" thick rubber sheet I put in as sort of a gasket to keep oil out. The holes to mount the arbor pedestal and to move the outside 4-bolt bearing are already center punched and ready to be drilled. I've also measured and center punched all of the holes required to install an 18" blade. If I get one, it will require that the blade move 2 inches toward the back of the box so that it doesn't dip too deep into the oil. The sump has a double slanted bottom with a 4" wide "catch basin" at the very bottom to collect all of the "snot" and debris to make it easier to clean and also to prevent most of the dust from getting up on the pump pedestal and clogging it up.
The box is that big because, well, it was what I had at hand for free. Actually, it's two 23x24 inch, 3/8" thick aluminum boxes welded together. My dad gave it to me in the 80's to use as a bait holding tank for the wild golden shiners I used to catch for trophy bass fishing. It easily held 12 dozen fish from 6 to 10 inches long. I think it was originally some kind of chemical bath/settling tank - he got it scrap where he worked. It had spent a good 13 years in the woods around my house under a big palmetto patch and finally found its new purpose in life this year - lol.
I'm gonna do a long "story" showing the steps in the build with a ton of pix but I reckon that should go into the Homemade Equipment section.
C-ya!
Rick
|
|
|
|
Post by Donnie's Rocky Treasures on Jun 19, 2013 6:21:50 GMT -5
Rick, Rick, Rick.....................That is a freaking awesome saw!!!!!!!!!!!!!!!!! You did an awesome job on that & I love the way you did the oil pump on there! I'll just bet you're having a blast cutting!!!
|
|
Deleted
Deleted Member
Member since January 1970
Posts: 0
|
Post by Deleted on Jun 19, 2013 11:41:24 GMT -5
I bet it runs like a jet aircraft! Perfection in so many ways.
Rykk you rock!
|
|
panamark
fully equipped rock polisher

Member since September 2012
Posts: 1,343
|
Post by panamark on Jun 19, 2013 16:41:43 GMT -5
Terrific job on the planning and construction Rick. One question though, how did you treat he plywood to keep it from eventually rotting and/or delaminating?
Again, congrats!
|
|
|
|
Post by Bikerrandy on Jun 19, 2013 16:44:45 GMT -5
That's a beautiful machine! I wanna see some slabs now  |
|
blackout5783
starting to spend too much on rocks
Member since November 2011
Posts: 248
|
Post by blackout5783 on Jun 19, 2013 17:02:14 GMT -5
That is one kickA$$ saw you built! The digital readout of the feed rate is awesome! I'd ask how you did that, but I changed majors in college out of engineering once I got to electrical engineering. I could have stepped into a Swahili 401 class for all that I understood in there!
|
|
robsrockshop
has rocks in the head

Member since August 2012
Posts: 715
|
Post by robsrockshop on Jun 19, 2013 21:42:06 GMT -5
Cool. Technosaw. LOL. You should put tank tracks on it and remote servos and control it with droid applications from an IPhone. Not poking fun, I love that crap. Wait till everyone sees my mobile 36" saw, fully weatherized and built to stay outdoors.
Few thoughts......looks like bare plywood. But if it's easy to replace and you dont mind doing it and it's not a functional componet who cares. Of course the entire hood looks plywood might want to think more about that #2......as far as saw marks read the 'how to align a saw something or other' currently running on this section of the board. As far as oil leaks hard to tell without seeing in person but my first guess is you have one at the rear of the saw on the blade side. If there is you need a guard behind the blade on the inside of the tank because the blade throws the oil straight up and under the hood. It's cool if you have had the chance to watch a saw that can have the lid open while operating and see where it sprays it's kinda like an aerodynamic test.
|
|
rykk
spending too much on rocks
Member since September 2011
Posts: 428
|
Post by rykk on Jun 20, 2013 0:11:55 GMT -5
panamark
robsrockshop - It's probably hard to see in the pix but all of the plywood is coated in marine fiberglass resin on both sides (except the outside of the lid 'cause it's painted) and there is cloth mat at every joint. Also, a thick bead of Ultra Black Permatex along the edges where the wood abuts the sides of the aluminum box. (Edit - Ok, I looked at the pix and I think they were taken b4 I'd coated the exposed/visible areas.)
robsrockshop - Yeah, I discovered that leak point the hard way. I jury rigged a guard behind the blade that dips all the way down into the oil sump. Still getting a good bit of leakage at the hinges on the back, though. I also have a couple of leaks along the edges of the false bottom that drip into the bottom of the box and then out of the few holes in the bottom where I'd changed my mind about where to hinge the motor and - once I realized there were leaks - a couple of holes I drilled on purpose to let it drain.
I've been cutting quite a bit in 3 months and, although the sump does hold right at 10gal of mineral oil, the oil has gotten pretty dirty. That coupled with being sick of catching the leaked oil in pans led me to drain the thing for the first time tonight. What a freaken mess!! That's some nasty stuff and I now see why y'all call it "snot".
I'm filtering the oil with two buckets with 1/2" carpenter's mesh and heavy paper bags like I've read about on this forum. Anybody know how long it should take to filter and how much of the 10 gallons I might expect to reclaim? The filtering looked to be going pretty quickly but then slowed way down when the thicker sludge was added. Looks like it will require at least two filter cycles as the oil reclaimed seems a little dusty still. Is this normal?
This break will give me a chance to build better baffles around the blade and - hopefully - stop the leaks. I got a big can of engine degreaser for the final cleaning and to prepare the surfaces along the edges for spraying with rain gutter sealer like the stuff on tv where the guy coats the screen bottom of a jon boat. Sure hope it works!
C-ya,
Rick
|
|
herb
spending too much on rocks
Member since November 2011
Posts: 445
Member is Online
|
Post by herb on Jun 20, 2013 7:42:29 GMT -5
I'm filtering the oil with two buckets with 1/2" carpenter's mesh and heavy paper bags like I've read about on this forum. Anybody know how long it should take to filter and how much of the 10 gallons I might expect to reclaim? The filtering looked to be going pretty quickly but then slowed way down when the thicker sludge was added. Looks like it will require at least two filter cycles as the oil reclaimed seems a little dusty still. Is this normal? C-ya, Rick First off, excellent job on building your saw! A easily variable speed feed rate like you have would be very nice to have! I also really like the interior lights! It is always difficult for me to see what is going on in my one saw because the viewing ports don't let in enough light. Filtering oil is a slow process! The answer to how long it takes to filter 10 gallons is: as long as you want it to! As you noticed, you get a fair amount of oil filtered fairly quickly, but then things slow down. Oil will keep dripping through for weeks or even months, but it will keep getting slower and slower. What I do is after the majority of the oil is filtered, let it sit and keep slowly dripping checking how much came out once a week or so. When the amount that came out over the course of the last week is small enough that I don't want to bother with it any more, I am done! If you are patient, you can probably recover about 8 or 9 of the 10 gallons. During the warmer months, if you put the draining bucket out somewhere where it gets direct sun, it will warm up the oil and make it flow a bit faster, just watch out for rain! As for the oil still being a little dirty after filtering it, I would not worry about it. The first cut you make will make the oil dirty again, so it is not worth trying to get it sparkling clean. |
|
rykk
spending too much on rocks
Member since September 2011
Posts: 428
|
Post by rykk on Jun 20, 2013 19:05:14 GMT -5
Thanks for the filtering advice, herb. I had no idea that I would be down for that long. I looked 2day and on one of the buckets, I tipped it and poured off the clean oil layer on the top. I appears that the debris settles to the bottom - as one would expect if there was no way for it to get out. The second bucket has the most and the thickest in it and seems to not have as much clear oil on the top. Actually, it looks like a hole in the middle with a small pond of clear oil in it.
I'm wondering if I should try swapping out the paper bag as it seems that it would get pretty clogged after a while. I might also try to make a round wooden disc and put maybe a 25 or 15lb barbell weight on it to compress the "snot" and squeeze the oil through the paper faster.... or just let it sit and buy a few gallons of mineral oil to make up the difference so that I can get underway again.
C-ya,
Rick
|
|
quartz
Cave Dweller
breakin' rocks in the hot sun
Member since February 2010
Posts: 3,341
|
Post by quartz on Jun 20, 2013 22:25:50 GMT -5
Impressive. Seems like the factory saws nowdays give people fits, and you built a "high tech" one that works well, shows it can be done with some foresight and care.
|
|
Deleted
Deleted Member
Member since January 1970
Posts: 0
|
Post by Deleted on Jun 21, 2013 22:17:38 GMT -5
RE: Filtering
Grain of salt warning: I do not yet own a saw - soon! lol
It occurs to me that perfect filtering is a waste of time. One cut and it's dirty again. I have a plan for "first cut clean" continuously. I plan to pump the oil secondarily thru a pillow case or two. MOST of the rock dust will stay in the pillow case. While the saw is running, I'll just run a second oil pump directing the output into a pillow case supported by a plastic bucket/box/something or other.
We'll see, best laid plans of mice and men and all that rot.
Great saw amigo!
|
|
rykk
spending too much on rocks
Member since September 2011
Posts: 428
|
Post by rykk on Jun 21, 2013 22:45:00 GMT -5
Shotgunner - Sounds like an ok plan however, try to make the filter surface area as large as possible. I found, using the paper bags, that the oil filters fairly quickly when it's mostly clean but slows WAY down once the dust is thick. It might be that, as more and more dust collects in your filter, the supply of filtered output might dwindle a lot during real-time operation. Maybe you could devise so way to swap out one of the two filters quickly so as to keep fairly clean filters at all times? Just sorta thinking out loud because I'm interested in trying something like you propose, too. Maybe we can brainstorm a good method between us and others on the forum?
C-ya,
Rick
|
|
Deleted
Deleted Member
Member since January 1970
Posts: 0
|
Post by Deleted on Jun 21, 2013 22:59:47 GMT -5
Love it rick,
My (bigger saw) plan was to have a milk crate/pillow case under the vise. It's dead space anyways. Then a second pump simply recirculating oil from the sump thru the pillow case. Main pump (like yours) feeding the oil to blade.
In my vision the oil will never be "clean" but it will also never be really dirty either. Let's say you do a ton of cutting all weekend. It sits until Friday nght. That evening you remove the pillow case, dump the muck, put pillow case back and cut again. It'll take months to get a pound of rock muck if you cut weekends.
edited to add:
Bonus!! the second pump is backup in case #1 fails. Redirect flow and keep cutting! Zero down time.
|
|
Deleted
Deleted Member
Member since January 1970
Posts: 0
|
Post by Deleted on Jun 21, 2013 23:04:00 GMT -5
My flow is faster do to the looser wweave of the fabric. Paper much tighter weave, leaves oil almost perfect clean. Pillow case 95% removed but FAST.
|
|


