jamesp
Cave Dweller 
Member since October 2012
Posts: 36,159
|
Post by jamesp on Mar 6, 2018 7:15:49 GMT -5
I only tumble glass now. Learning more about tumbling it. This batch w/best polish to date. China, SDS Seapoot, fine hand blown vase. Heavy, full of colored glass. Fine colors 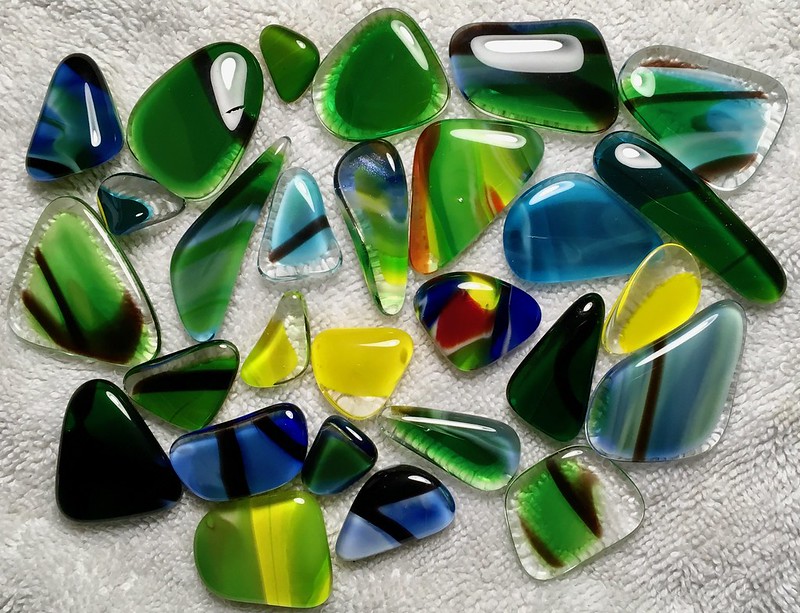 Back side of above, almost tumbled the background color off on some 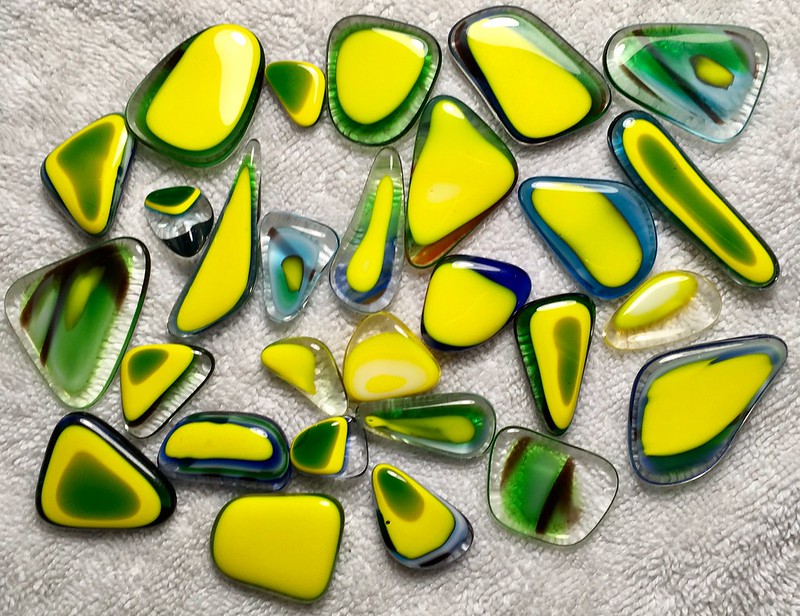 China machine blown vase 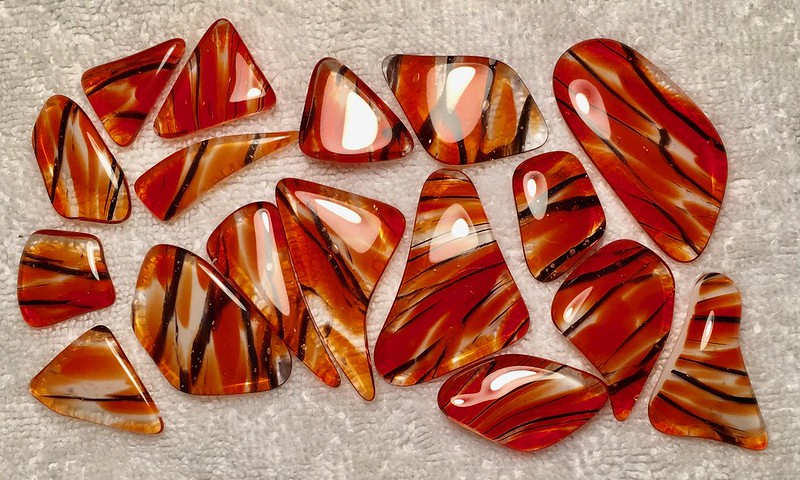 Another China machine blown 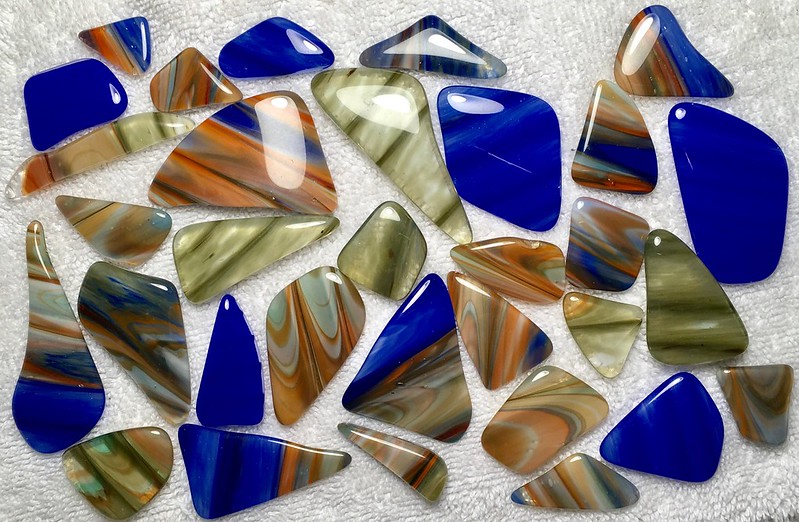 From our neighbors in Poland. Note copper wires running in multi-color 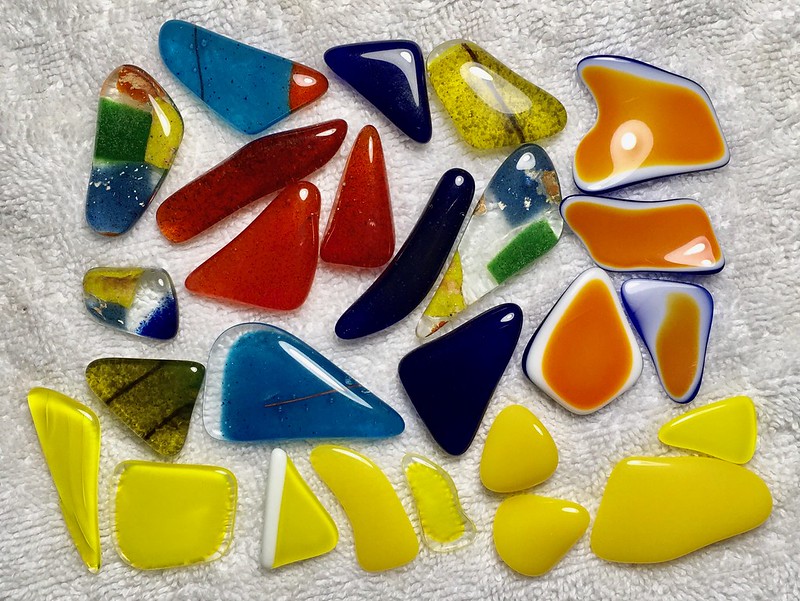 Italy, including an expensive Murano vintage original hammered by accident 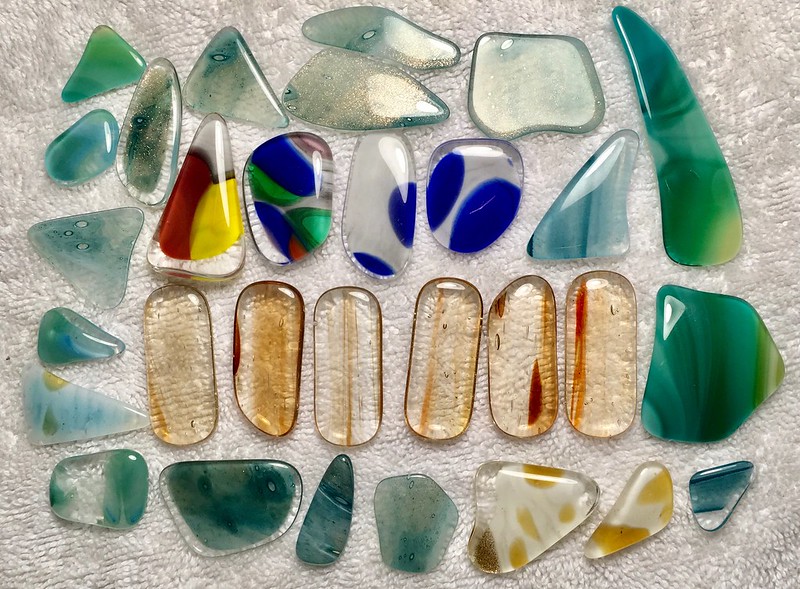 Soft Turkish plate and tricky to polish  Vintage US Radium glass at top, Italian hand blown yellow glass at bottom has copper wires to make brown streaks  Vintage Hirsch glass tiles 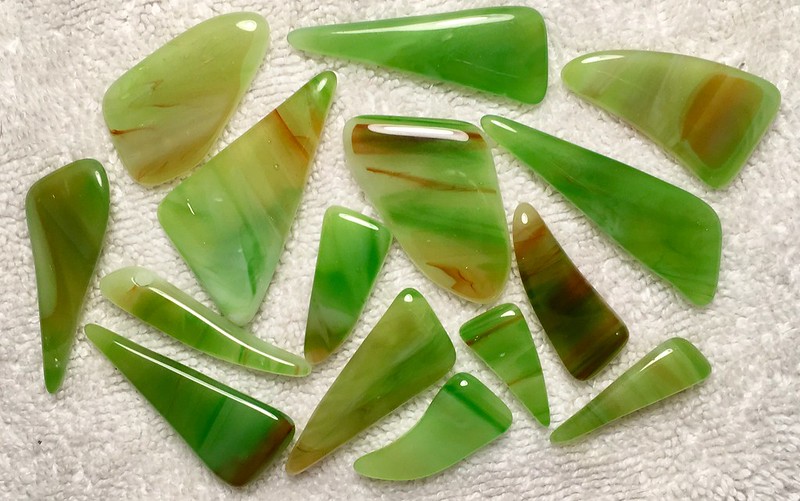 misc. 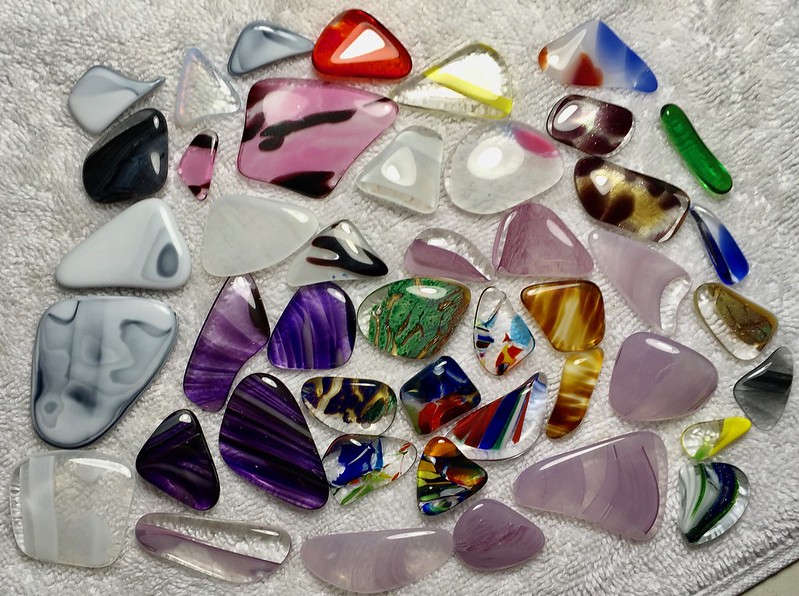 Sorting tray for delivery to stock cabinet 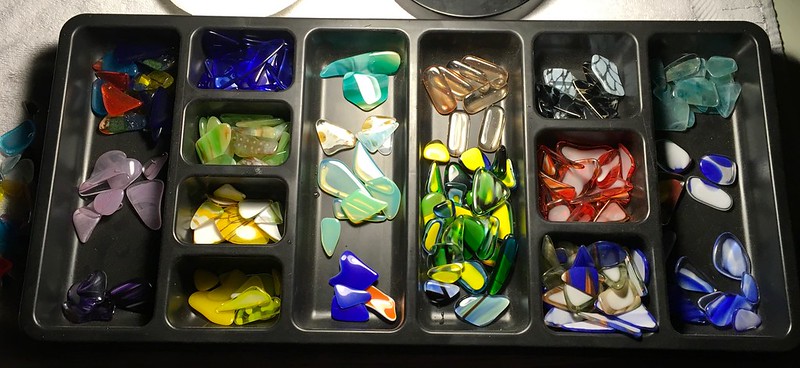 |
|
|
|
Post by fernwood on Mar 6, 2018 8:09:30 GMT -5
Question on the Uranium Glass:
Was this a thrift store find? I have some 1940's light green depression that is Uranium glass. The color is beautiful. I could tell what it was immediately, without the portable black light. It glowed in natural light outside. I see it at thrift stores here all the time, very reasonably priced.
Another thought: Do you remember the 1960's-70's Creepy Crawly and jewelry making machines for children? I had 2 set-ups. The creepy crawly ones were for making insects/worms. A liquid resin was poured into a lead form. The form was then placed in the machine which heated it. There was no cover on the machine. For the jewelry forms, a powder was placed in the forms.
As I got older, I adapted the concept. Took one of the forms, burnished it, filled in with a layer of lead. We made sinkers and jigs all the time, so melting lead was easy. Also added some iron dust to the lead, for strength. Iron dust was common on the farm, from sharpening tools. I had filed the edges of the form to accommodate 4 sides, which I attached. Let everything cool.
Time to have fun. Placed some old, flowing, window glass in the bottom of the form, which I had cut to the size wanted. Then added something for interest. The somethings ranged from tiny rocks, larger rocks, glass shards, metal charms. Even tried dried flowers and bark, just to see what would happen.
Placed another piece of glass over the somethings. Turned on machine, but covered it with a Sad Iron, which had been heating to almost red on the stove. Note, that I had adapted the plastic parts of the machine with stainless steel to prevent the machine from melting.
Would change out the sad iron, as it became cool. We had plenty of sad irons and even used them for ironing at times. Total process took a few days, as irons would cool at night.
All I can remember about the results was that I loved them. Turned most into hanging light catchers/window decorations.
Only reason I share this is that if there is a want to do something, one can always find creative ways of doing it. Thanks for the memories, as I might have not remembered this, if not for your glass experiments.
|
|
|
|
Post by MsAli on Mar 6, 2018 9:01:43 GMT -5
Those came out great and I Love the Hirsch
|
|
kevin24018
spending too much on rocks

Member since February 2012
Posts: 284
|
Post by kevin24018 on Mar 6, 2018 9:18:26 GMT -5
I will never think the term "bull in a china shop" the same way again.
|
|
jamesp
Cave Dweller
Member since October 2012
Posts: 36,159
|
Post by jamesp on Mar 6, 2018 15:52:06 GMT -5
I will never think the term "bull in a china shop" the same way again. I have to really treat this glass with kid gloves in the tumbler Kevin. However the making tumble sized pieces does require bull techniques. I quit using the saw and learned about glass nippers. Saved a lot of fractures and wasted glass. |
|
jamesp
Cave Dweller
Member since October 2012
Posts: 36,159
|
Post by jamesp on Mar 6, 2018 15:54:04 GMT -5
Those came out great and I Love the Hirsch I love tumbling this stuff. I bet I don't have 3% waste. No fractures, no pits, no chips, just about all perfect tumbles. Did you acquire a new tumbler Alison ? My wife stomped me on the $100 glass purchase competition. She found those 80's era Hirsch 4 inch glass tiles. They look fine and even more so in person. Hirsch is a big glass tile maker. Smack the tile right in the center and presto fine shaped pendants, one hit. They had a ridge in them, apparently a defect in manufacture. |
|
|
|
Post by MsAli on Mar 6, 2018 16:02:48 GMT -5
Those came out great and I Love the Hirsch I love tumbling this stuff. I bet I don't have 3% waste. No fractures, no pits, no chips, just about all perfect tumbles. Did you acquire a new tumbler Alison ? My wife stomped me on the $100 glass purchase competition. She found those 80's era Hirsch 4 inch glass tiles. They look fine and even more so in person. Hirsch is a big glass tile maker. Smack the tile right in the center and presto fine shaped pendants, one hit. They had a ridge in them, apparently a defect in manufacture. I did get myself a new tumbler- a lovely little Lortone 4 lb barrel. Both are running my competition agates.
She did very good-reminds me of sherbert
|
|
jamesp
Cave Dweller
Member since October 2012
Posts: 36,159
|
Post by jamesp on Mar 6, 2018 16:03:30 GMT -5
Question on the Uranium Glass: Was this a thrift store find? I have some 1940's light green depression that is Uranium glass. The color is beautiful. I could tell what it was immediately, without the portable black light. It glowed in natural light outside. I see it at thrift stores here all the time, very reasonably priced. Another thought: Do you remember the 1960's-70's Creepy Crawly and jewelry making machines for children? I had 2 set-ups. The creepy crawly ones were for making insects/worms. A liquid resin was poured into a lead form. The form was then placed in the machine which heated it. There was no cover on the machine. For the jewelry forms, a powder was placed in the forms. As I got older, I adapted the concept. Took one of the forms, burnished it, filled in with a layer of lead. We made sinkers and jigs all the time, so melting lead was easy. Also added some iron dust to the lead, for strength. Iron dust was common on the farm, from sharpening tools. I had filed the edges of the form to accommodate 4 sides, which I attached. Let everything cool. Time to have fun. Placed some old, flowing, window glass in the bottom of the form, which I had cut to the size wanted. Then added something for interest. The somethings ranged from tiny rocks, larger rocks, glass shards, metal charms. Even tried dried flowers and bark, just to see what would happen. Placed another piece of glass over the somethings. Turned on machine, but covered it with a Sad Iron, which had been heating to almost red on the stove. Note, that I had adapted the plastic parts of the machine with stainless steel to prevent the machine from melting. Would change out the sad iron, as it became cool. We had plenty of sad irons and even used them for ironing at times. Total process took a few days, as irons would cool at night. All I can remember about the results was that I loved them. Turned most into hanging light catchers/window decorations. Only reason I share this is that if there is a want to do something, one can always find creative ways of doing it. Thanks for the memories, as I might have not remembered this, if not for your glass experiments. I am still reading this over fernwood. I had to look up that iron. Give me a bit of time. Yes, the uranium glass was an unusually large plate at 14 inches. It was flat and had no press marks typical of that glass so it made fine flat pendants. I paid $10. I heated some of it and it changed to custard glass, an opaque yellow/green color and was brilliant in polish. Struck me odd it changed color so much. |
|
kevin24018
spending too much on rocks
Member since February 2012
Posts: 284
|
Post by kevin24018 on Mar 6, 2018 16:43:26 GMT -5
I will never think the term "bull in a china shop" the same way again. I have to really treat this glass with kid gloves in the tumbler Kevin. However the making tumble sized pieces does require bull techniques. I quit using the saw and learned about glass nippers. Saved a lot of fractures and wasted glass. ah yeah some stained glass tools are probably handy, though a .22 would work and be fun  |
|
quartz
Cave Dweller
breakin' rocks in the hot sun
Member since February 2010
Posts: 3,341
|
Post by quartz on Mar 7, 2018 0:06:02 GMT -5
I've been watching you develop your glass tumbling to the state of perfection above without saying much; boy you do have it running on a wire. I especially like the misc. part of this show. Keep up the good work, and showing it off.
|
|
jamesp
Cave Dweller
Member since October 2012
Posts: 36,159
|
Post by jamesp on Mar 7, 2018 3:18:00 GMT -5
I have to really treat this glass with kid gloves in the tumbler Kevin. However the making tumble sized pieces does require bull techniques. I quit using the saw and learned about glass nippers. Saved a lot of fractures and wasted glass. ah yeah some stained glass tools are probably handy, though a .22 would work and be fun A 30.06 may be better. some of these vases are over a half inch thick at low and top ends. The glass nipper is heavy duty but not made for nipping half inch thick. or my hands weren't made to nip glass that thick. Had to weld extensions on the handles on a nipper for more leverage for the thick glass. there are no tools made for this type of glass work. New frontier  |
|
jamesp
Cave Dweller
Member since October 2012
Posts: 36,159
|
Post by jamesp on Mar 7, 2018 3:53:57 GMT -5
I love tumbling this stuff. I bet I don't have 3% waste. No fractures, no pits, no chips, just about all perfect tumbles. Did you acquire a new tumbler Alison ? My wife stomped me on the $100 glass purchase competition. She found those 80's era Hirsch 4 inch glass tiles. They look fine and even more so in person. Hirsch is a big glass tile maker. Smack the tile right in the center and presto fine shaped pendants, one hit. They had a ridge in them, apparently a defect in manufacture. I did get myself a new tumbler- a lovely little Lortone 4 lb barrel. Both are running my competition agates.
She did very good-reminds me of sherbert
Give em hell Alison. You just started tumbling and already got you boxing gloves on. Best of luck ! You said the ladies are always right about color choices. Speaking of color: Janke is going to make me some jewelry glass vases but assigned me to pick and supply the frit for pattern and color. So I am making frit. With me supplying the frit it will save a lot of money because of the labor involved. They make most of their own and it is labor intensive. I am making a lapper that will grind the clear glass away from the colored glass of his scraps quite easily allowing richer colors. I can also grind and clean up the big chunks of clear glass from the scraps and get credit on the clear glass. Basically I am the labor and supplier for the materials plus filling their clear pot of glass for all their work. I will tumble the clear glass chunks in large tumbler barrels over night to get them very clean. They are busy blowing and don't take the time. And process is really messy. This lapper grinder will capture the colored glass shavings via water flow into a bucket. I will remelt the shavings in the kiln. So I could grind 2 or 3 different colors and capture the shavings in a mix and make whatever color I desire. The process takes a lot of clean water and they are on expensive downtown city water and can not afford it. I have a powerful clean water well that I had dug for the aquatic plant business. Cheap water. So this monster keeps getting more interesting. |
|
jamesp
Cave Dweller
Member since October 2012
Posts: 36,159
|
Post by jamesp on Mar 7, 2018 4:04:01 GMT -5
|
|
jamesp
Cave Dweller
Member since October 2012
Posts: 36,159
|
Post by jamesp on Mar 7, 2018 4:23:29 GMT -5
I've been watching you develop your glass tumbling to the state of perfection above without saying much; boy you do have it running on a wire. I especially like the misc. part of this show. Keep up the good work, and showing it off. Thanks Mr. Larry. I am busy at the coarse tumble. Having to dump and wash the three ~15 pound barrels every 48 hours and pick out about 30 to 40 percent of the glass. I dump into a screener sitting over a large container to recapture the unused SiC. When the large container gets to about 80 pounds of mud in it I have to take fresh water and separate the unused grit from the mud. Takes a lot of water to emulsify the mud and pour it off leaving the heavier grit in the bottom of the large container. Must do that about every 2 weeks. So the coarse grind keeps me busy. All of this is done on plant nursery carts outside over pasture grass, fine soil amendment as the glass mud is alkaline. Stock piling the coarse ground glass for the slower finishing, and will slow down once all the glass has been in coarse process. |
|
|
|
Post by fernwood on Mar 7, 2018 4:48:53 GMT -5
When certain types/colors of glass are heated, they do change color. This is especially true for the older glass. Too bad about the green turning custard though. I envisioned a bright glowing green monster with red, inset eyes, lit from behind for a Halloween pendant or pin, lol.
|
|
jamesp
Cave Dweller
Member since October 2012
Posts: 36,159
|
Post by jamesp on Mar 7, 2018 5:04:00 GMT -5
When certain types/colors of glass are heated, they do change color. This is especially true for the older glass. Too bad about the green turning custard though. I envisioned a bright glowing green monster with red, inset eyes, lit from behind for a Halloween pendant or pin, lol. Lol, that fired up your imagination. You mentioned older glass changes upon heating. Wow, well, this was the oldest glass I ever heated.... The result was still desirable though. Looks similar to a Fenton slag glass or more so custard glass. Don't be surprised if custard glass is uranium glass heated to a higher temp. If custard glass glows in a black light you can rest assured it is uranium glass taken to a higher temp. I was trying to melt the uranium plate rim sections down but the kiln was not hot enough to blob it. It lowered the elevated rim a bit, changed the heck out of the color and put a super flame polish on it. check it out, after and before: 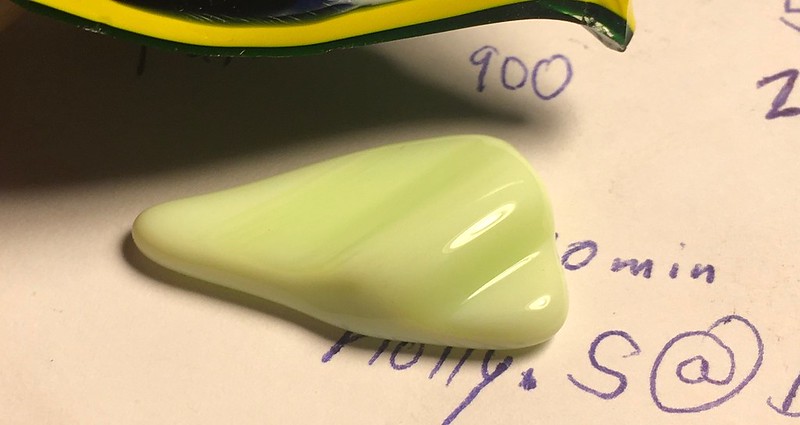 |
|
|
|
Post by fernwood on Mar 7, 2018 5:24:30 GMT -5
Nice work. I am thinking the finished ones might glow under black light.
|
|
jamesp
Cave Dweller
Member since October 2012
Posts: 36,159
|
Post by jamesp on Mar 7, 2018 5:26:40 GMT -5
Filling two barrels with 38 pounds of fresh broken glass. One of the big mouth barrels 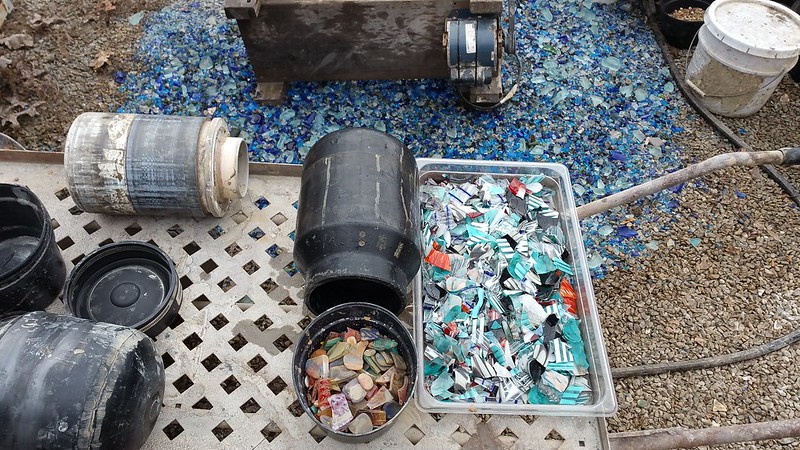 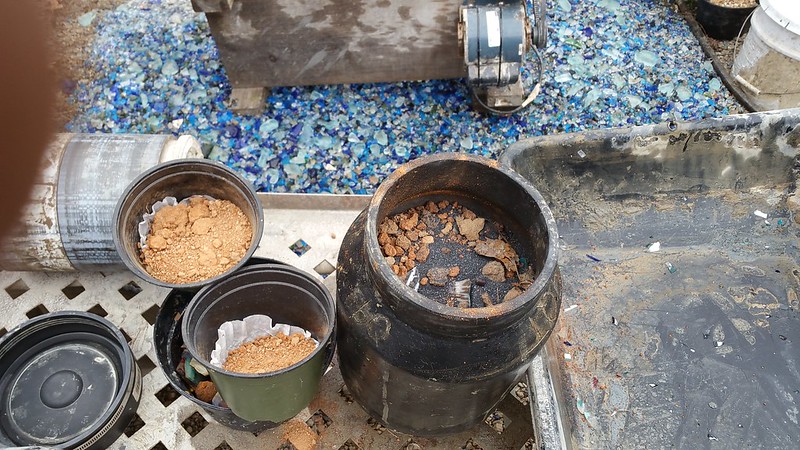 Smaller mouth 4 inch barrel requires transferring sharp glass into smaller pots to pour into barrel  Clay slurry additive pre-dosed in 6 inch nursery pots. 3 pots for big barrels, 2 pots for smaller barrels. Use lots of red clay during coarse grind. Very messy. Clay gets dug with excavator and put into 6 inch pots for ease of handling/dosing. Presently using about 15 to 20 of these 6 inch pots of clay/week. ~35 to 40 pounds This water holding container is full of 6 inch pots and is ready to fill with water to pre-wet the clay. Wet clay is easier to get slurry consistency dialed in. Water must be maintained and clay not allowed to dry out once wet or you will have round bricks. 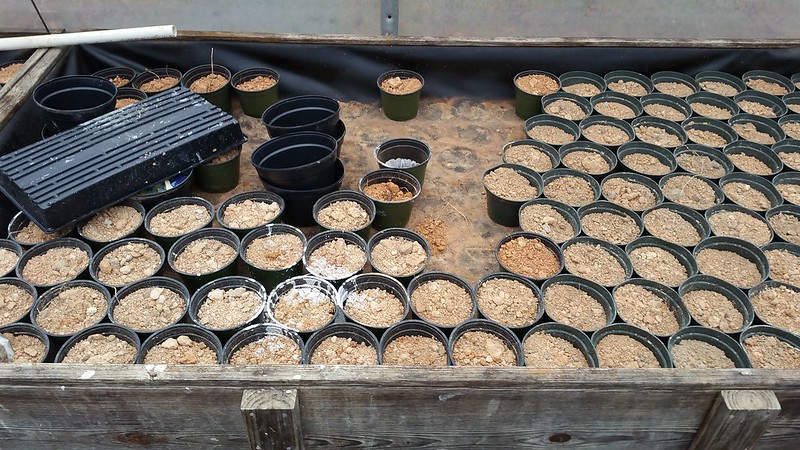 |
|
jamesp
Cave Dweller
Member since October 2012
Posts: 36,159
|
Post by jamesp on Mar 7, 2018 5:31:43 GMT -5
Nice work. I am thinking the finished ones might glow under black light. 100% sure fernwood, you can not heat the metals out of glass unless you take it to full melt and they 'may' settle to bottom. And even that is not guaranteed. For instance blue glass colored w/Cobalt at 2600F full melt will cause the Cobalt molecules to settle to the bottom of the vat. (The glass blowers probably get tired of all my questions) |
|
jamesp
Cave Dweller
Member since October 2012
Posts: 36,159
|
Post by jamesp on Mar 7, 2018 5:46:23 GMT -5
Glued and painted cement blocks for Lot-O. Next step is taping down. Fingers crossed.
Very anxious to give the Lot-O a go on polishing glass.
Got a giant pile waiting for polish.
|
|


 Al Falfa


