itsandbits
freely admits to licking rocks

Member since March 2012
Posts: 825
|
Post by itsandbits on Jun 28, 2012 22:16:51 GMT -5
this is the back  ADMIN EDIT - repaired broken attachment thumbnail and embedded the image. |
|
itsandbits
freely admits to licking rocks
Member since March 2012
Posts: 825
|
Post by itsandbits on Jun 28, 2012 22:10:52 GMT -5
Thanks everyone, I'm just glad I think I'm contributing something that may be usefull; I know it's pretty regimented compared to the artistry I've seen here but because of that should be a really versatile and adaptable one too. I notice I didn't put a finished stone up and because I've only done one; this is it. It is my fourth wrap ever, and my first one of this type. Oh i see you posted while I was posting this Helen, I only have this stone mounted and I used the frame wire to form and wrap the bale and the curlyques are from the ends of the loop wires I said to leave long enough to do this with. The embellishments don't look as good as I know others will make them. 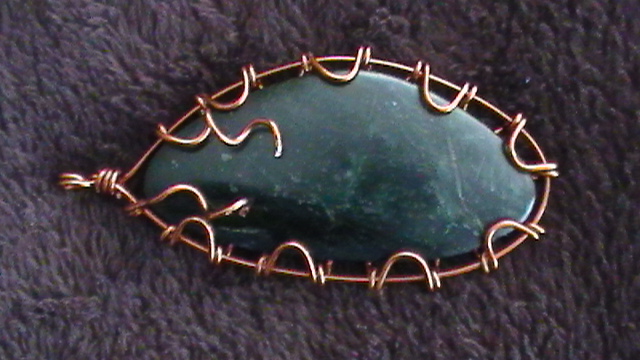 ADMIN EDIT - repaired broken attachment thumbnail and embedded the image. |
|
itsandbits
freely admits to licking rocks
Member since March 2012
Posts: 825
|
Post by itsandbits on Jun 28, 2012 16:58:40 GMT -5
I would rotate it to the right 90 degrees and look at that nice mountain range with the storm rolling over from the right and that UFO hovering over the face of the mountain!!! DUH DUMP! DA DUMP! DA DUMP! DUH DUMP! WHEEEOOOOO! WHEEEOOOOO :<))))))
|
|
itsandbits
freely admits to licking rocks
Member since March 2012
Posts: 825
|
Post by itsandbits on Jun 28, 2012 13:08:21 GMT -5
What a little treasure, in a rare colour too! Definately keep a slab for display
|
|
itsandbits
freely admits to licking rocks
Member since March 2012
Posts: 825
|
Post by itsandbits on Jun 28, 2012 13:06:05 GMT -5
your cab shapes look a lot like mine; and I like it! Good job working the different materials.
|
|
itsandbits
freely admits to licking rocks
Member since March 2012
Posts: 825
|
Post by itsandbits on Jun 28, 2012 10:01:26 GMT -5
7/28/2017 - ADMIN EDIT - fixed all broken attachment thumbnails, consolidated posts and embedded the images. --------------------- These are the tools you'll need. If you need to, a vise to hold the stiff wire that the wrapping is done on; that I'll call a mandrel, can be used. A nice thing with this is that you can use an endless length of wire and cut it off when you reach the desired length of border plus a little extra straight wire on both ends for embellishments. Your choice of material to use is only limited by your credit card, your imagination, and what is available!! Thanks for looking, I hope you try this and enjoy the endless variety you can bring to it by all the little things that can be changed and still be the same thing.  you'll notice that each loop is on opposite sides of the wire "mandrell". This gap between the loops is where the bevel will fit so if you are going to fit a large bevel, use a larger diameter mandrel. You can use anything you want as a mandrel for size; a nail would work just fine as long as you can hold onto it securely enough to bend the wire. I am using a 1mm enamel coated copper wire. The mandrel is a 14g house electrical wire with the insulation stripped off. I use it for the frame; the wire that replaces the mandrel when you set the stone, also if I want. Any wire that will fit through the mandrel hole and you are able to bend to fit your stone will do; get inventive!  Going along nicely back and forth from one side of the mandrel to the other. As you are going over the "form"; the peice you are pulling the loop over before wrapping it back on the mandrel, you may get a slight twist or a little more spread where the stone is going to fit, but you can give the form a little twist to the side and straighten it out later or if you notice, now would be a good time.  once you get along a little ways it may be easier for you to slip some of the finished lace edge off the mandrel and reinsert the mandrel in the working portion so the mandrel doesn't have to be too long. At this point I will say; for you that cannot hold the manrel, no problem, a vise works great and can be one of the ones that can be clamped to a table edge, or a vise grip clamping the mandrel to something.  as you can see, even using the heavy 14g wire as the border, the laceedge can easily be bent to fit most stones 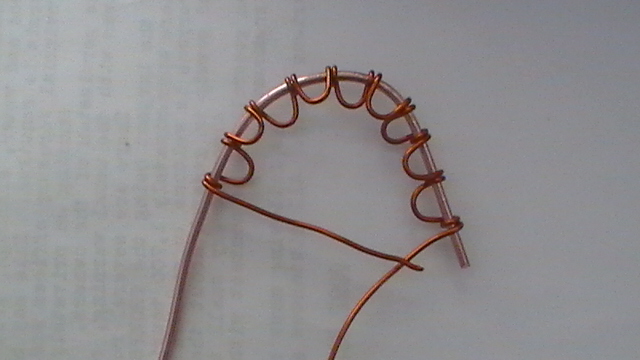 This is a contrasting colour coated copper wire about 1 1/2mm, as I said before; use whatever is pleasing to your eye and the finished peice.  The laceedge should fit any stone you have by varying the size of the mandrel and the form. These can be whatever materials you have at hand to do the job, silver, gold or any other wire of formable material will do, mix them up, and have fun. Change the size of the loops as you go, wrap the wire around the mandrel for a ways to space the loops or even string a long bead on as a spacer and enhancement.  another example  This stone has the standard bevel and would set quite well in this size loop but by using different size forms for the loops you can vary the size for more a more or less delicate look.  closeup of the finished weave. You will notice that some of the loops are closer or further away from each other than others but this is easily adjusted as you are putting it on your stone for symmetry. You may want to stretch it all out or even bunch them up close together but because the loops are all formed on a mandrel, they will all be one size; which you could vary as you go along too for a different effect; try using more than one form as you are making the loops.  and from the back or outside. As you are going along, beads or anything you wish could be strung on the loops, and the finished loops could be a starter for a "crochet" or chain mail; endless possibilities. In between loops if you wish you could simply wrap the wire around the mandrel and then start looping again; as I say " endless possibilities. If you have any comments or suggestions, thank you for waiting till I had this "done?" Feel free to make any changes to the different sizes of mandrel or wires used and the form used for the loops and the way they are positioned can be endlessly varied as well, whatever your skill level or you can work with is "fair game" Lloyd  |
|
itsandbits
freely admits to licking rocks
Member since March 2012
Posts: 825
|
Post by itsandbits on Jun 28, 2012 9:21:15 GMT -5
Thanks for showing, that stuff really penetrated
|
|
itsandbits
freely admits to licking rocks
Member since March 2012
Posts: 825
|
Post by itsandbits on Jun 28, 2012 9:14:32 GMT -5
So I totally forgot I was going to send you something. No hard feelings I hope, sometimes I get distracted with things and forget about some of the gift parcels I arrange to send out. Respect Chad for "making it right" ; in the words of the great Mike Holmes |
|
itsandbits
freely admits to licking rocks
Member since March 2012
Posts: 825
|
Post by itsandbits on Jun 27, 2012 22:39:47 GMT -5
your life is fullfilled :<))) It's a beaut!!
|
|
itsandbits
freely admits to licking rocks
Member since March 2012
Posts: 825
|
Post by itsandbits on Jun 27, 2012 22:36:40 GMT -5
no guesses on what it is other than the obvious; a great job and kudos for a good job on the back too
|
|
itsandbits
freely admits to licking rocks
Member since March 2012
Posts: 825
|
Post by itsandbits on Jun 27, 2012 21:52:14 GMT -5
Wow you all have some awesome material to work with but the effort you make to bring out even more by putting yourself into it is what makes this a competition.
|
|
itsandbits
freely admits to licking rocks
Member since March 2012
Posts: 825
|
Post by itsandbits on Jun 27, 2012 21:39:44 GMT -5
it's the little things that make life good!!
|
|
itsandbits
freely admits to licking rocks
Member since March 2012
Posts: 825
|
Post by itsandbits on Jun 27, 2012 21:39:22 GMT -5
it's the little things that make life good!!
|
|
itsandbits
freely admits to licking rocks
Member since March 2012
Posts: 825
|
Post by itsandbits on Jun 27, 2012 15:16:46 GMT -5
Hi Krista,
I prewrapped the border on a stiff pc of 14g and alternate the loops from one side to the other by doing 1 1/2 wraps around the 14g and then used a nutpick; about 3/16" diameter to form the loop over before going back down to the 14g and wrapping 1 1/2 and coming back up the other side to form another loop and keep going back and forth that way making loops on alternate sides of the 14g. Hope that helps, the pictures I have up are front and back. I will do a tut with pictures if anyone wants.
|
|
itsandbits
freely admits to licking rocks
Member since March 2012
Posts: 825
|
Post by itsandbits on Jun 27, 2012 11:16:55 GMT -5
This is the back of the stone and shows how clean looking it can be without the embellishments, Thanks for looking Lloyd I should add that I cut my stones with a pretty fine edge because the stone I mostly work with is so tough but if you have a cab with too big of bevel you could cut it down or make the loops bigger and splayed outwards more and fold them slightly to fit the bigger bevel. Attachments:
|
|
itsandbits
freely admits to licking rocks
Member since March 2012
Posts: 825
|
Post by itsandbits on Jun 27, 2012 11:15:14 GMT -5
Hi I don't know if anyone else is doing it this way but I premake the border to the length needed to fit the stone and then thread the frame wire through and bend it around the stone making adjustments to the distance between the loops and the way the frame wire fits the stone so it looks even as I go along. I made the frame wire long enough so that I could use it for the bail and the other end to wrap the tucked bale wire to secure the top. please ignore the poor craftsmanship, colour and attempted embellishments as copper is all I have, only have uncoated needlenose, and I was trying something out with the curlycues. I have been working on and off for a while trying to come up with something to contribute and this is it; try it, you'll love it. Use contrasting frame or border wire as suits the stone you are doing. This is my fourth actually finished wrap. Attachments:
|
|
|
|
itsandbits
freely admits to licking rocks
Member since March 2012
Posts: 825
|
Post by itsandbits on Jun 26, 2012 21:18:42 GMT -5
boy that looks like a maraslab!!!
|
|
itsandbits
freely admits to licking rocks
Member since March 2012
Posts: 825
|
Post by itsandbits on Jun 26, 2012 21:12:14 GMT -5
boy that looks like a maraslab!!!
|
|
itsandbits
freely admits to licking rocks
Member since March 2012
Posts: 825
|
Post by itsandbits on Jun 26, 2012 13:52:54 GMT -5
This is a picture with the closest representation of colour in the banded green material but it is a more yellow tone and a more vivid tone as well, It doesn't photo well for me; I'll have to play with the settings a bit more. I think you have some of this Jan? The collecting sites are up on the hills but the roads would be mush if you tried to use them Attachments:
|
|