zapins
starting to spend too much on rocks

Member since March 2016
Posts: 116 
|
Post by zapins on May 13, 2017 12:05:43 GMT -5
I am still trying to figure out the shocks I need. I have never used them in real life and do not know how they handle. Do you think a pair of these would work to help open the lid? www.ebay.com/itm/2ea-RV-28-200lb-NP-Gas-Spring-Shock-Hatch-Door-Strut-Lift-Support-Prop-Arm-28in-/371935737062?hash=item569918f4e6:g:dzIAAOSwq7JT3lXY&vxp=mtr$hotgunner - yep the blade is 2.25" from the bottom of the floor. It will dip into the oil 3/4" deep. I will have 2.5" deep of oil on the bottom. woodman - thanks for that link. I think I will end up buying from them. Their price is very good. bsky4463 - thanks, I'll upload better plans soon. I have a 3d model file of the saw box and then other diagrams for the shaft size and the other parts. I'll upload a full build thread from start to finish with lots of photos and schematics when I finish making the vice & carriage. I am still figuring out how I want those to work and it seems a little bit tricky since it all has to line up very well. Still don't know if I want to cast the frame out of aluminum or iron or if I want to just weld it up out of steel. Probably steel since it is easier to source and work with. Rockoonz - I went with 7 gauge for the body and 3/8" thick inner frame to give the saw box support. There are also triangles on the corners and the legs give the saw body strength. These things have strengthened the body up considerably. I don't think it will warp over time. I built in an oil pan reducer in the bottom which you can't see in the photo. I calculated that there will be about 7 or 8 gallons of oil in the bottom. 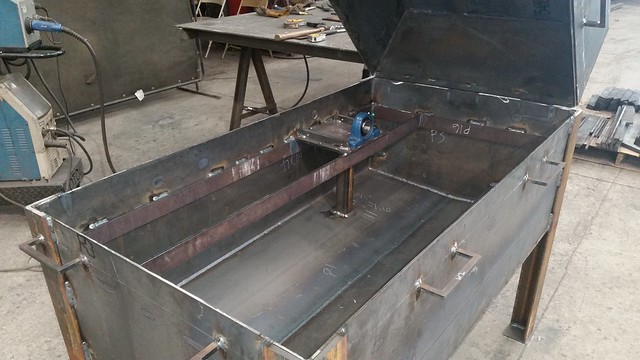 |
|
zapins
starting to spend too much on rocks
Member since March 2016
Posts: 116
|
Post by zapins on May 12, 2017 15:43:06 GMT -5
Going to look into pistons, shocks and torsion springs before I do a weight system. I have hooks on the lI'd though incase I need to go that route.
Need to figure out what kind of oil and where to buy it from now. I think I need about 6 to 8 gallons. The tractor supply place near me has cattle laxative light mineral oil. Will that work?
|
|
zapins
starting to spend too much on rocks
Member since March 2016
Posts: 116
|
Post by zapins on May 11, 2017 14:49:46 GMT -5
The fabrication process has been started. The lid is very heavy (200 pounds). How do people lift the lid up on professional saws? It seems extremely heavy and difficult to open. Are the lids counterbalanced? Or do they have some sort of spring or piston to help open the lid?
|
|
zapins
starting to spend too much on rocks
Member since March 2016
Posts: 116
|
Post by zapins on May 10, 2017 20:28:11 GMT -5
Will the tractor supply mineral oil work for a 24" blade?
What weight oil is ideal for 24" blades?
|
|
zapins
starting to spend too much on rocks
Member since March 2016
Posts: 116
|
Post by zapins on Apr 25, 2017 15:43:56 GMT -5
Hmm. I think I'm going to have to put this idea to the test and cast some bronze blanks then lathe/mill them into some gears! See how close I can make it. At the very least it will be a fun project  Just need to find some decent photos of the part, or better yet some designs with the number of teeth/angles. |
|
zapins
starting to spend too much on rocks
Member since March 2016
Posts: 116
|
Post by zapins on Apr 25, 2017 10:35:20 GMT -5
Why don't more people make their own faceting machines? They really don't seem very complicated. Basically just a spinning diamond disc with a mast. Getting the right angle seems to be the most difficult part with the stone holder, but the body of the machine looks easy especially if you have a lathe and can center everything yourself?
|
|
zapins
starting to spend too much on rocks
Member since March 2016
Posts: 116
|
Post by zapins on Apr 23, 2017 0:42:35 GMT -5
Interesting thought about silver nitrate causing the discoloration. That could be one possibility.
Thanks. The orchids and organic castings are pretty easy to do. I use a centrifugal casting machine with jewelry investment. I can probably post photos of that setup, but there isn't much to it really. Pretty simple & easy.
|
|
zapins
starting to spend too much on rocks
Member since March 2016
Posts: 116
|
Post by zapins on Apr 22, 2017 2:34:21 GMT -5
I'm not sure, but I think it is because the pins are so low mass that they don't really dent the surface very much at all. Also, after spinning the pins around in the chamber the points dull and aren't sharp so they don't dig into the piece.
I have noticed that silver hardens up considerably once it has been polished in the machine. Probably because of the millions of impacts that slowly work hardens the surface. This helps for very thin castings like the orchid flowers and the aquarium plants.
The pins manage to find their way into every nook and cranny. Into places that can't be polished by hand at all.
I used some detergent soap to help lubricate the water and a little splash of ammonia.
After running the pins for a while the water tends to become murky with steel dust. It takes a few rinses with ammonia and running the polisher for a few minutes and repeat flushing to clean the dust off the pins and surface of the container. This has to be done fairly regularly to ensure the dust doesn't coat silver stuff. Also the faster the machine spins the more dust is made so I usually run it at around 2/3 of max speed.
|
|
zapins
starting to spend too much on rocks
Member since March 2016
Posts: 116
|
Post by zapins on Apr 22, 2017 2:27:48 GMT -5
Thanks ! Kribs in the video but I have apistos too in another tank. Nice - what apisto species? I used to search the cichlid auctions for rare and unusual apisto species to raise (or kill)  Not the easiest fish to keep in SF Bay area water so hard you can stand a fork up in. Some of them practically need black water - 5.0 pH to thrive and breed. Depends on the species. I have cacatuoides that are breeding and agazzizi red that laid eggs. I used to keep Eunotus and eremnopyge. I'm looking forwards to getting some nijsseni or abacaxis this summer. There is a local shop up in CT that can order any species. They aren't too picky about low pH water if they have been captive bred for a while. Wild caught fish are a whole different story. |
|
zapins
starting to spend too much on rocks
Member since March 2016
Posts: 116
|
Post by zapins on Apr 20, 2017 22:07:34 GMT -5
Thanks ! Kribs in the video but I have apistos too in another tank.
|
|
zapins
starting to spend too much on rocks
Member since March 2016
Posts: 116
|
Post by zapins on Apr 20, 2017 21:03:44 GMT -5
|
|
zapins
starting to spend too much on rocks
Member since March 2016
Posts: 116
|
Post by zapins on Apr 20, 2017 20:57:57 GMT -5
Here are some examples of before and after polishing. I just ran my first piece for about 10-15 mins. On the left is what the flower looked like before polishing, on the right is what it looks like after. The polish is fairly high for so little time in there. It also didn't dent or damage the piece in any way. I'm quite impressed with it so far. I'm running 2 more flowers now, then I'll run my little plant and see how it turns out. I think that this polisher is going to turn out to have been well worth it.  After an hour and a half in the polisher:  Before the polisher (actually I did an acid bath after this picture, before I put it in the polisher but I forgot to take a pic of it!!)  |
|
zapins
starting to spend too much on rocks
Member since March 2016
Posts: 116
|
Post by zapins on Apr 20, 2017 20:56:36 GMT -5
I spray painted the inside white and primed the outside with 3 coats of primer (white latex Killz 2 primer). I'll be painting the outside cabinet with black latex paint soon. Look at that expert taping job!    Magnets are from magnetics4less (part number: NB057-0-N48, qnty 4), mounted in staggered configuration N-S-N-S poles. (polarized through thickness, NOT LENGTHWISE) Motor (Ebay): 90VDC, 1/3HP (or less) is fine. Max RPM is 1750 Motor Controller (Ebay): K&B KBIC-120  Got the first coat of latex paint on the outside. I'll probably do 2 more to ensure a good finish. I'm unsure if clear epoxy will stick to the latex paint, but if it does I think I'll give it a final coat of it to give a nice slick looking finish.  |
|
zapins
starting to spend too much on rocks
Member since March 2016
Posts: 116
|
Post by zapins on Apr 20, 2017 20:55:39 GMT -5
Got five of these "5x20mm 15A Slow-Blow Ceramic Fuse T15a 250v." The socket apparently takes "Fuse Size : 20 x 5mm / 0.8" x 0.2"(L*D)" according to the Walmart page for the socket. Got them from ebay of course: www.ebay.com/itm/5-Qty-5x20mm-15A-Slow-Blow-Ceramic-Fuse-T15a-250v-/400645212062?hash=item5d4850c79e:g:EJMAAMXQQtNRyd7aI assume T15a is the fuse type? Here are some pictures of the socket, I measured it and drew a little box where I wanted the hole.  Then I drilled out as much of the wood as I could and then used my Dremel with a tungsten carbide bit to gouge out the wood into a rectangle shape. Then I used a file to tidy it all up until the socket fit snugly.  And here it is pushed into place. Just need to paint the cabinet first, put the fuse in, wire it up and then I'll screw it into its final place.  Finished wiring it up. This is how I did it. The switch works and everything.  I didn't have a T splitter to make the connection for the white wire, so I drilled a tube connector and then stripped one of the wires and ran it through. Not sure if this is to code or whatever, but it seems to work well and protects the bare wire from touching anything.  Got some cable fastener things and tidied up the wires inside the cabinet. Going to attach the speed knob to a metal plate in the front and maybe get a larger dial for it.  This is the plug on the back all flush and in place. I'll prime and paint it soon with some latex paint. Perhaps 2 coats, maybe 3. Then I'll secure the plug in place and it should be ready to good.  I cut a slot for a metal plate that I can mount the dial into (the wood isn't fancy enough to attach the dial into). It would be nice to find a dial to slide over the white plastic peg. Something to grab onto. Perhaps I'll buy one, if I can find one, or maybe cast one?  Then I drilled, counter sunk and polished a piece of 1/8" steel plate I had lying around.  I also reorganized the wires in cabinet a bit so the wires don't bump into the shelf when the door closes.  Did a little more work on the dial area, polished the face plate up and bought a dial for the front. I also filled in 2 spots where I originally tried to attach different hinges. I'll add another coat of the wood filler stuff tomorrow then sand it down. Hopefully when it dries it will allow latex paint to stick to it. Then at some point I'll finally get around to painting it.     |
|
zapins
starting to spend too much on rocks
Member since March 2016
Posts: 116
|
Post by zapins on Apr 20, 2017 20:52:49 GMT -5
This is how I wired up the speed controller:   I bought one "AC Line/Armature Fuse Block Kit" from ebay which consists of two fuse blocks suitable for any KBIC controller board. It uses 1/4” x 1-1/4” 3AG type fuses which I also got from ebay in the appropriate 5 amp "3AG 5A 312 250V LITTELFUSE" variety which I think are the correct rating for my 90v motor. I got a pack of 10, so I expect they will last me a longer than the motor/controller will last. Found this picture of how to wire the grounds up, basically exactly what you said, wire both to the frame. madmodder.net/index.php?topic=8391.0 |
|
zapins
starting to spend too much on rocks
Member since March 2016
Posts: 116
|
Post by zapins on Apr 20, 2017 20:49:15 GMT -5
I decided to make a magnetic polisher to help polish jewelry and larger bronze sculptures but buying a large enough polisher would cost hundreds to thousands of bucks. So instead here is my build. It works by spinning steel pins around inside a container. The pins hit the objects you put inside and polish it to a high shine finish. It does not erode the detail on the object and polishes very quickly. Here is the finished machine. Here is the cabinet that will house the motor. One side will function as a door for maintenance. I cut it out of two 3/4" thick, 24" wide x 48 long" boards from home depot.  This is the piece of wood that the motor mounts onto. I cut it out with a hand held jig saw.  This is the motor connected to the wood. This wood will be mounted inside the cabinet just like a shelf.  This is a 12" steel arbor for a shopsmith with a piece of wood on top. I will mount the magnets above this.  Added more photos: Added more photos:I added hinges I got them on ebay. The hinges are "Probrico 105º Full Overlay Self Close Concealed Hidden Face Frame Cabinet Hinges" they cost me $13 for four of them shipped. I also attached the plexiglass to the top of the cabinet with screws and moved the circuit board to the door so it is easily accessible in the future.   Here is a video of it running without any paint and without any liquid in it. |
|
zapins
starting to spend too much on rocks
Member since March 2016
Posts: 116
|
Post by zapins on Feb 26, 2017 1:25:48 GMT -5
Do you have before and after pictures? I haven't heard of cooking rocks before other than sapphires/rubies/gemstones.
I've gone looking with my girlfriend a few times for KY agates in Estill county but haven't found any of the nice ones yet. I wish I knew where to look or better yet meet up with someone who does!
|
|
zapins
starting to spend too much on rocks
Member since March 2016
Posts: 116
|
Post by zapins on Feb 24, 2017 19:04:55 GMT -5
I have been working on these plans for the last few months. I have drawn inspiration from many different models and home built saws that I have seen online. Can you guys spot any obvious mistakes in the design or anything I need to add? I am going to put in an order for all the metal to be cut to size for me soon and I'd rather not make a stupid mistake and find out about it afterwards. I am still not sure about the vice. I think I'll probably end up changing that part quite a bit. Also, the total length of my box is currently 50," compared to some commercial saws like highland park they have a 54" long box which presumably gives them longer cutting ability. Is this something that is important enough to warrant me increasing the length I have drawn? Not sure why I can't upload the file to my post since it is only 400 kb large and the limit is 1 mb on attachments so I had to put it on my google drive: drive.google.com/file/d/0B9nQUARu47-OcEpSQUl3aFo5TUk/view?usp=sharing***Edit***This is a link to the completed saw & vice plans for a 24" lapidary slab/rock saw. Feel free to use them to make your own saw though I'd suggest you use thinner gauge steel for the roof than I did. Otherwise it will be too heavy to lift. drive.google.com/file/d/0B9nQUARu47-OZ05kTzFTbklVcVU/view?usp=sharing |
|
zapins
starting to spend too much on rocks
Member since March 2016
Posts: 116
|
Post by zapins on Feb 22, 2017 21:58:23 GMT -5
I was wondering if anyone had the dimensions (or could measure their arbor shaft) of the Highland Park arbor shaft for 24" blade saw? Specifically I'd like to know:
1) The overall length of the shaft 2) The distance between the tip of the threaded end and the thicker part (in the photo below). 3) The total length of threads until they hit the smooth part. 3) Distance between the smooth end where the pulley fits on and the thicker part. Also, I understand that this shaft and all shafts are left hand threaded? Thanks!  |
|
zapins
starting to spend too much on rocks
Member since March 2016
Posts: 116
|
Post by zapins on Dec 29, 2016 0:22:13 GMT -5
Didn't know you could resurface a grinding wheel. How long does this fix last for? How does it compare to a new wheel?
|
|


 Not the easiest fish to keep in SF Bay area water so hard you can stand a fork up in. Some of them practically need black water - 5.0 pH to thrive and breed.


