|
|
Post by therockapprentice on Oct 31, 2022 22:04:41 GMT -5
I am hoping someone can provide some suggestions on how to help me finish a nice collection of Arizona Agates I started tumbling & vibrating. I have rotary tumblers (two 3 lb and one 6 lb) and a Lot-o tumbler. I collected quite a pile of these really rough mostly white agates in Arizona this year and put them through a 4 step rotary tumbling (coarse to polish) but I didn’t like how they turned out and I may have screwed up and left polish in the many cracks and holes in the agates. I decided to put then into the Lot-o tumbler with 220 grit and after 2-3 days vibrating and 1 full day of vibrating with dish liquid and water this is how they turned out. 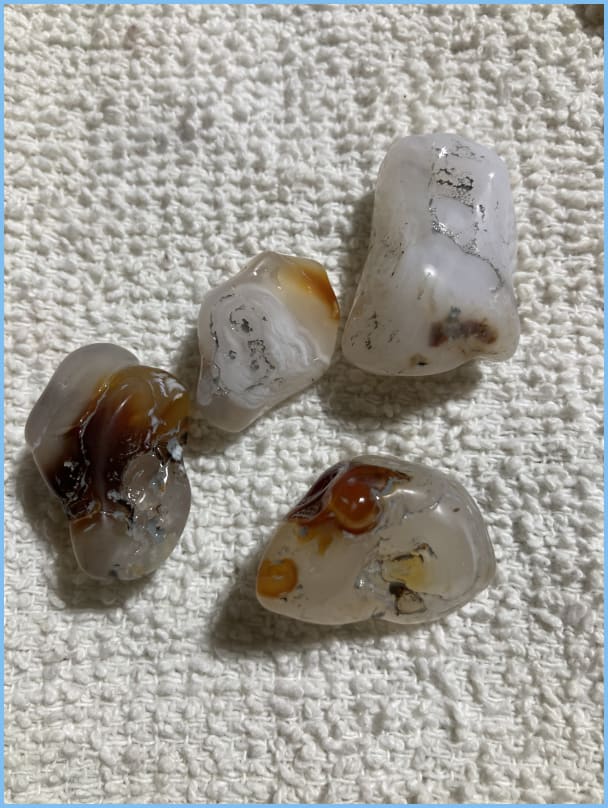   Obviously there is a tremendous amount of grit left in the cracks and holes. I did not let them dry out as i feared that the grit would harden and be even harder to remove. So for now they are sitting in water. I was considering taking them back to coarse and starting over in a rotary tumbler (I probably have enough of them to fill the 6 lb tumbler) and just keep tumbling with coarse until they are mostly smooth. My concern is a lot of them are very small already and I am afraid that if I keep tumbling them on coarse there will be very little left. I am fine accepting some of them as “rough” but I really want to get all that grit out and hope that I haven’t ruined them. I have only been polishing for a few months and getting better, but these are a real challenge and I would really appreciate any suggestions you all might have. Thank you. |
|
|
|
Post by mohs on Oct 31, 2022 22:16:36 GMT -5
those are cool
some of those pits and cracks look pretty deep
so trying to tumble those out smooth
lose a lot of ruck
I'm no tumbler tho -so have no advice
others will be more precise
do you know where in zona they were collected?
Welcome to RTH !
Ed
o yeah good idea keeping then in water
might try pict/tooth-brushing grit out
|
|
|
|
Post by pebblesky on Oct 31, 2022 22:40:42 GMT -5
People do "burnishing" which is to put pure ivory soap slices or borax, into the water with rocks to tumble several hours between steps and after polishing, to get rid of the slurry and grits deep in the pits and cracks. I haven't tried burnishing myself yet. Maybe worth giving it a try to see how effective it is for your rocks.
From your pictures it seems the cracks and holes are really deep compared to the size of the agates, and will take very long to tumble out, and you are right, some nice features will be tumbled out before the cracks go away.
|
|
|
|
Post by rmf on Nov 1, 2022 6:51:56 GMT -5
Because of the botryoidal nature of the agates there will always be hard to reach spots. Tumble them longer in the rotary and grind away more. Then go to the vib. Rotary for for coarse at least a month.
|
|
ericabelle
spending too much on rocks
 Instagram acct: @erica_shoots_everything
Member since April 2021
Posts: 482
|
Post by ericabelle on Nov 1, 2022 7:03:30 GMT -5
I posted some of these (that I bought in a large rock collection) on the rock ID forum, and they were identified as "desert chalcedony", but some of them have banding. So, I dunno.
I'm not sure how to polish them either. I have put some of the more "solid" pieces in my rotary tumbler just to smooth them out a bit. The only problem is, they REALLY hold onto the grit in their tiny holes. When I put them in my ultrasonic cleaner, big clouds of grit come out, but there is always some left.
I haven't tried them in my vibe yet, as there is already a ton of rocks waiting to be vibed. My rocks don't have to be perfect, especially the agates, but getting the grit out of these has really been a problem for me!
|
|
|
|
Post by Peruano on Nov 1, 2022 7:08:08 GMT -5
They are chalcedony nodules and because of their complex surfaces, quite difficult to polish. I have had best luck by doing some preliminary grinding on a rough wheel of a cab machine, and then running them in a vibratory machine with an assortment of sizes, but most importantly using small garnets. The chalcedony is hard and so too is the garnet. The small size of the garnet gets into the grooves and works out the discoloration (not all of which is your grit, but probably includes dirt, and oxidation put there by thousands of years of exposure). Garnet sand can occasionally be found on ant mounds, but usually in thin layers so it must be cleaned before use. I'll try to find a couple of photos of my efforts, but let me say trying to tumble this material is a bit like buying junk bonds, most of them won't produce, but rarely one will be a winner. The other option is to use a dremel and tiny diamond bits, or other improvised polishing aids. Vaseline on a hardwood toothpick carrying various sizes of grit has worked for small persistent spots that needed to be treated by hand. As you can see, it hard to get all discoloration out of the material.   Here is the garnet, about the size of BBs.   Here are two shots of one of my most successful attempts.   This is a close approximation of what you would do if you were trying to polish fire agate, but clearly the rewards are more modest. |
|
ericabelle
spending too much on rocks
Instagram acct: @erica_shoots_everything
Member since April 2021
Posts: 482
|
Post by ericabelle on Nov 1, 2022 7:14:19 GMT -5
Thanks, Peruano , that is really helpful! |
|
|
|
Post by HankRocks on Nov 1, 2022 8:40:00 GMT -5
I have polished the tumbled the exact same material. In my case it was collected at the Round Mountain in Arizona just across the border from New Mexico. Before tumblingI soaked mine in Iron Out and then a bleach solution to remove as much of nature's dis-coloration as possible. Wanting to preserve as much of the natural peaks and valleys of the material I tumbled with small pea gravel which made up almost half the batch. They turned out very nice and if you looked at some of the nooks and crannies you would see that they are not polished as well. That's difficult to tell without using a Loop. The only drawback to my method, a few of the small pieces of the pea gravel wedge themselves into the nooks and crannies. Used old dental tools to remove them. flic.kr/p/DT8Kp6flic.kr/p/23x7fuKflic.kr/p/22aHDXFflic.kr/p/23x7ebn |
|
Deleted
Deleted Member
Member since January 1970
Posts: 0
|
Post by Deleted on Nov 1, 2022 8:48:11 GMT -5
In between every stage I dump mine into a container of water after rinsing them well and take a took brush to every piece and scrub them. It is a bit of a tedious process but I think it really makes a difference in the end.
|
|
hoolligan1938
spending too much on rocks
Member since January 2022
Posts: 253
|
Post by hoolligan1938 on Nov 1, 2022 10:32:54 GMT -5
Have you tried an ultra sound cleaner? I've had some good luck using a mixture of borax and water in an ultra sound to get the dirt out. Depending on how good your ultra sound is, it works pretty well. The mixture of borax and water is not critical, in my opinion, and I usually use a tablespoon of borax to about two or three cups of water. If you don't have access to an ultra sound, try soaking the rocks in the mix for mabey a day or so and brush the rock with a stiff bristle brush when you remove them from the solution. Good luck with your cleaning.
Jim
|
|
|
|
Post by pebblesky on Nov 1, 2022 10:43:25 GMT -5
I have polished the tumbled the exact same material. In my case it was collected at the Round Mountain in Arizona just across the border from New Mexico. Before tumblingI soaked mine in Iron Out and then a bleach solution to remove as much of nature's dis-coloration as possible. Wanting to preserve as much of the natural peaks and valleys of the material I tumbled with small pea gravel which made up almost half the batch. They turned out very nice and if you looked at some of the nooks and crannies you would see that they are not polished as well. That's difficult to tell without using a Loop. The only drawback to my method, a few of the small pieces of the pea gravel wedge themselves into the nooks and crannies. Used old dental tools to remove them. flic.kr/p/DT8Kp6flic.kr/p/23x7fuKflic.kr/p/22aHDXFflic.kr/p/23x7ebnWow these are just stunning... |
|
jimmie
starting to spend too much on rocks
Member since August 2021
Posts: 233
|
Post by jimmie on Nov 1, 2022 14:15:54 GMT -5
I have polished the tumbled the exact same material. In my case it was collected at the Round Mountain in Arizona just across the border from New Mexico. Before tumblingI soaked mine in Iron Out and then a bleach solution to remove as much of nature's dis-coloration as possible. Wanting to preserve as much of the natural peaks and valleys of the material I tumbled with small pea gravel which made up almost half the batch. They turned out very nice and if you looked at some of the nooks and crannies you would see that they are not polished as well. That's difficult to tell without using a Loop. The only drawback to my method, a few of the small pieces of the pea gravel wedge themselves into the nooks and crannies. Used old dental tools to remove them. flic.kr/p/DT8Kp6flic.kr/p/23x7fuKflic.kr/p/22aHDXFflic.kr/p/23x7ebn |
|
jimmie
starting to spend too much on rocks
Member since August 2021
Posts: 233
|
Post by jimmie on Nov 1, 2022 14:16:09 GMT -5
Very nice
|
|
ericabelle
spending too much on rocks
Instagram acct: @erica_shoots_everything
Member since April 2021
Posts: 482
|
Post by ericabelle on Nov 1, 2022 19:54:19 GMT -5
@hankrocks those looks absolutely perfect! It really shows off the material to its fullest.
|
|
|
|
Post by therockapprentice on Nov 1, 2022 20:17:01 GMT -5
Thank you to everyone for your helpful suggestions. I would like to share some follow-up thoughts and a couple of questions.
Peruano thank you for helping me to identify the stones. Thank you also for sharing the pictures and suggestions to use garnets. I am not familiar with those and I should have mentioned that I live in Michigan so not sure where I would get any garnets unless I buy them. I don’t have a cab machine but I have gotten pretty good at using a very small 4 inch diamond wet tile saw to trim, and grind out some bad spots prior to tumbling. Unfortunately I have way too many small stones to try to grind them all on the saw. I love the Junk Bond analogy…I have a few really nice ones and just trying to finish the rest that I have worked so hard on already.
Mohs, I found these at Saddle Mountain just west of Phoenix. They are quite plentiful there but most small and you can see some of the issues I am having with those.
HankRocks, I love your pictures, they are exactly like my stones. Before tumbling I spent weeks scrubbing them and soaking them in many different chemicals to see if I could get them clean enough to polish. Do you just use plain pea gravel like you would use for landscaping to help polish? Also, did you use the pea gravel like ceramics and used them with the 4 different grits (Coarse, 220, 500, polish)? I love the suggestion on the Dental tools. I bought some a while back and now I have a use for them!!
|
|
|
|
Post by therockapprentice on Nov 1, 2022 20:18:14 GMT -5
Here is a picture of a few that have turned out great so far  |
|
nursetumbler
Cave Dweller 
Member since February 2022
Posts: 981 
|
Post by nursetumbler on Nov 2, 2022 4:13:08 GMT -5
therockapprenticeWelcome to the forum from Michigan also. You won't be disappointed woth the forum members. All are very kind and answer questions that they probably answered a thousand times as if it were the first time. I've been on web sites and people ask questions and you get the answer "search it first" I feel if you have the time to answer you have time to help, what's the issue. Again welcome from Michigan
|
|
|
|
Post by therockapprentice on Nov 4, 2022 17:36:49 GMT -5
I have polished the tumbled the exact same material. In my case it was collected at the Round Mountain in Arizona just across the border from New Mexico. Before tumblingI soaked mine in Iron Out and then a bleach solution to remove as much of nature's dis-coloration as possible. Wanting to preserve as much of the natural peaks and valleys of the material I tumbled with small pea gravel which made up almost half the batch. They turned out very nice and if you looked at some of the nooks and crannies you would see that they are not polished as well. That's difficult to tell without using a Loop. The only drawback to my method, a few of the small pieces of the pea gravel wedge themselves into the nooks and crannies. Used old dental tools to remove them. flic.kr/p/DT8Kp6flic.kr/p/23x7fuKflic.kr/p/22aHDXFflic.kr/p/23x7ebnHankRocks, I love your pictures, they are exactly like my stones. Before tumbling I spent weeks scrubbing them and soaking them in many different chemicals to see if I could get them clean enough to polish. Do you just use plain pea gravel like you would use for landscaping to help polish? Also, did you use the pea gravel like ceramics and used them with the 4 different grits (Coarse, 220, 500, polish)? I love the suggestion on the Dental tools. I bought some a while back and now I have a use for them!! |
|
|
|
Post by therockapprentice on Nov 4, 2022 17:50:33 GMT -5
They are chalcedony nodules and because of their complex surfaces, quite difficult to polish. I have had best luck by doing some preliminary grinding on a rough wheel of a cab machine, and then running them in a vibratory machine with an assortment of sizes, but most importantly using small garnets. The chalcedony is hard and so too is the garnet. The small size of the garnet gets into the grooves and works out the discoloration (not all of which is your grit, but probably includes dirt, and oxidation put there by thousands of years of exposure). Garnet sand can occasionally be found on ant mounds, but usually in thin layers so it must be cleaned before use. I'll try to find a couple of photos of my efforts, but let me say trying to tumble this material is a bit like buying junk bonds, most of them won't produce, but rarely one will be a winner. The other option is to use a dremel and tiny diamond bits, or other improvised polishing aids. Vaseline on a hardwood toothpick carrying various sizes of grit has worked for small persistent spots that needed to be treated by hand. As you can see, it hard to get all discoloration out of the material. Here is the garnet, about the size of BBs. Here are two shots of one of my most successful attempts. This is a close approximation of what you would do if you were trying to polish fire agate, but clearly the rewards are more modest. Peruano thank you for helping me to identify the stones. Thank you also for sharing the pictures and suggestions to use garnets. I am not familiar with those and I should have mentioned that I live in Michigan so not sure where I would get any garnets unless I buy them. I don’t have a cab machine but I have gotten pretty good at using a very small 4 inch diamond wet tile saw to trim, and grind out some bad spots prior to tumbling. Unfortunately I have way too many small stones to try to grind them all on the saw. I love the Junk Bond analogy…I have a few really nice ones and just trying to finish the rest that I have worked so hard on already. |
|
|
|
Post by Peruano on Nov 4, 2022 20:03:43 GMT -5
You use what you have. A dremel with a diamond bit will remove lots of the opaque oxidized material and a finer one will clean grooves. I've even tried cutting leather disks that can be mounted on a dremel to carry various grits using Vaseline as a carrier. As pointed out pea gravel should work in almost any vibe. The object is to create some progress and occasionally something of beauty in your view.
|
|


 Serious thought goes into a Chat Box v.2 post. "It Ain’t Easy"


