|
|
Post by johnw on Feb 20, 2018 15:32:01 GMT -5
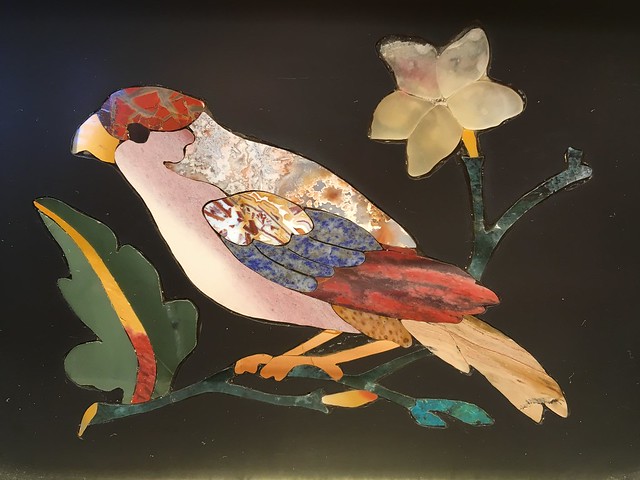
All you need is the right gear, being a small diameter diamond saw, several 1/16 inch thick cut slabs, each with characteristics that supports an image element, a flat lap, some epoxy and a piece of slate to hold your creation. You will also need a Dremel to rough out the slate to hold your creation. It helps if you can look at a picture or object and breakdown the image into elements. If you can do that you can figure out what stones would create those elements. Next all that needs to be done is to put those visualized elements to paper, cut them out and apply them to the appropriate stones for cutting and assembly. Once together, rough out the slate, insert the image, flat lap the assembly and you are done. Here is a sample of what you can do, (fabricated: January 24, 1981). Cheers, johnw 
|
|
Deleted
Deleted Member
Member since January 1970
Posts: 0
|
Post by Deleted on Feb 20, 2018 15:35:40 GMT -5
Beautiful!!
|
|
|
|
Post by taylor on Feb 20, 2018 15:50:13 GMT -5
Wow! Thank you for sharing!
|
|
|
|
Post by melhill1659 on Feb 20, 2018 15:54:46 GMT -5
It’s beautiful johnw Thank You for sharing. |
|
|
|
Post by fantastic5 on Feb 20, 2018 16:31:03 GMT -5
That's fabulous! And your write up makes it sound so easy lol!
|
|
|
|
Post by fernwood on Feb 20, 2018 16:51:06 GMT -5
I love doing intarsia with wood, but this brings to a different level. Thank you for sharing.
|
|
|
|
Post by Jugglerguy on Feb 20, 2018 18:44:20 GMT -5
That’s really nice. I’ve thought about doing something like that, but I could never find a picture that I both liked well enough and had colors that I could find in rocks. I might have to look again.
I don’t quite understand how you made it flush with the background slate. How did you carve out the slate to a uniform depth?
|
|
|
|
Post by rockjunquie on Feb 20, 2018 19:01:43 GMT -5
That is so beautiful! I can appreciate all the work that went into it, too.
|
|
|
|
Post by Pat on Feb 20, 2018 19:08:36 GMT -5
Wow! Thanks for showing.
|
|
|
|
Post by johnw on Feb 21, 2018 0:30:05 GMT -5
That’s really nice. I’ve thought about doing something like that, but I could never find a picture that I both liked well enough and had colors that I could find in rocks. I might have to look again. I don’t quite understand how you made it flush with the background slate. How did you carve out the slate to a uniform depth? First, Jugglerguy, thank you for the compliment and now to answer your question: " visualize that you have created and assembled your masterpiece. All the various parts have been glued together and are now one solid piece. Place it on a flat piece of slate, position it where you want it to be and then scribe the outline. Use the Dremel to route out the inside of the image on the slate to approximately 1/8 of an inch deep. You either need judge the depth, have a router that has a head 1/8 heigh, or create your own template to control the depth. If your piece consists of component parts that are all 1/16 of an inch thick it will fit inside the outline you have roughed out and you will have about 1/16th of an inch to spare. OK so far? So this is the tricky part because you have a short period of time to perform the next task. Spread epoxy over the entire area where you will insert the piece and then insert it. Make sure the piece is pushed firmly into place and slightly below the surface of the slate. Flip the slate over onto a piece of kraft paper and let the epoxy set. Once set you can now flat lap the entire piece grinding down the surface of the slate and the assembled pieces until all items are flush." Hope this helps and encourages you to give it a try. Cheers, johnw |
|
|
|
Post by johnw on Feb 21, 2018 3:22:18 GMT -5
That’s really nice. I’ve thought about doing something like that, but I could never find a picture that I both liked well enough and had colors that I could find in rocks. I might have to look again. I don’t quite understand how you made it flush with the background slate. How did you carve out the slate to a uniform depth? First, Jugglerguy, thank you for the compliment and now to answer your question: " visualize that you have created and assembled your masterpiece. All the various parts have been glued together and are now one solid piece. Place it on a flat piece of slate, position it where you want it to be and then scribe the outline. Use the Dremel to route out the inside of the image on the slate to approximately 1/8 of an inch deep. You either need judge the depth, have a router that has a head 1/8 heigh, or create your own template to control the depth. If your piece consists of component parts that are all 1/16 of an inch thick it will fit inside the outline you have roughed out and you will have about 1/16th of an inch to spare. OK so far? So this is the tricky part because you have a short period of time to perform the next task. Spread epoxy over the entire area where you will insert the piece and then insert it. Make sure the piece is pushed firmly into place and slightly below the surface of the slate. Flip the slate over onto a piece of kraft paper and let the epoxy set. Once set you can now flat lap the entire piece grinding down the surface of the slate and the assembled pieces until all items are flush." Hope this helps and encourages you to give it a try. Cheers, johnw |
|
|
|
Post by johnw on Feb 21, 2018 3:34:18 GMT -5
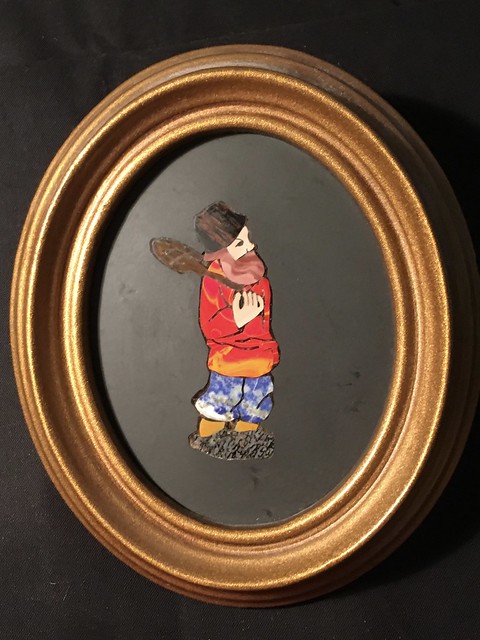
The concept is straight forward, visualize the various pieces of stone you would use to create your image and piece them together to form the picture. Doing faces and hands is difficult and this was the best I could do. I used the diamond wire saw to cut the features. Oh well, I think it turned out pretty good. Cheers, johnw 
|
|
|
|
Post by johnw on Feb 21, 2018 4:04:25 GMT -5
For those who want to experiment with this technique just start out with two pieces, like this one. Tip: you have to drill through the background piece first so you can cut the outline of the Cheetah with a diamond wire saw. FYI, the Cheetah was cut from a thin slice of petrified bamboo. Cheers, johnw, 
|
|
|
|
Post by Jugglerguy on Feb 21, 2018 6:27:38 GMT -5
Thanks for the additional info, John. I think I understand better now. The additional pieces you showed are really nice too!
|
|
|
|
Post by beefjello on Feb 25, 2018 12:53:16 GMT -5
Man that's terrific work. I'm really likin' that cheetah!!
|
|
|
|
Post by johnw on Feb 25, 2018 13:29:36 GMT -5
Man that's terrific work. I'm really likin' that cheetah!! Hi beefjello, thanks for the compliment. One thing that really makes it all worthwhile, cause it takes time, lots of time to complete the project, is the fact you get to look at something and break it down in your mind thinking, now what stone could I use for that particular effect. Petrified bamboo was the look I needed for the Cheetah and so I found just the piece for the effect. The background kinda sucks, but it was my first attempt out of the chute and I was not too adept at that time for background effects so you can see why I went to individual objects and used the slate as a backdrop. I'm thinking if I had to do it again I would have something really dramatic for the background. Anyway, I hope you find the opportunity to give it a try. Cheers, johnw |
|
NRG
fully equipped rock polisher
  
Member since February 2018
Posts: 1,688
|
Post by NRG on Mar 4, 2018 1:25:01 GMT -5
That’s really nice. I’ve thought about doing something like that, but I could never find a picture that I both liked well enough and had colors that I could find in rocks. I might have to look again. I don’t quite understand how you made it flush with the background slate. How did you carve out the slate to a uniform depth? Just inset them and then sand down so all surfaces are flush. Slabs can be varying width too. |
|
|
|
Post by johnw on Oct 14, 2018 13:14:45 GMT -5
One more. this little guy is a copy of a Faberge three dimensional carving. This was my third attempt at intarsia in 1982. The make up of the picture is: dino fossil dung for the shoes, pictures jasper for the legs, lapis for the pants, red glass for the shirt. mahogany obsidian for the shovel and hat and picture jasper for the face, hands and beard. Slate was used for the background. I was not adept enough to do a mosaic face, so I used a micro saw to cut the features, both in the face and hand. It turned out pretty good I thought. His name is Ivan. Cheers, johnw  |
|
|
|
Post by vegasjames on Oct 14, 2018 17:57:06 GMT -5
Nice job on those. I have been wanting to try stone intarsia. Bought a book for patterns but have not had time yet to try it.
|
|
|
|
Post by johnw on Oct 14, 2018 21:09:52 GMT -5
Nice job on those. I have been wanting to try stone intarsia. Bought a book for patterns but have not had time yet to try it. vegasjames. thanks for the compliment. If you go back in this thread, my very first intarsia was two pieces. Now you can't go too wrong with two pieces for a beginning. I gave instructions how to craft such a piece. Really it is not too difficult, just takes time. I wish you luck and perseverance.. Cheers, johnw |
|