Post by rockjunquie on Apr 24, 2018 22:29:00 GMT -5
I spent the day playing with heavy metal.
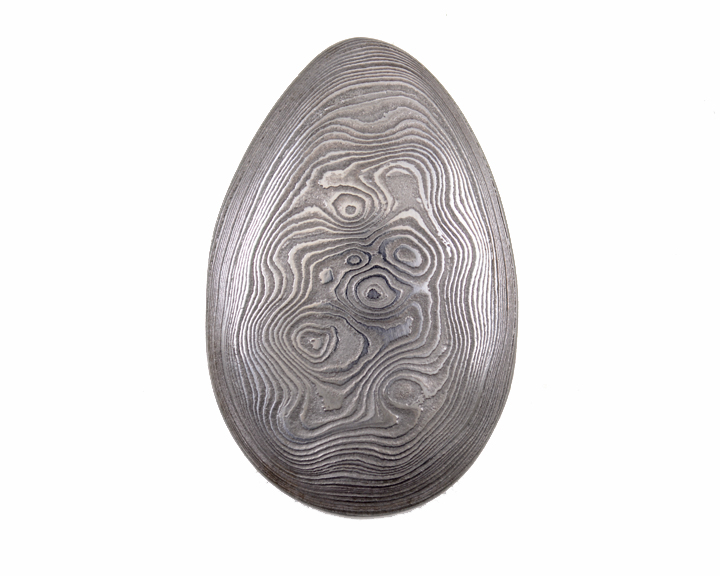
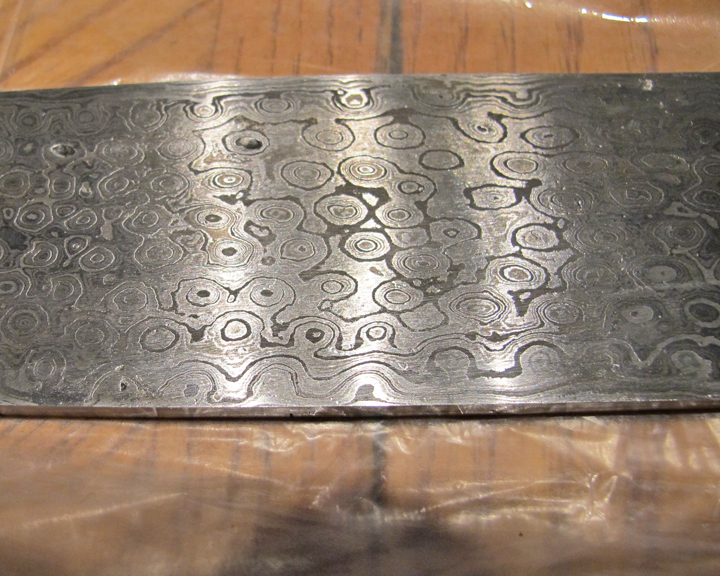
I got a billet of raindrop pattern Damascus on ebay. It's from Pakistan. I don't know the exact metal content. It would help if I did. But, it was relatively cheap for something to play around with.
The first thing to figure out was how to preform it. I had some great input from a few RTH'ers. I ended up using Dremel cut off wheels. Not those thin ones. I think these are fairly new. They are pretty heavy duty.
![]() 1:
1: 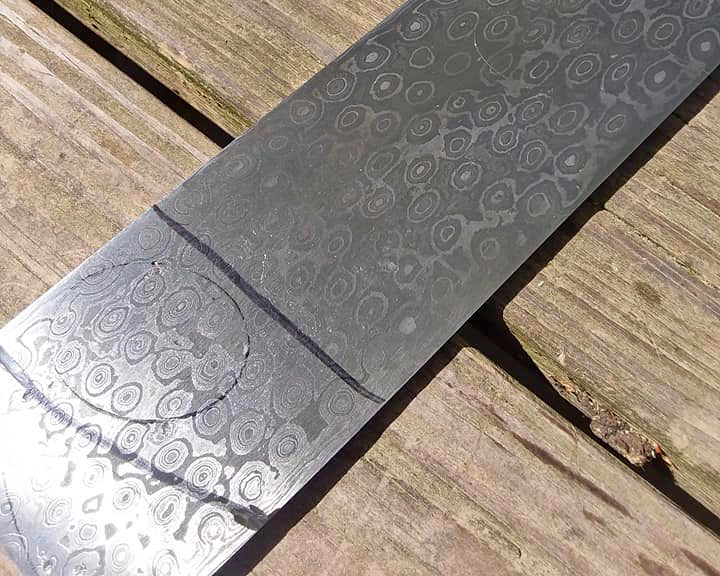
Doing this outside is a must. Sparks WILL fly and the metal will get extremely hot- enough to burn you. You'll need clamps.
2: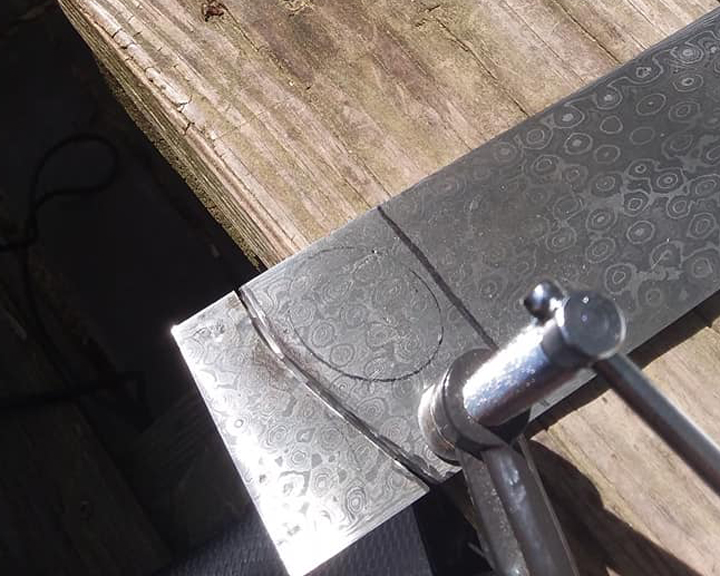
Seems pretty straight forward. Preform as you would a slab of rock.
3:
Now, get a little closer.....
4:
You can literally see how hot this got!
5:
Here's the dremel wheels. Used 1.5. Not bad. They held up real well.
6: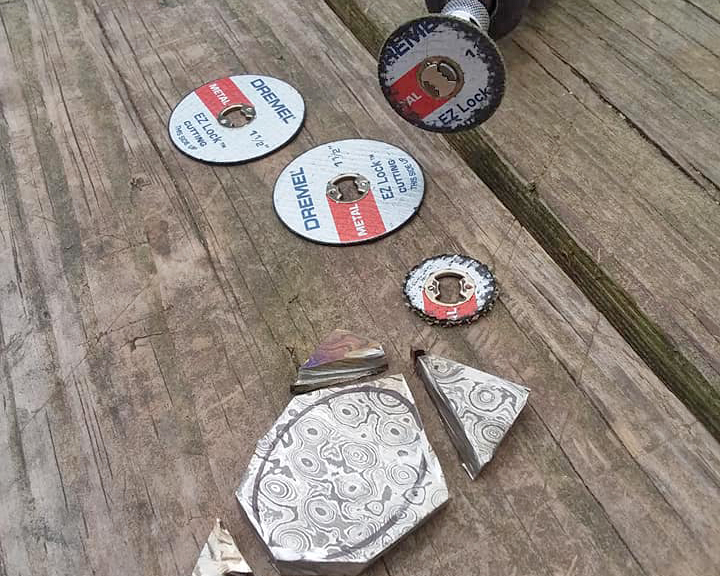
The next preform. The colors are beautiful!
7:
I cabbed it on the Genie using old wheels. It cabbed a lot like an agate. It was a little tricky- mostly due to how shiny it is. If you've ever cabbed silver, it's a lot like that. If you leave scratches on the 220 they will not show until you are on the 1200. Then they stick out like a sore thumb. I went for a high polished look- even cheating a little by jumping over to my NOT old 1200. I may live to regret that. On youtube, most people said go to 600, but a few went to 1200. Going higher would make for a gorgeously reflective cab, but it would be a waste of time since the etchant will eat away at it. But, you do want it to be a nice finish.
You notice you can barely see the pattern anymore? That's because all of the etchant was ground off. You won't see the pattern again until the acid bath.
8: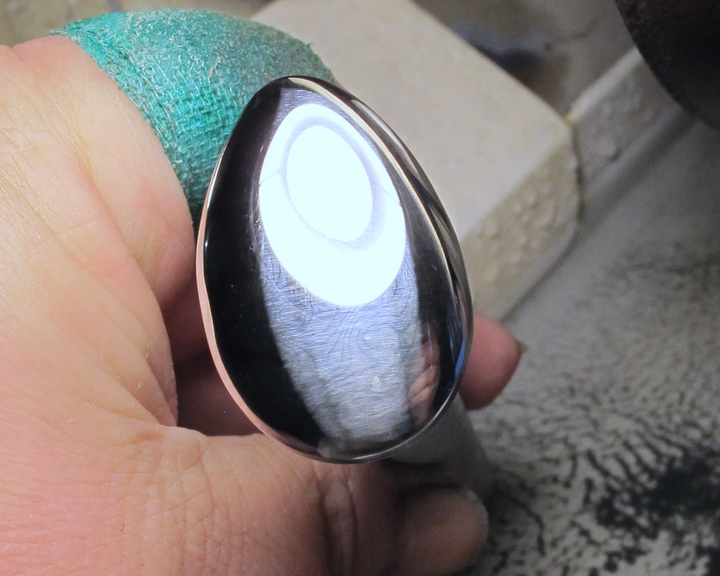
On this side view, you may be able to make out that the back side had a ring of burrs. They are very sharp. They formed when I was shaping on the 80 wheel. The whole line of razor sharp metal had to be filed off. I could have used the genie, but it was easier on me and Gene if I used a #2 and then a #4 file.
10: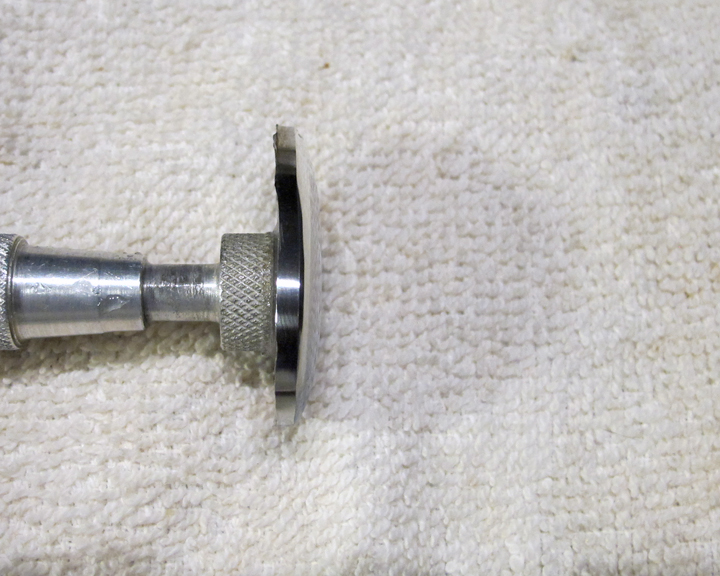
Preparing to do the acid bath. On youtube a guy said to add vinegar to the ferric chloride (pcb etchant). You will see that was probably a bad idea. I used a baking soda solution to neutralize the acid.
11:
It's cooking......
12: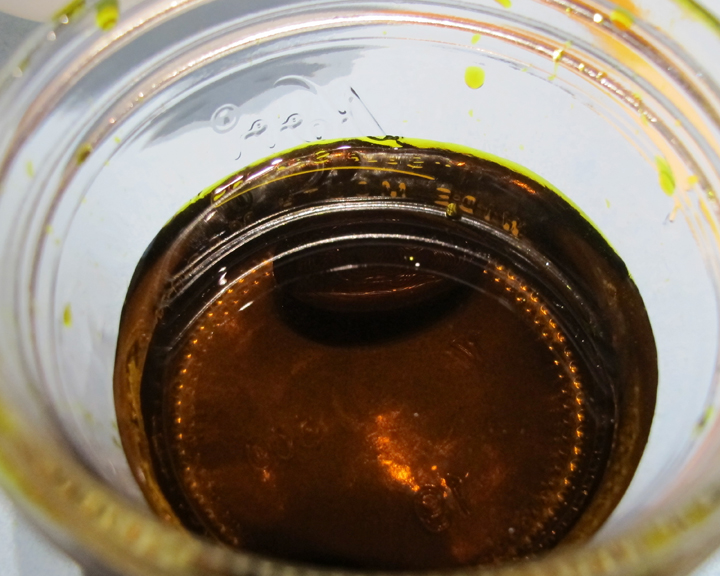
This is after 20 minutes. It's covered with dissolved steel and acid. I let it sit for 10 more minutes. You can definitely see the pattern now.
13:
Shout out to minerken and his glue dops. I do not think wax would work with this. It did take about 6 hrs in acetone to release, though.
Here is the cab after neutralizing, washing in clear water and polishing from 600 to 8000 grit paper. Not the greatest light for it and the pictures do no justice. Tomorrow, I'll get a better shot in the light tent. (I just remembered! I was supposed to let it sit awhile for the black to set up. Oh well. I'll try that next time.)
14: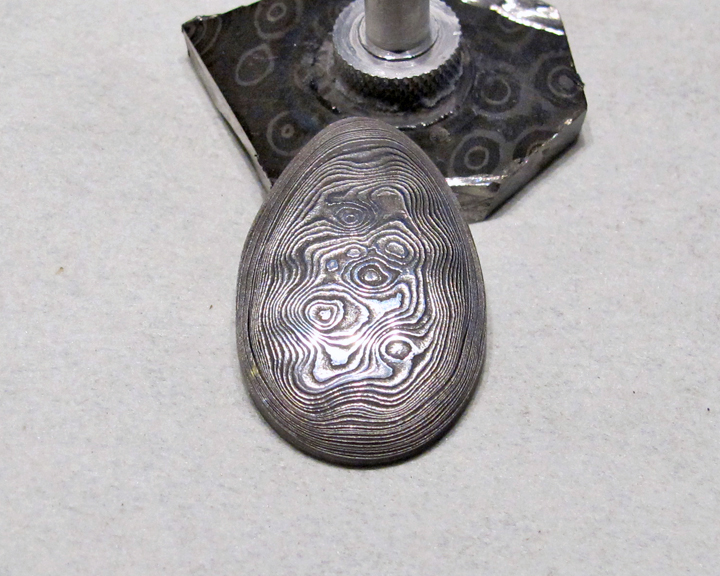
15: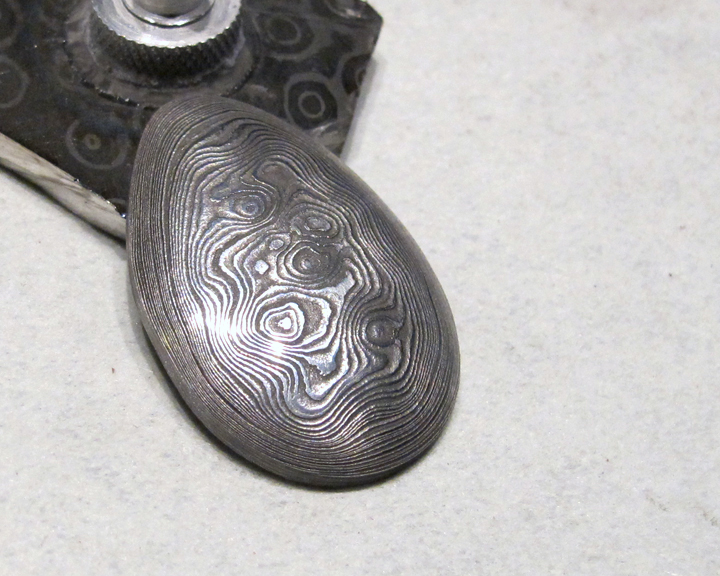
16: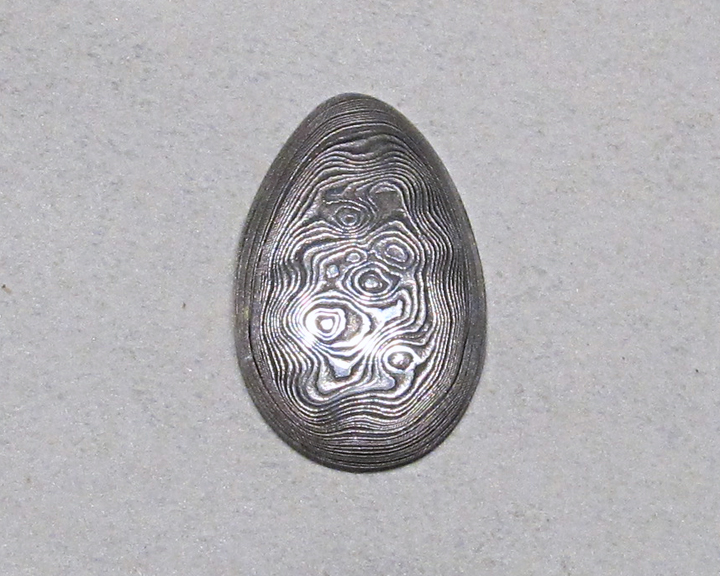
Lastly, you see this is a dirty job, but someone had to do it.
17: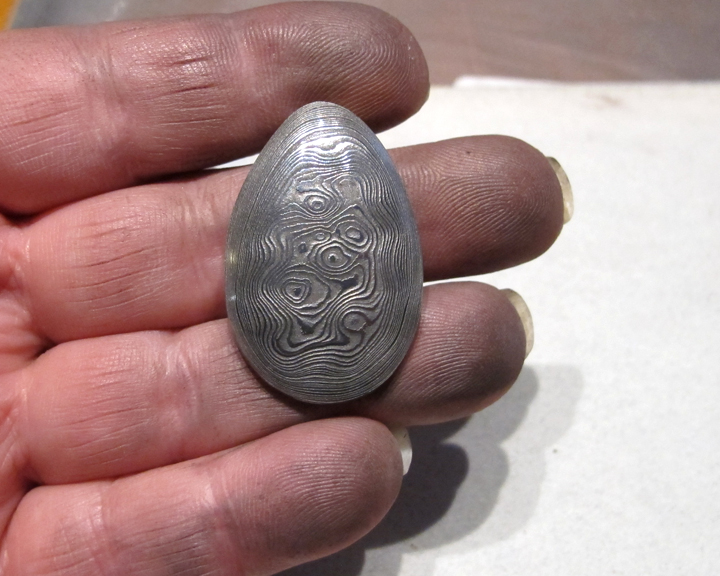
This cab has a bit of a dome. It started out 6mm thick. I think it would be much better next time to do a buff or near buff top. That would put more of the pattern on the top- much like with Drummond Island Rocks 's Fordite. The lines on the side are the layers of different metals.
You can run your finger or nail over this and feel the ridges like a fingerprint. That's caused by the etch. Tomorrow, I may re-etch this with straight ferric chloride and see if I cant get blacker lines. But, I believe that the metal content more determines how black it will get. We'll see. (Plus, I'll leave the black to sit longer before sanding. Doh!)
That's it till next time.
I got a billet of raindrop pattern Damascus on ebay. It's from Pakistan. I don't know the exact metal content. It would help if I did. But, it was relatively cheap for something to play around with.
The first thing to figure out was how to preform it. I had some great input from a few RTH'ers. I ended up using Dremel cut off wheels. Not those thin ones. I think these are fairly new. They are pretty heavy duty.
Doing this outside is a must. Sparks WILL fly and the metal will get extremely hot- enough to burn you. You'll need clamps.
2:
Seems pretty straight forward. Preform as you would a slab of rock.
3:
Now, get a little closer.....
4:
You can literally see how hot this got!
5:
Here's the dremel wheels. Used 1.5. Not bad. They held up real well.
6:
The next preform. The colors are beautiful!
7:
I cabbed it on the Genie using old wheels. It cabbed a lot like an agate. It was a little tricky- mostly due to how shiny it is. If you've ever cabbed silver, it's a lot like that. If you leave scratches on the 220 they will not show until you are on the 1200. Then they stick out like a sore thumb. I went for a high polished look- even cheating a little by jumping over to my NOT old 1200. I may live to regret that. On youtube, most people said go to 600, but a few went to 1200. Going higher would make for a gorgeously reflective cab, but it would be a waste of time since the etchant will eat away at it. But, you do want it to be a nice finish.
You notice you can barely see the pattern anymore? That's because all of the etchant was ground off. You won't see the pattern again until the acid bath.
8:
On this side view, you may be able to make out that the back side had a ring of burrs. They are very sharp. They formed when I was shaping on the 80 wheel. The whole line of razor sharp metal had to be filed off. I could have used the genie, but it was easier on me and Gene if I used a #2 and then a #4 file.
10:
Preparing to do the acid bath. On youtube a guy said to add vinegar to the ferric chloride (pcb etchant). You will see that was probably a bad idea. I used a baking soda solution to neutralize the acid.
11:
It's cooking......
12:
This is after 20 minutes. It's covered with dissolved steel and acid. I let it sit for 10 more minutes. You can definitely see the pattern now.
13:
Shout out to minerken and his glue dops. I do not think wax would work with this. It did take about 6 hrs in acetone to release, though.
Here is the cab after neutralizing, washing in clear water and polishing from 600 to 8000 grit paper. Not the greatest light for it and the pictures do no justice. Tomorrow, I'll get a better shot in the light tent. (I just remembered! I was supposed to let it sit awhile for the black to set up. Oh well. I'll try that next time.)
14:
15:
16:
Lastly, you see this is a dirty job, but someone had to do it.

17:
This cab has a bit of a dome. It started out 6mm thick. I think it would be much better next time to do a buff or near buff top. That would put more of the pattern on the top- much like with Drummond Island Rocks 's Fordite. The lines on the side are the layers of different metals.
You can run your finger or nail over this and feel the ridges like a fingerprint. That's caused by the etch. Tomorrow, I may re-etch this with straight ferric chloride and see if I cant get blacker lines. But, I believe that the metal content more determines how black it will get. We'll see. (Plus, I'll leave the black to sit longer before sanding. Doh!)
That's it till next time.