karldubya
starting to shine!

Member since March 2021
Posts: 32
|
Post by karldubya on May 5, 2021 18:31:30 GMT -5
Okay, this hobby is going to drive me crazy. I just got my 6th final product. I’ve done this six times. I won’t count the first two with garbage natgeo polish. Are my expectations to high? I’m looking for that mirror or glass quality finish. I’ve kept a log book: the last two batches I’ve done have been completely different with the same results. For starts phase 1 for any stone I don’t track I have 3 tumblers so one is always spinning phase one and I move them when they are ready. It could be 1 week or 4 weeks. Batch #1 ran P2 - 3 weeks, P3 - 2 weeks and Phase 4 - 2 weeks. Batch #2 ran P2 - 2 weeks, P3 - 1 week and Phase 4 - 1 week. Both are about the same results, both batches are with new materials I got from the rock shed. I have some really cool rocks from a recent vacation running in phase 2 right now so I want to get it right. I talked to Shawn at the rock shed when I orders the only thing I think I can try different is using ceramic media in the late stages. I currently use plastic pellets. Here are my results - Batch 1 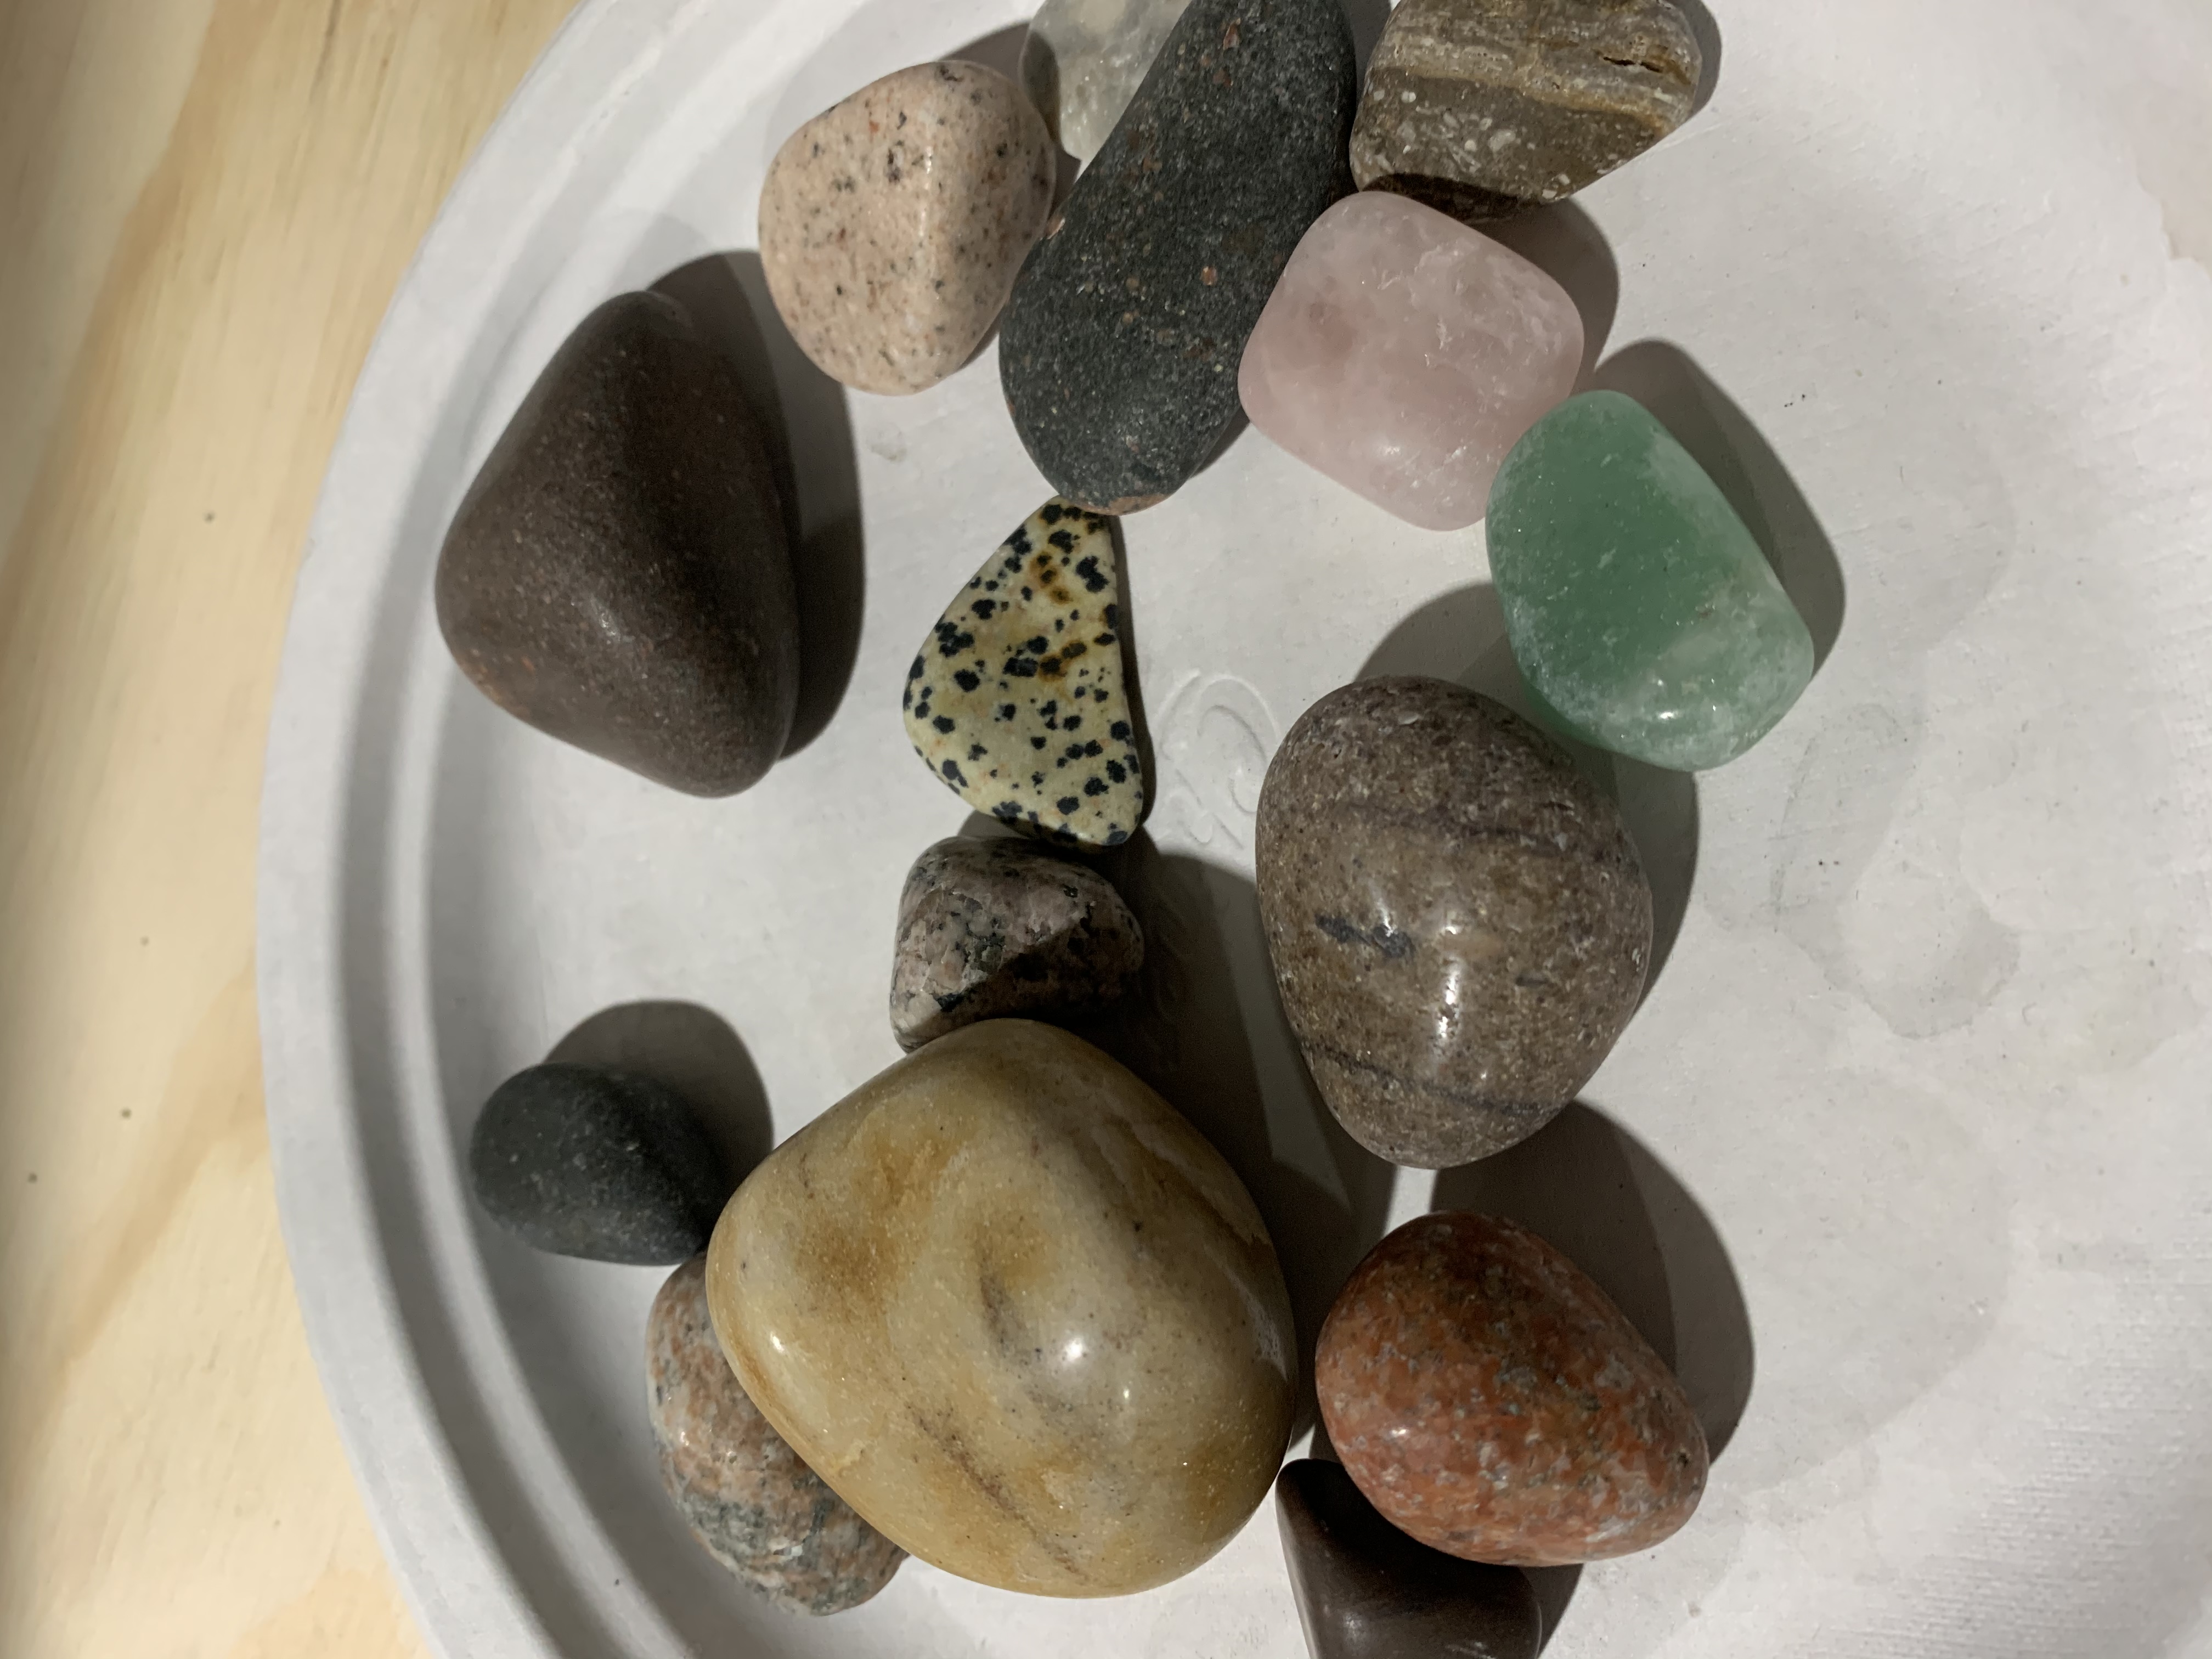 Batch 2 (with some closeups) 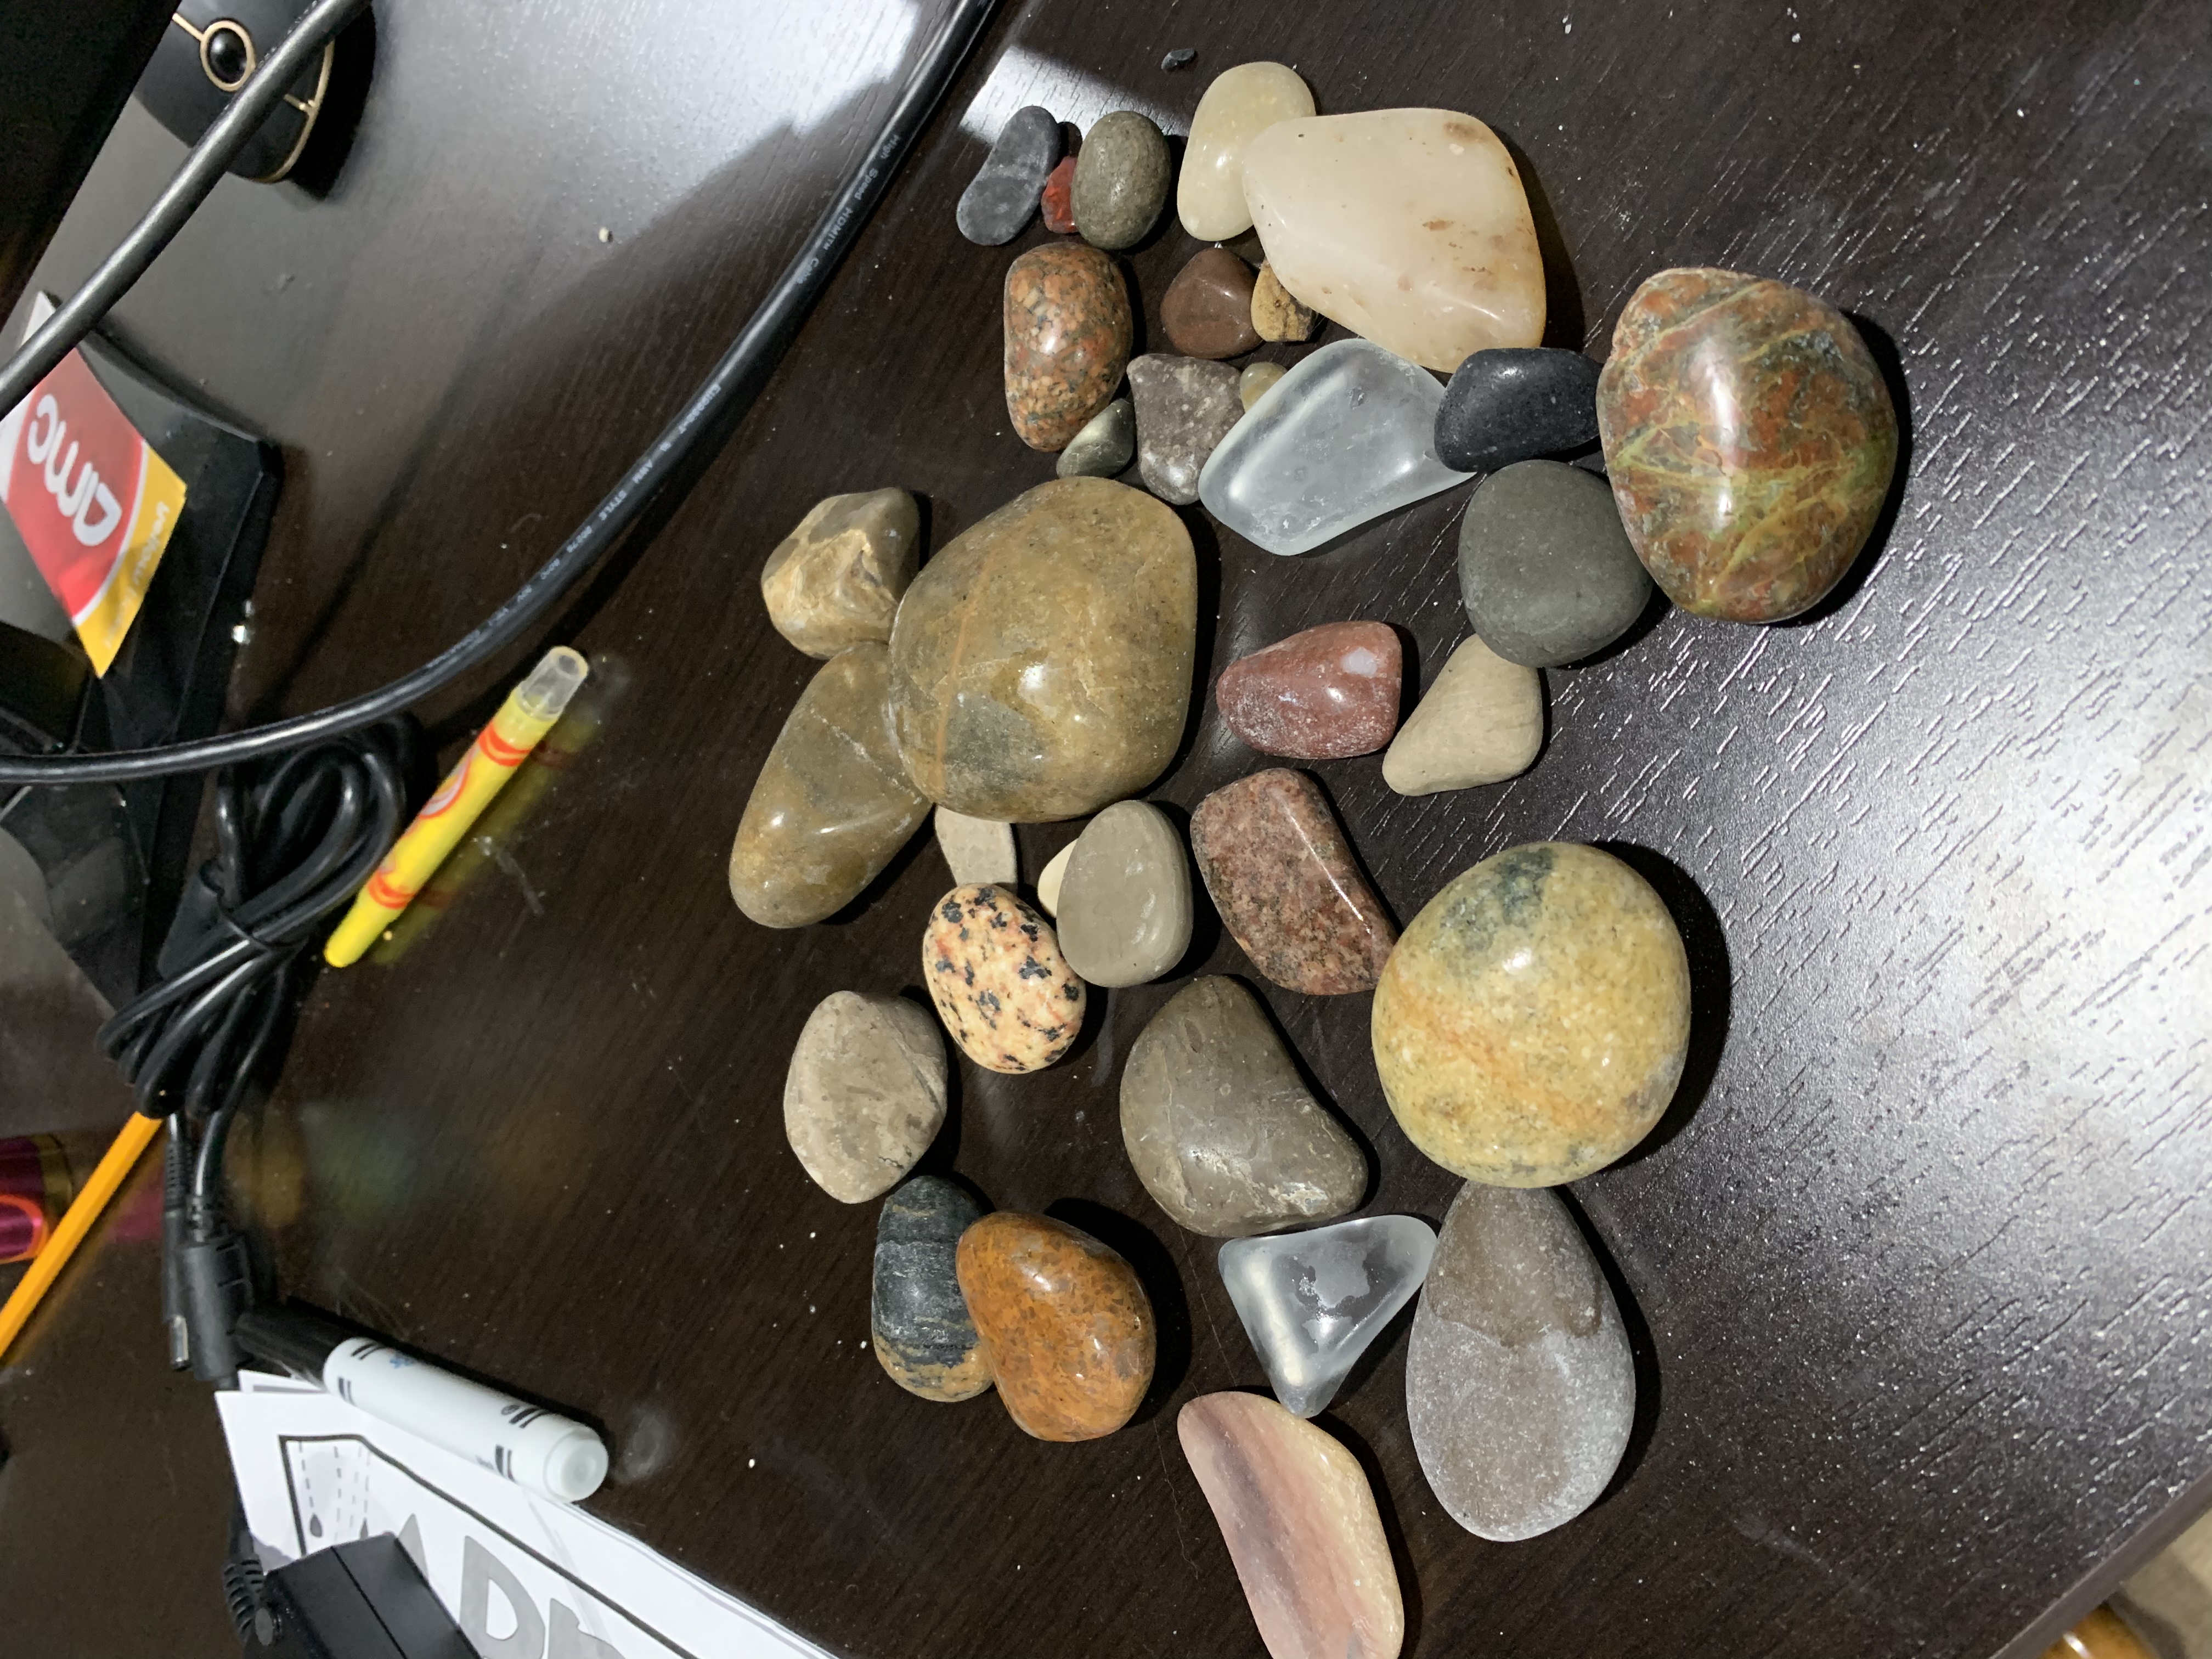   Halp!!! |
|
|
|
Post by HankRocks on May 5, 2021 18:41:06 GMT -5
Need to know some more facts;
- What grits are you using for the different steps
- What kind of Tumbler
- What kind of Polish
Looking at some of your rocks I would say that some of them will not take a high polish.
|
|
karldubya
starting to shine!
Member since March 2021
Posts: 32
|
Post by karldubya on May 5, 2021 19:27:04 GMT -5
Need to know some more facts; - What grits are you using for the different steps - What kind of Tumbler - What kind of Polish Looking at some of your rocks I would say that some of them will not take a high polish. Grits are a pack from therockshed described as: This grit pack includes 1 lb. of coarse (60-90 grit), 1 lb. of medium (120-220 grit), 1/2 lb. of fine grit (500 pre polish) and 1/2 lb. of our polish. I use a Chicago electric tumbler. |
|
Wooferhound
Cave Dweller  Lortone QT66 and 3A
Member since December 2016
Posts: 1,423 
Member is Online
|
Post by Wooferhound on May 5, 2021 20:03:12 GMT -5
Some of the rocks in both batches will not polish well or at all.
Those that won't polish will prevent the rest of them from polishing well.
Put all the rocks that did take a reasonable shine back in polish for a week and wait for a surprise.
|
|
karldubya
starting to shine!
Member since March 2021
Posts: 32
|
Post by karldubya on May 5, 2021 20:29:03 GMT -5
How do you know what will or won’t take polish? My kid just picks up stones at the beach and I try to polish them.
|
|
Wooferhound
Cave Dweller
Lortone QT66 and 3A
Member since December 2016
Posts: 1,423
Member is Online
|
Post by Wooferhound on May 5, 2021 21:06:16 GMT -5
With only a little bit of experience you will learn to recognize the stones that will take a polish. Porous rocks like Granite and Limestone are difficult to polish. Glassy hard stones like Quartz or Flint will polish fabulously. In my experience, less than 10% of the stones I see are not suitable for a shine Looking at your pictures you can see the unpolished rocks have a rough uneven surface that will never shine. Some of your rocks have parts shiny and parts dull. Examine your tumbled rocks with a magnifying glass to see what works and what doesn't. It helps to crack a newly discovered rock open to see what it really is.
Where are you located ?
|
|
|
|
Post by Peruano on May 6, 2021 6:52:40 GMT -5
When you are using beach rocks, you can tell a lot by feeling the surface of the rock. Rocks that are fine grained or not grained at all will feel extremely smooth to the touch, whereas those with coarse granulations like sandstone or granite will feel rougher (all because the beach action has already polished them somewhat if they are the right configuration. If a rock has pits, cavities or holes it may be an indication that it has some minerals that are softer than other minerals in the same rock. That variation can frustrate the polishing process in a tumbler. I have a basic rock tumbling book that says to separate your rocks into hard, soft and throwaways. Run the hard rocks (those that file will not scratch) separate from the softer ones (those that can be scratched by a file or pocket knife). Try to separate the ones you have been working on; hard vs soft and work on the hard ones first. Good luck and stay the course; rewards are not immediate but well worth the effort.
|
|
karldubya
starting to shine!
Member since March 2021
Posts: 32
|
Post by karldubya on May 6, 2021 7:14:25 GMT -5
With only a little bit of experience you will learn to recognize the stones that will take a polish. Porous rocks like Granite and Limestone are difficult to polish. Glassy hard stones like Quartz or Flint will polish fabulously. In my experience, less than 10% of the stones I see are not suitable for a shine Looking at your pictures you can see the unpolished rocks have a rough uneven surface that will never shine. Some of your rocks have parts shiny and parts dull. Examine your tumbled rocks with a magnifying glass to see what works and what doesn't. It helps to crack a newly discovered rock open to see what it really is.
Where are you located ?
Going down what you said - "less than 10% of the stones I see are not suitable for shine" This is what drives me crazy that means I have a 90% chance that whatever I pickup should shine. Watching YouTube that seems to be the case, I'm not sure half those people know what they have. "Looking at your pictures you can see the unpolished rocks have a rough uneven surface that will never shine." Maybe my Phase 1 and 2 need to be more diligent and go longer. P1 I'm generally looking for shape, no hard edges and P2 I'm just trying to get rid of the remaining blemishes. Additionally in the pictures there are two stones (the light green and pink) that came from a pan handling thing my kid did on vacation. Those were super smooth, but again, barely any shine. "Examine your tumbled rocks with a magnifying glass to see what works and what doesn't." Maybe this sounds dumb, but what am i looking for that i can't see with the naked eye? "Where are you located ?" Michigan, SouthEast - but many of these stones came from the thumb or northeast of the mitten. Thanks |
|
karldubya
starting to shine!
Member since March 2021
Posts: 32
|
Post by karldubya on May 6, 2021 7:20:38 GMT -5
When you are using beach rocks, you can tell a lot by feeling the surface of the rock. Rocks that are fine grained or not grained at all will feel extremely smooth to the touch, whereas those with coarse granulations like sandstone or granite will feel rougher (all because the beach action has already polished them somewhat if they are the right configuration. If a rock has pits, cavities or holes it may be an indication that it has some minerals that are softer than other minerals in the same rock. That variation can frustrate the polishing process in a tumbler. I have a basic rock tumbling book that says to separate your rocks into hard, soft and throwaways. Run the hard rocks (those that file will not scratch) separate from the softer ones (those that can be scratched by a file or pocket knife). Try to separate the ones you have been working on; hard vs soft and work on the hard ones first. Good luck and stay the course; rewards are not immediate but well worth the effort. Would you say that hard rocks and soft rocks can be combined towards the end (polish)? or will they still irritate each other? Like I said I generally throw everything into a tumbler together and just keep examining week to week until I feel something can move on. So i'm not trying to say, "all these rocks just run for 3 weeks and move on", they move only when ready, then I keep buckets of water around to put them in until I have enough for the next stage. |
|
|
|
Post by Peruano on May 6, 2021 11:41:57 GMT -5
Hard rocks can scratch softer ones. Scratched result in lack of shine.
|
|
standles
spending too much on rocks
 Well all I got was a rock ... Cool!
Member since February 2021
Posts: 325
|
Post by standles on May 6, 2021 13:34:05 GMT -5
Would you say that hard rocks and soft rocks can be combined towards the end (polish)? or will they still irritate each other? Like I said I generally throw everything into a tumbler together and just keep examining week to week until I feel something can move on. So i'm not trying to say, "all these rocks just run for 3 weeks and move on", they move only when ready, then I keep buckets of water around to put them in until I have enough for the next stage. My results got alot better when I started grouping my tumbles into batchs with same Mohs number hardness. Now with wild caught rocks you have to do some scratch testing and investigation to determine what you got but with purchased stuff that is identified it is easier. |
|
saxplayer
fully equipped rock polisher

Member since March 2018
Posts: 1,327
|
Post by saxplayer on May 6, 2021 15:37:10 GMT -5
The easiest way to learn how to tumble is to eliminate causes of error.
In my opinion, this would be to learn your tumbler and grit actions by using a batch of all agates or jaspers (mohs 7 or so). Ideally - just one kind of rock from therockshed.com would be ideal so that you know it is all the same type of hardness and same type of material.
Then - the rock factor - is eliminated and you can focus on barrel loading, grit types and amounts etc.
once you have learned the proper time and way to achieve a glossy shine, add different rock types into other mixed jasper/agate batches and see what happens!
Grant
|
|
rockfrog
starting to spend too much on rocks
Member since February 2021
Posts: 114
|
Post by rockfrog on May 6, 2021 20:43:31 GMT -5
I'm pretty new too so I'm definitely no expert but my last batch was mixed and I had some that didn't shine at all and others actually achieve that "glass" quality finish, so I'm not sure if the ones that won't ever shine actually ruined the rest. However, my first batch had similar results with lacking shine so here are the things I've changed since then:
-One week in course, clean out, then one more week in course. Originally I only did one week but since you're already doing at least two I think you're covered here.
-Added ceramic media instead of plastic pellets. I did add a few pellets in the final polish to give a little extra cushioning though, so I'm not sure if this changed anything. If you continue using plastic pellets just make sure you use different pellets for each grit stage. I quite like the ceramic since I don't have to separate and add more each stage and instead it just moves on with the rocks, but I'm sure pellets will work fine in the meantime.
-Lastly, cleaned my barrel in between stages! I just rinsed it out originally but now I actually scrub my barrel after each completed stage. However, I only have one tumbler and it's small so scrubbing it doesn't take that long. I know some people burnish in between each stage, I haven't tried that yet personally but it's probably worth a shot if you don't wan to scrub it. Out of things I changed I think this one helped the most but I can't be sure.
That's all that I changed but these are just personal observations! You'll probably just have to keep experimenting until you find out what's best for you and your tumbler, good luck!!
|
|
Benathema
has rocks in the head
 God chased me down and made sure I knew He was real June 20, 2022. I've been on a Divine Mission.
Member since November 2019
Posts: 703
|
Post by Benathema on May 6, 2021 22:06:36 GMT -5
Summary of my approach, geared towards anyone new:
- Mohs 7+, avoid random stones unless you've accepted that they might not turn out.
- Pitted rocks need a little scrub between stages to get the sludge out, otherwise a good rinse until everything is clean enough (I'm in the camp that believes a good rinse is good enough - that it's unlikely that there would be grit contamination if the grit has broken down - and unlikely a fresh piece of grit was lodged in a crevice for an entire week - and that the grit that has broken down is probably finer than the stage you're about to put it in except maybe prepolish to polish).
- Let the tumbler do its work, meaning don't truncate the run thinking it'll be okay.
- It's all about stage 1, If it doesn't look good/well-shaped there, the other stages aren't going to fix it.
- Inspect stones coming out of stage 1 when they're dry to avoid having water hide the flaws.
- Ceramics instead of plastic for stage 3&4.
- Good AO polish.
- 2 week polish run.
- Don't skip grit steps.
- Proper 2/3 - 3/4 rock fill level and water just to the bottom of the top layer of rocks.
- Work backwards when doing cleanouts to avoid contamination, meaning clean your polish barrels out first, then prepolish, then medium, and then coarse.
- Slurry thickeners if you're so inclined.
This was going to be a 4 item list, but... Ah well...
|
|
karldubya
starting to shine!
Member since March 2021
Posts: 32
|
Post by karldubya on May 7, 2021 9:08:31 GMT -5
- Slurry thickeners if you're so inclined. For the last two full runs I've been saving the Slurry of each stage in separate jars - Instead of filling with all fresh water I use half old slurry half water. Good Approach? I was worried it might not create as much action between rocks in earlier stages. |
|
|
|
Post by hummingbirdstones on May 7, 2021 9:15:56 GMT -5
I don't tumble, but just thought I'd throw this out there. Our own Jugglerguy is in Michigan and he has a YouTube channel Michigan Rocks that may help you out some. He makes some awesome videos and may help you with some of the rocks you're finding. |
|
|
|
Post by paulshiroma on May 7, 2021 10:43:01 GMT -5
I don't tumble, but just thought I'd throw this out there. Our own Jugglerguy is in Michigan and he has a YouTube channel Michigan Rocks that may help you out some. He makes some awesome videos and may help you with some of the rocks you're finding. Definitely a good idea. karldubya, The other thing you could do is give The Rock Shed guys a call and get a recommendation on some of their crushed rock to try out. They've been extremely helpful. Also, FWIW, don't be afraid to cull out material after each stage. As I run batches of agates and jasper, I separate the good vs bad after each batch. I only move forward with the "good" materials eliminating as I go. I end up with a pile of discards that eventually make it into the garden. It also means that I'm running several batches at a time until I have enough to go to the next grit stage. And yes, the hobby can test your patience (and budget, and time, and storage...). |
|
Brian
fully equipped rock polisher
Member since July 2020
Posts: 1,506
|
Post by Brian on May 7, 2021 10:51:22 GMT -5
paulshiroma said something above that was so important that I would like to repeat it. If you see something in the batch that doesn’t seem to be turning out well, take it out! We learned that lesson the hard way. In the first batch we ever tumbled, we had a crazy mix of rocks—all of the interesting rocks a then 8 and 6 year old would find cool. We kept everything together and got predictably bad results after taking them through the polish stage. Nothing looked good but a few rocks showed some promise. From that batch, we removed everything that didn’t look like it was showing a hint of a shine and through the rest back in for another try. When we only put the rocks that looked like they had potential for a high polish, they turned out amazing! Not only were those problematic rocks not going to shine up in a mixed batch, but they were also preventing the other rocks from looking their best. Long story short, pay attention to which rocks look like they are making good progress and put the rest aside. You can later try them in a batch by themselves or just focus on the rocks that work out the best for you.
|
|
|
|
Post by paulshiroma on May 7, 2021 11:34:19 GMT -5
- Slurry thickeners if you're so inclined. For the last two full runs I've been saving the Slurry of each stage in separate jars - Instead of filling with all fresh water I use half old slurry half water. Good Approach? I was worried it might not create as much action between rocks in earlier stages. mentioned eliminating causes of error. Maybe simplifying and just using fresh slurry each time until you've got the results you desire? Then you can try this out. I've never done this only b/c I didn't think of it, LOL! Might be a good idea but until you get your process down, maybe skip this. Just a thought. Each of us has a slightly different recipe that we follow, usually after a great deal of trial and error.  |
|
Benathema
has rocks in the head
God chased me down and made sure I knew He was real June 20, 2022. I've been on a Divine Mission.
Member since November 2019
Posts: 703
|
Post by Benathema on May 7, 2021 12:37:37 GMT -5
I'd hold off on reusing your jars of slurry if you're having trouble. Specifically, hold off on reusing polish.
Slurry thickeners from my side of things are kaolin clay kitty litter for stage 1... Maybe stage 2 if I'm feeling froggy. Then sugar in stages 3&4.
Everything gets washed into the same 5 gal buckets, so I can't reuse it for tumbling... Period. The sugar feeds lil monsters and it gets disgusting, evolves CO2, yucky.
|
|


