ziggy
spending too much on rocks

Member since June 2016
Posts: 483 
|
Post by ziggy on Jan 16, 2017 15:10:17 GMT -5
The build progresses today. Hubby started by measuring and scribing lines with a carbide tipped scribe. Here he scribes a cut line and the saw blade width kerf line. He really started out first by squaring up his saw clamp to saw blade. The piece he is working on will be the three sided frame that the pan sits in.  Into the chop saw it goes for the first of four cuts.  The big piece was too long so it needed cut twice accounting for the 4 cuts I mentioned. 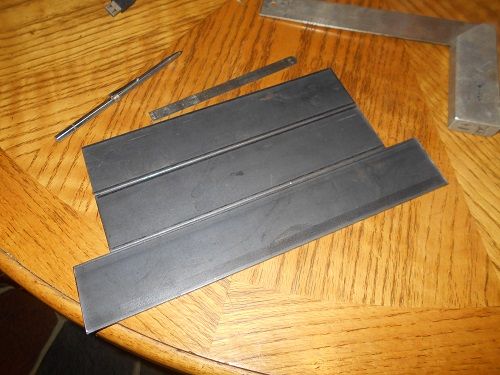 Next he cuts a 4 inch piece of angle steel x 2. He increased the length of the feet because he is thinking about using 2 stainless steel C-clamps to hold the depth stop strip in place. With space under the pan he can now just C-clamp the depth stop strip right to the bottom of the pan.  The saw is cutting well today. 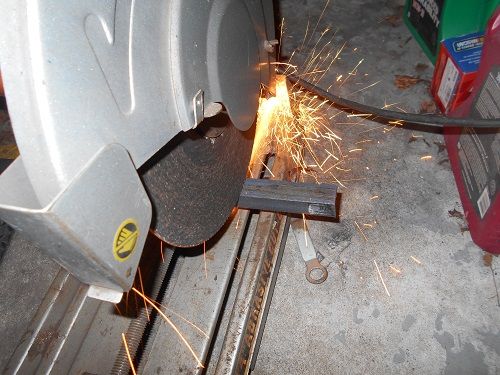 After measuring and scribing guidelines for hole location Hubby center punches where the drill needs to go. 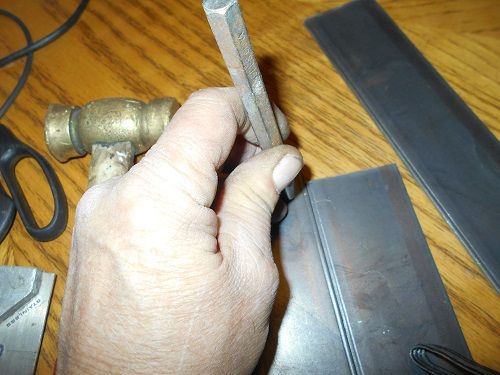 The punch marks.  Out in the pole barn we have a nice drill press to get good easy holes. The plate gets a clearance hole for a 10-32 socket head cap screw.  The angle pieces get four holes each too but the are drilled for a 10-32 tap. 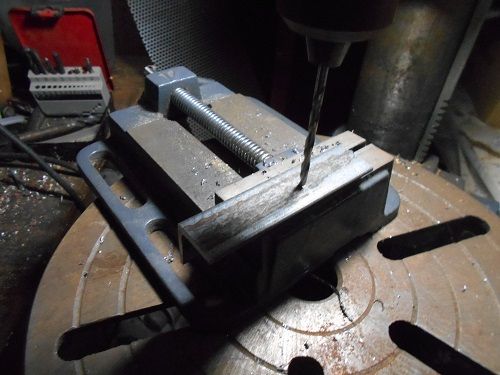 Tapping the 10-32 holes by hand. We discovered that dawn dish soap works even better than expensive tap oil. Don't believe me? Try it. Hubby freaked out and said it works better than tap magic. Just put a dab on the tip of the tap and you get a good, CLEAN hole. Pun intended.  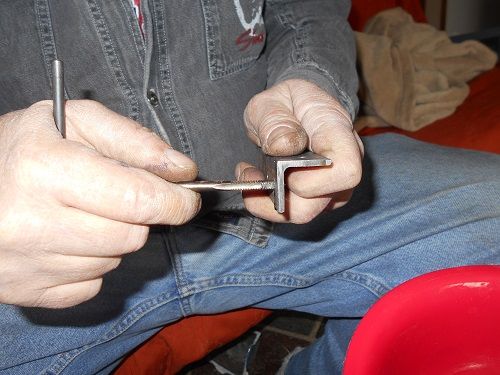 The two rear legs hold the frame together. 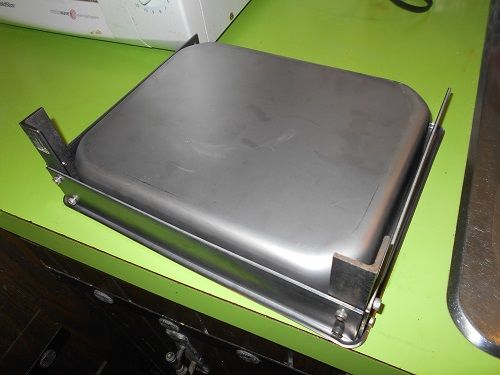 Here, the pan sits on three legs of the frame. So far, so good. All three legs are sitting squarely on the counter top.  What the front "pan stop" legs look like. EDIT: Should read "looked like". This feature has been eliminated from the final product 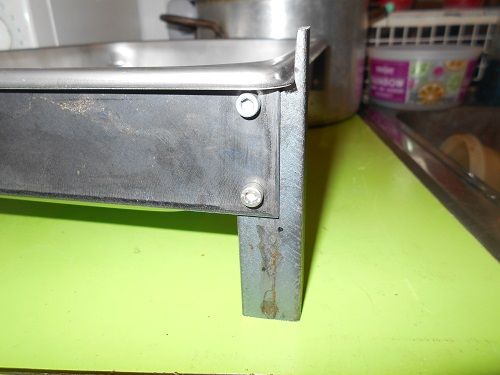 Hubby will be finishing the other front leg tomorrow then it will be time to fab the motor risers. We are going to order the motor in about two weeks. Then the diamond bit around the first of march. After we get the motor he is going to use a piece of thick sheet steel bent into a pivoting motor mount that will mount on the motor risers. Rather than making the pan look sloppy by cutting out spaces in it for the motor risers, he has decided to use a steel plate of the proper thickness as a spacer between the frame back piece and the motor risers. I gotta say, this thing is coming out pretty sweet so far. The only mistake was a broken tap which was popped right out with no problem by hitting it on the point with a steel hammer.. |
|
ziggy
spending too much on rocks
Member since June 2016
Posts: 483
|
Post by ziggy on Jan 15, 2017 21:02:37 GMT -5
I would by-pass the switch and put an in line switch in the cord wigglinrocks' idea of dropping the bad switch would work. Not a bad idea if you can't get the right rocker to fit. Plan B. As long as you know what wires will make the circuit live when joined you could tape them up and drop that switch altogether. The indicator light wire can be taped off and left unused. |
|
ziggy
spending too much on rocks
Member since June 2016
Posts: 483
|
Post by ziggy on Jan 15, 2017 20:53:21 GMT -5
I resisted and there are lots of RTHers in Ohio. I wonder if it's uptodate, if they are not members are they still marked on the map? Ohio should have a pppaaarrrrtttyyyyy. I'm in. Looks like you entered yourself onto the old map spiceman . Can't find you on this one. Actually, I can't find you on either one. www.zeemaps.com/map?group=2363314&add=1# |
|
ziggy
spending too much on rocks
Member since June 2016
Posts: 483
|
Post by ziggy on Jan 15, 2017 20:41:44 GMT -5
Found a different picture and it looks like it is a square style Push on/push off with a light or a lighted rocker under a clear cover. Looks like two phillips head screws hold it in. Make sure it's unplugged and take the switch out to see if there is something obviously wrong with it.
|
|
ziggy
spending too much on rocks
Member since June 2016
Posts: 483
|
Post by ziggy on Jan 15, 2017 20:34:50 GMT -5
Yes, it was ziggy who nailed it. I'd almost rather eat a bug than fix it!  Should add that it is Plasplug from England. Can't find any US outlets. I was looking at the switch they used but the picture was not the best quality. Is it a split switch? With a separate button for on and off? Is it a single push to start/push to stop single button switch? Or, is it a rocker on/off switch? I see it has an indicator light built in. All three can be replaced with american stuff if the switch and switch mount isn't too proprietary and custom made. |
|
ziggy
spending too much on rocks
Member since June 2016
Posts: 483
|
Post by ziggy on Jan 15, 2017 20:25:11 GMT -5
Best wishes in retirement! ziggy Yep, thanks. No more getting up everyday before the sun. Sleeping in when you want. Actually having the time to really watch a sunset together. Going fishing and rockhounding when the whim hits. That's what he worked all those years for. But he still likes to tinker and build things. |
|
ziggy
spending too much on rocks
Member since June 2016
Posts: 483
|
Post by ziggy on Jan 15, 2017 20:17:12 GMT -5
I just love enterprise and encouraging new entrepreneurs. It's the sales manager in me! uL stuff is easily avoided. The trick is to sell the unit without power cord attached. The customer finished assembly. Plus UL isn't required. And the workaround for SsDI is he doesn't make any money personally. SSDI can't stop you from sharing.  ziggy ziggy Points well made and considered. But there is this one part "We just don't have the energy (not to mention money) that it would all take. Hubby is literally living on borrowed time and was looking forward to relaxing in his retirement (read as "picking up rocks") and not trying to start up a new product. I made a mistake when I mentioned we might try and market it. I didn't tell him first." He's right. He worked all his life and needs a break. |
|
ziggy
spending too much on rocks
Member since June 2016
Posts: 483
|
Post by ziggy on Jan 15, 2017 20:12:46 GMT -5
Just checked to a few things. Turned on well, removed thumb, and it quit. Off button would not move. Hit on again and it turned on. Removed thumb and it stopped. Sounds like a switch issue. Blade kept spinning. No brake. Yep. By golly I think you've got it. Easy fix. Switches fail often. Can be little buggers to figure out. |
|
ziggy
spending too much on rocks
Member since June 2016
Posts: 483
|
Post by ziggy on Jan 15, 2017 20:00:23 GMT -5
ziggy I'll check out your questions. First time it turned off, I checked to see if it were still plugged in. Yes. Turned it back on. Stopped. Repeat. The on intervals got smaller faster. More off than on time. That's when I quit. Motor is entirely enclosed. I did not think to feel the plastic on the bottom. Ewwww. That doesn't sound real good. Does it free spin to a stop? Or does it stop like the brakes were put on? Free spin would be good. Some motors have built in brakes but not usually 1/2 HP ones (some circular saws and radial arm saws are the exception to that.) If it stops like the brakes were applied but it is not a braked motor, it is probably a bad ball bearing or more likely, sleeve bearing. The shorter and shorter run time thing sounds like bearing issues. Also I am guessing by looking at the design of that unit that it is a direct drive from motor to saw blade with no belts or pulleys. If I am wrong on that, it would be another thing to look at. I can't see how they could fit in stuff like that in that saw though. |
|
ziggy
spending too much on rocks
Member since June 2016
Posts: 483
|
Post by ziggy on Jan 15, 2017 19:38:18 GMT -5
My old faithful 4" tile saw suddenly developed a problem; it turns off by itself. Over and over. Is this fixable? Is it dying? Is it dead? Thanks. Does it do it at regular intervals or just stop unpredictably? If at regular intervals and you need to let it cool down before it restarts I would ditto what shotgunner said. If it does it just whenever it could be a loose wire or bad connection in the circuit. Does it come back on by itself too? If it comes back on by itself after a short cool off it is almost certainly thermal stoppage. Why would that shutting off condition develop suddenly? Normally it wouldn't and I would think the thermal overload circuit is messed up if the motor isn't hot to the touch. Knowing exactly the way it acts when shutting down and how you get it to come back on matters as it could be something as simple as a worn on off switch. |
|
ziggy
spending too much on rocks
Member since June 2016
Posts: 483
|
Post by ziggy on Jan 15, 2017 19:19:05 GMT -5
ziggy I think the small market size is good for u guys. Sometimes too many orders buries a business. Plus, its a foot in the door to building a reputation in equipment. Lastly, I bet you could sell 100++ a year by doing shows and pnline advertisements. Etsy included. Many groove wrappers there could use this tool. Encouraging words for sure but, 1. We are old. Both sick a lot. Both of us have COPD and hubby has stage 3 kidney failure (along with a slew of other health issues.) 2. He is getting SSDI until may when he goes on regular S.S. They have rules when on SSDI about working he would be breaking by opening a business. We need that money and can't afford to have it taken away. 3. Neither of us wants the hassles of laws that must be followed, safety certification of the device (ie. UL listing) all the work involved in trying to advertise and market a new product, all the travelling to shows with all the associated expenses of that travel, the returns and possible lawsuits involved. We definitely don't need to be involved with any more lawyers. We just don't have the energy (not to mention money) that it would all take. Hubby is literally living on borrowed time and was looking forward to relaxing in his retirement (read as "picking up rocks") and not trying to start up a new product. I made a mistake when I mentioned we might try and market it. I didn't tell him first. But I appreciate the thoughts you have....even though we are glued in place on this. |
|
ziggy
spending too much on rocks
Member since June 2016
Posts: 483
|
Post by ziggy on Jan 15, 2017 18:09:57 GMT -5
flic.kr/p/PYBFDbHoping this posts. Here's a tumble I wrapped in silver. Thanks for looking! Wow. No really. Wow. Nice job. |
|
ziggy
spending too much on rocks
Member since June 2016
Posts: 483
|
Post by ziggy on Jan 15, 2017 14:58:40 GMT -5
The build moves forward with some design mods. Hubby is going with a stamped stainless steel pan instead of the powder coated plain steel. Doing it this way saves the pan part fabbing, welding and powder coating cost and effort. The frame that will be holding the pan and the motor is going to be fashioned from the two pieces of steel in the photo below shown with the pan. Hubby decided to not weld the frame assembly also which will instead be bolted together using cap screw bolts. The wide piece of steel will form the sides of the frame. These sides will be bolted together using 2 1/2" pieces of the angle steel as combination corner posts and feet with an additional foot at each front corner of the pan as well. The motor will bolt to a steel motor plate (not yet pictured) that will hinge at the two angle steel pieces that will be bolted on the frame for this purpose in the middle of the pan on one side. The bottom of the hinged steel motor plate will also bolt to the angle steel to keep the motor rigidly in position when being used, but by removing the bottom bolts the motor can be swung up for bit maintenance/changes. It's all kind of hard to comprehend in pieces but things should work out as planned when everything is fitted up. 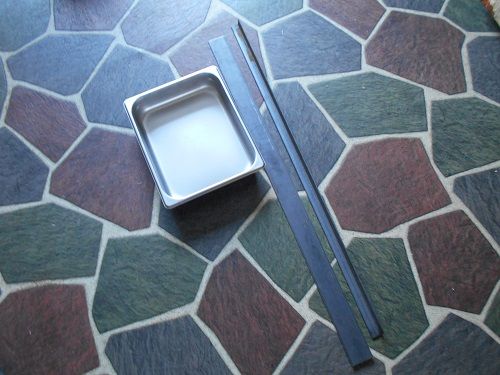 Below are some drawings illustrating how the frame assembly will look finished. 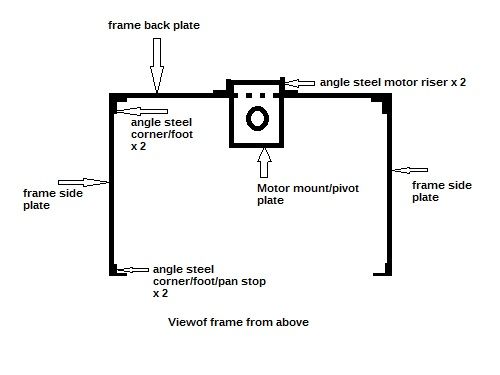 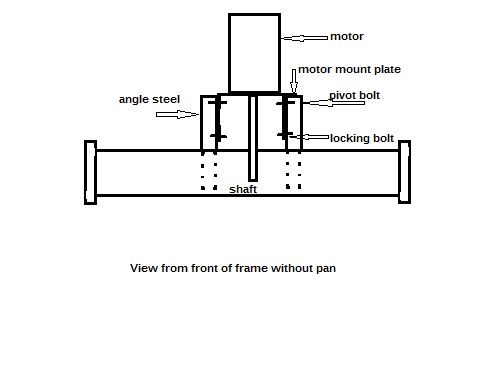 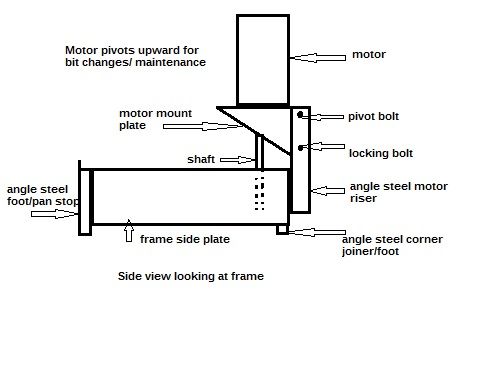 The pan will need to be notched on the rim/pan lip in two places where the motor risers will interfere with the pan lip. Since hubby is all about re-purposing things, he is using a steam table pan. Assembly and fab info coming soon. Total cost of purchased parts so far $31.00. Cost of motor shipping included $59.90. Cost of diamond bit $28.90 Bolts, motor plate steel, tools, labor.....got all that so it won't add to the bill (but if you decide to build one it will add to the cost for you.) Total cost of build for hubby $119.80. Spread out over three months. We could have bought a used one (wizard) on ebay for right around the same price (minus the diamond bit which we would still have to buy, most of them come with a glass grinding bit) but ours will be brand new, purpose built, with features like an adjustable depth stop and water covered bit. It should last the rest of our lives then our daughter gets it. We have decided not to try and market this after all after considering that very few people even know what it's for and the overall market is not large. Feel free to use our designs if you decide you want to build one. Coming next.....Fabbing the frame. |
|
ziggy
spending too much on rocks
Member since June 2016
Posts: 483
|
Post by ziggy on Jan 15, 2017 9:12:34 GMT -5
A bit more time for a proper reply to ziggy. The recipe in that video using plaster and sand for the refractory cement is just stupid. Probably useless after using it once. The same goes for most of the homebrew refractory mixes. At high temperatures things like cement and plaster act as fluxes and help the melting of the rest of the ingredients in your refractory. Aluminium, Lead, Pewter can use some of the better homebrew refractories without failing, for a while. Its much better to spend the money and buy a few bags of commercial pourable refractory, you will save money in the long run. For copper you must have high temp refractory, a graphite or silicon carbide crucible and a way of getting things really hot. Copper will also require a charcoal blanket over the melt to stop everything oxidising. I did say its tricky. Casting metal is a whole nuther hobby but its potential is really up to your imagination, I have cast backing plates, laps, bearing housings, a part for my faceting amchine, lots more. In aluminium as its relatively easy, I did try copper but struggled to get it melted hot enough to pour, just enough to puddle in a semi melted sludge in the bottom of a expensive crucible and then go solid, of course when you try to heat it up again the metal expands and shatters the crucible. Grr. I will address your comments in order. Yes, I already understand that sand and p.o.p. are not suitable and IF YOU WOULD HAVE READ MORE CLOSELY WHAT I HAD TO SAY you would have seen that I MENTIONED THAT CAST ABLE REFRACTORY CEMENT WOULD MAKE A MUCH BETTER SUBSTITUTE. Seems to me that is the EXACT SAME THING YOU SAY will work better. In the first video he is just using charcoal and forced air to operate his forge. Obviously this is not the way to go when trying to melt copper so if you would have watched the second video you would have seen that there is an alternative to that that is entirely capable of doing it. I wrote that stuff late at night right before going to bed. I was going to, first thing in the morning, make another entry here suggesting that instead of that stupid fire extinguisher crucible he purchase something more like  Copper melts at 1, 984 degrees. These temps are easily obtainable using mapp gas (flame temperature of 2925 °C (5300 °F) in oxygen, combustion temperature of 2,020 °C (3,670 °F) in air.) and the propane burner setup. (Also as previously mentioned.) Mapp gas is so hot that it can be used for fusion welding on steel but not on anything too big. The home made burner can be made into a non oxidizing flame. The adjustable air inlet feature allows fine tuning of the flame and can perform as well as the "oil spray" type. It too is fed into the forge through the side and doesn't require any extra "hair dryer" or "vacuum cleaner" to get the correct air/fuel mixture. Being completely familiar with combustion I can see advantages of the simple to build propane/mapp setup over the complicated oil burning setup. There is always more than one way to skin a cat they say. The "old fashioned way" is not always the only way. Hubby told me to inform you that the problems you have with copper hardening quickly and breaking the crucibles is due to not melting enough copper to stay molten long enough to pour. With copper, more stock in the crucible and more time in the heat is all that is required after melting to obtain a successful pour. He also mentioned that your inability to get enough heat points to bad burner (read as air/fuel) adjustment. If you pull your crucible and it isn't glowing as bright as the molten copper, then it's not hot enough. Following is an example of someones backyard forge (powered by propane even) doing what you say can't be done. Hubby is no spring chicken and he for sure isn't stupid. He used to re-line a refractory furnace that was used to temper spring steel. He knows a lot about this stuff. He is almost 62 years old and has done more things in his life than anyone I've ever met. He is what I would call a mechanical genius. He spent his whole adult life professionally building huge machines and doing mechanical design. Has a college degree in computer network engineering (Cisco Certificate, not easy to obtain) that he never even needed to use. I originally posted to try and help the person who asked about making a forge. That simple design looked like a good start for him. Hubby plans on using just the burner design from the second video and has his own design for the actual forge itself. I think he won't have too many problems that he can't overcome. |
|
ziggy
spending too much on rocks
Member since June 2016
Posts: 483
|
Post by ziggy on Jan 14, 2017 23:07:37 GMT -5
I am looking to make my own setup to melt metal and cast objects. I have a natural gas outlet available in the backyard and that seems like the convenient way to go. however I am not to certain on the burner assembly, couplings etc. would the membership have any guidance for me? I think what you are looking for is something like what is shown in the following TWO videos. The first video shows how to make the foundry (rock bottom cost uses sand and plaster of paris, (I would go with cast able refractory cement) and the second one shows how to run it on propane including building the burner from scratch. Ditto on what shotgunner said about the natural gas. Go with propane, or if you can afford a little extra cost, MAPP gas burns hotter than propane and might be hot enough to melt steel in this setup. Hubby is planning on making this setup to melt his scrap copper and recycle it into jewelry. 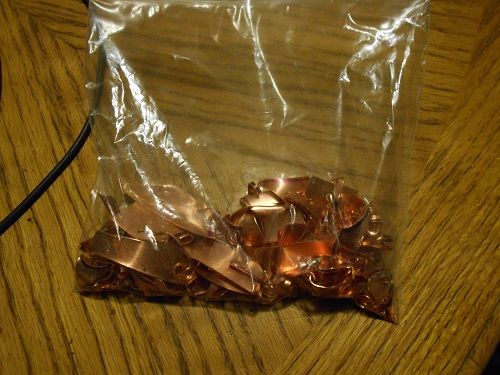 |
|
ziggy
spending too much on rocks
Member since June 2016
Posts: 483
|
Post by ziggy on Jan 14, 2017 21:56:02 GMT -5
Zebra jasper! Yahoo. Thanks. I agree that the bottom of the canyon is the way to see Bryce. And probably the top is the way to see Zion. We did a little descending and ascending at each park, but the altitude, our 60-ishness, and only a day at each park limited us a bit. Hubby had visions of Angel's landing at Zion but that went by the wayside once we saw the vastness of the park, and what that climb would entail. I did go part way down into Bryce, and it was magical. Looking up at the Hoodoo's was enchanting. Our next trip will be longer to allow us more time to take the whole hike at a pace that won't kill us. It's not the going down, it's the coming back up that is tough. We have to schedule a redo of Grand Canyon as well, since the day we allotted to go to the north rim was a total washout, with dense fog to top it off. But we are quite sure that there really was a big canyon out there somewhere.... My gosh. I hear you on the 60-ishness. Hubby and I still plan on making one more good trip out west if we both live long enough to do it. There is no way though that either of us will ever get to hike any distance down into anything. We both have COPD. Poor hubby has 3 stents and a whole body full of blocked arteries and failing kidneys. We both consider ourselves lucky to have been to those places at least once before we die. |
|
ziggy
spending too much on rocks
Member since June 2016
Posts: 483
|
Post by ziggy on Jan 14, 2017 21:40:26 GMT -5
That is sooooo cute!!!! Great job. And the perfect cab. What did you end up doing about a bail? The last picture has the bail I used. Its simple. Not too froo froo for a young boy. This is a pretty old post. I'm happy to report that he still wears it. When he comes over with it on, I give it a good cleaning and polishing. Still looks pretty nice for raw copper. I think I brought this thread back from the resting after you gave me that link. I had to say something about the Petoskey Stone turtle. I'm from Michigan after all. Well, now a few newcomers besides me who missed the thread the first time around have seen it too.  |
|
ziggy
spending too much on rocks
Member since June 2016
Posts: 483
|
Post by ziggy on Jan 14, 2017 21:19:29 GMT -5
Nice job. I am lazy, I cut everything a little big with shears and use a flex shaft to clean it up. Also when you flatten the metal it will work harden. It will need to be annealed before bending the tabs. Vic I rarely anneal unless I absolutely have to. I have successfully managed to do tab pieces, after hammering, without annealing. It is better to anneal, but not only am I lazy and in a hurry, but I worry about the tabs not being hard enough after annealing. Yeah, I worry about the tabs even when they're not annealed The copper I use is pretty thin and bends fairly easy but is still pretty strong so I probably won't be doing a lot of annealing on it. |
|
ziggy
spending too much on rocks
Member since June 2016
Posts: 483
|
Post by ziggy on Jan 14, 2017 21:15:31 GMT -5
Since you are open to suggestions and want to continue with metal working, may I suggest that you get some files- a large #2 and some needle files? Also, and this is just kinda a thing with me, I love to see finished edges with a burnished shine. A steel burnisher really puts a nice shine on things and can cut down on some of the finishing work on the edges. These things are cheap, but you will wonder how you ever did without them. Advice digested and absorbed. Sounds like a plan I can follow. |
|
ziggy
spending too much on rocks
Member since June 2016
Posts: 483
|
Post by ziggy on Jan 14, 2017 20:51:14 GMT -5
That is very interesting material, and I find it challenging to cab stuff that soft, but you have cabbed it masterfully. Peace, Rich Thank you for the complement. The heart was pretty easy since it is mostly flat. Only the edges are really rounded any. After I got the roughing scratches out it polished right up. I love working with these soft Michigan stones. Most of the time we go right from 600 grit diamond wheel right to the buffer with white compound and they get mirror shiny. Some of the stones have this light grey mud that won't polish like the darker mud does. It seems to get a velvety finish which works OK right next to the shiny stuff most of the time. It actually seems to add a 3D feeling to it. Some of the Lightning Stone cabs my hubby does put mine to shame. He is really good at the high cabs and unusual shapes. The one at lower right actually has metallic flecks in it some of which can be seen as tiny little bright spots if you look really closely at it. So many subtle shades of brown, orange, white and pink. Each rock is different but the same. all of the cabs are backed with copper for strength. 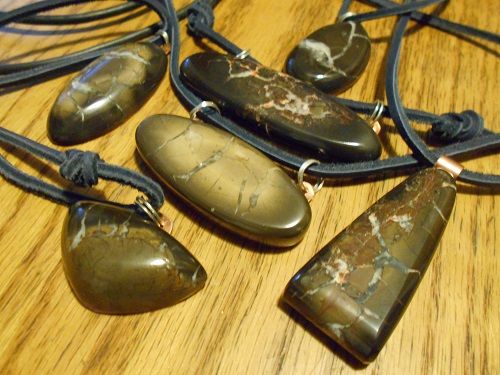 When you pick up these rocks lots of times they look like turds with white veins. Who would ever guess a turd would polish up so nicely? |
|


 A Raccoon on hot pavement