QuailRiver
fully equipped rock polisher

Member since May 2008
Posts: 1,623
|
Post by QuailRiver on Jul 13, 2023 23:46:24 GMT -5
Maybe Medicine Bow Agate? If so not necessarily slabbed in the direction to best exhibit the full plume profiles. Still makes an interesting cab though.
And kudos for your band saw conversion! We would love to see separate thread for that!
|
|
QuailRiver
fully equipped rock polisher
Member since May 2008
Posts: 1,623
|
Post by QuailRiver on Jul 12, 2023 1:07:51 GMT -5
Yes you are right about that motor is sounding pretty rough with the belt off in your video. I'm surprised at how rough it does sound. As Rockoonz advised, if there are oil holes for the bearings then lube them and see if that helps. If there are not and the motor has ball bearings then the bearings are probably shot. If you do decide to go with a new motor a 1/3hp will be plenty powerful for a D-14 poly Arbor. I'm not sure how much difference in noise a resilient mounted motor will have. Any motor similar to the one linked below should fit the bill. www.zoro.com/dayton-split-phase-belt-drive-motor-13-hp-56z-frame-115v-ac-voltage-1-725-nameplate-rpm-6k030/i/G1381256/#specificationsGood luck! |
|
QuailRiver
fully equipped rock polisher
Member since May 2008
Posts: 1,623
|
Post by QuailRiver on Jul 10, 2023 22:54:17 GMT -5
As far as rock grinding noise goes I once bought a used faceting machine at an estate sale where the previous owner had set up acoustical screens around their faceting station to dampen the noise so not to bother others in the house. Commercially made acoustical screens can be kind of pricey unless you can find some used ones at an office going out of business sale or from a business liquidating company. But there are several on-line sources that show how to make inexpensive DIY acoustic panels.
|
|
QuailRiver
fully equipped rock polisher
Member since May 2008
Posts: 1,623
|
Post by QuailRiver on Jul 10, 2023 22:16:11 GMT -5
When the belt is not connected to the arbor and you turn the motor on does it sound similarly bad? Bearings in motors can get worn too and need replacing and motor arbors can get bent but the later is not common.
That noted, the noise in your video is not normal for a D-14 Poly Arbor. Those arbors generally run pretty smooth. It may be that the bearings have gone bad and need replacing. Before buying a new motor or new bearings I would first make sure that the pulley on the motor and the pulley on the arbor are not visibly misshapen. Soft alloy pulleys can become misshapen from metal fatigue or from someone having removed or reinstalled the belt over the pulley without releasing/easing the tension. Then I would make sure that the two pulleys are perfectly aligned with each other and that the setscrews are firmly tightened. This may even require shifting the motor if whoever originally mounted it didn't get the motor shaft perfectly perpendicular to the belt/pulley alignment. But likely would just require loosening the pulley set screws and sliding them a little on their shafts to align them using a straight edge. Most of that type Poly Arbor came with either a two, or a three step pulley so just make sure that the motor pulley is aligned with the section of the step pulley for your desired speed. If the pulleys are not properly aligned this can cause really bad vibrations and noise (especially bad if the motor is not perpendicular as mentioned).
I can't tell for sure from the video but it appears that you are using SC grinding wheels. If so, these types of wheels can fairly easily get out of round and out of balance. And this can cause vibration. So try taking the wheels off and start the machine and see if you still have the noise.
If none of these are the issue then next I would change the bearings on both ends of the arbor. Bearings for these are not very expensive but sometimes can be a little tricky to change on a Poly Arbor without a bearing press. So if you don't have access to a press or aren't comfortable doing the job yourself then you may want to take it to a machine shop or motor repair shop and have them change the bearings. It only takes a few minutes to do with the right equipment and know-how so should not be too costly to have done.
If the problem persists then, and only then would I look for a new motor. Worst case scenario if it comes to that after having done all of the above you should then have one sweet running cabbing arbor for a long time to come.
|
|
QuailRiver
fully equipped rock polisher
Member since May 2008
Posts: 1,623
|
Post by QuailRiver on Jul 8, 2023 19:06:34 GMT -5
Very nice old E-50! Your set-up is similar to mine except much better looking! My first vertical wheeled cabbing machine was a 6" Lortone unit that I cabbed with from 1977 up until almost twenty years ago. In the early 90s I also acquired a Poly Arbor similar to yours but with 8" x 3" expando sanding drums. Somewhere around 2005 I picked up the modified HP E-50 unit pictured below at an estate sale and found that for me the 8" wheels way outlasted 6" wheels, more so than just proportionate to the size difference. So that E-50 has been my primary grinding machine ever since. I especially like using the tool rest for pre-forming. It really helps minimize the finger, hand and wrist fatigue and damage. The tool rest on the HP E-50 is much more useful with the hard wheels so at some point you may want to reconfigure your wheel line-up. When I first switched over to NOVA sanding wheels I originally did mount one NOVA (the 280gt) in the section of arbor (between the two pillow block bearings) with my hard wheels. But the soft NOVA wheels wear out much faster than hard grinding wheels so I found that to be a mistake since on the E-50 you have to basically disassemble most of the unit to change the wheels mounted between the pillow block bearings. So I changed my line-up to only have hard wheels on the section of arbor between the pillow blocks and only use the NOVA wheels on the end section of arbor where they can be replaced by only having to remove one nut and one washer. And since there was only room for two NOVA wheels on that end section of the arbor I mounted my 280 and 600 grit NOVAs there, and mounted the 1200 and 3000 grit NOVAs on the Poly Arbor unit next to the HP unit. IMHO Life is too short to spend anymore time than absolutely necessary disassembling and reassembling lapidary equipment! 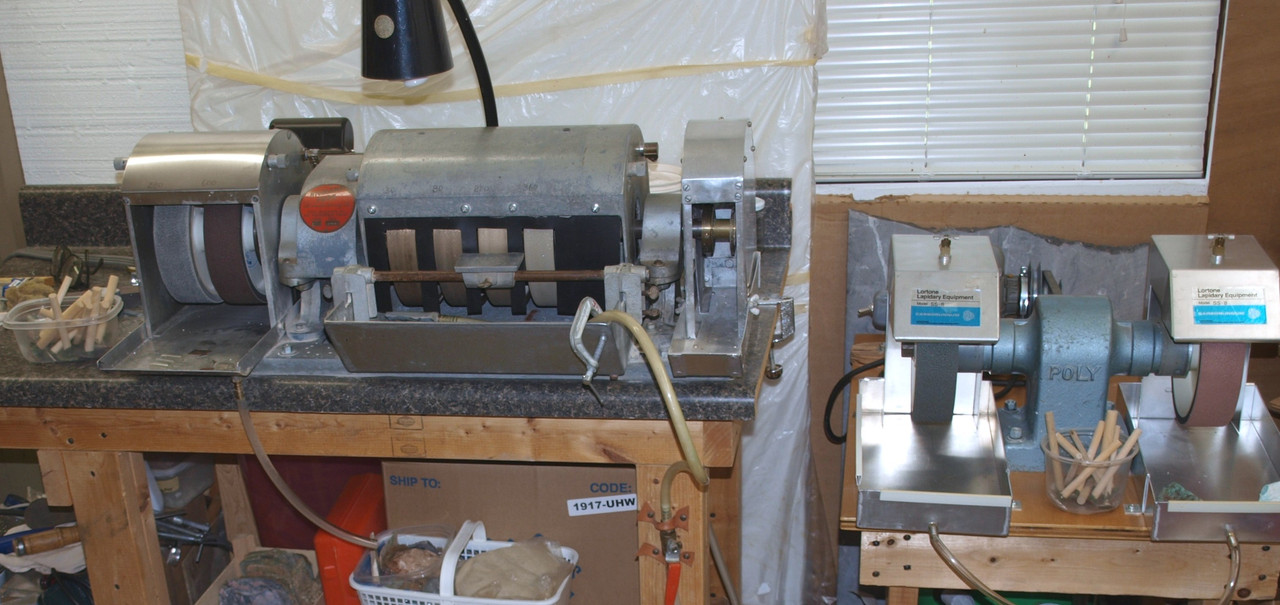 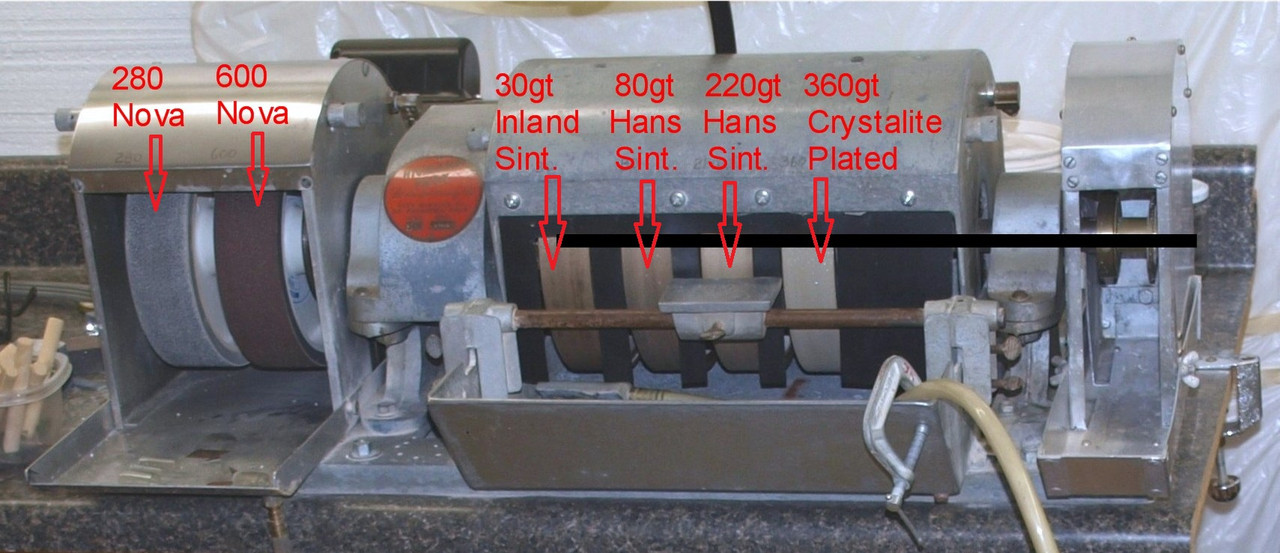 |
|
QuailRiver
fully equipped rock polisher
Member since May 2008
Posts: 1,623
|
Post by QuailRiver on Jul 6, 2023 17:33:30 GMT -5
I don't use the PSA pads for lapidary but I did use the PSA sanding discs for a while when I was a furniture repairman many years ago. And switched to the hook & lock backing pads for the very reasons you're mentioning. The PSA ones could be a @#$%^$ to remove from the rubber backing. Most backing adhesives I've seen do soften with heat so a hair dryer can loosen the adhesive grip a little but still may require some scrapping off while warm.
For lapidary resin discs I always bought the pads without the factory applied PSA adhesive and instead used "Lapidary Disc Cement" made by Leech. Once applied to the backing of a resin disc the disc can be peeled off and reattached several times without reapplication as long as it is kept clean. But I don't think Leech is still in business anymore but I have heard that 3M "Feathering Disc Adhesive" is similar and works for lapidary discs.
|
|
QuailRiver
fully equipped rock polisher
Member since May 2008
Posts: 1,623
|
Post by QuailRiver on May 26, 2023 17:44:57 GMT -5
Here is a link to a good set of standardized cabochon templates. These same style templates have been in production for over 50 years. The ovals and rectangles are the most common standardized sizes for those shapes and are the easiest to find commercial made settings for: www.rockshed.com/rock-shop/lapidary-equipment/other-useful-stuff/set-of-5-colored-templates/And as you mentioned the rounds are easy. As for most other shapes and sizes, if you want to set them, you're either going to have to learn to wrap and/or make settings. Or find someone else who can and is willing to do it for you. Howbeit, a Riker Mount case full of beautiful unset cabochons can stand alone on display most anywhere! |
|
QuailRiver
fully equipped rock polisher
Member since May 2008
Posts: 1,623
|
Post by QuailRiver on May 11, 2023 20:33:32 GMT -5
It's my understanding that on those types of water pump bearings that they cut the threads into the shaft before they treat the steel to harden it and before they assemble it. I was once (just once) able to get a local machine shop to agree to cut threads into a generic already assembled water pump bearing shaft. Afterwards the shop owner said that he wished he hadn't agreed to do it. The hardened steel bearing shaft ruined three of his cutting bits.
|
|
QuailRiver
fully equipped rock polisher
Member since May 2008
Posts: 1,623
|
Post by QuailRiver on Apr 25, 2023 0:39:04 GMT -5
For about 25-30 years I used canvas resin belts that I charged with diamond paste. Then for a few years I used 3M belts and for a while was happy with those. But about 15 years ago their quality went to crap. I was lucky to get two large agate cabs sanded before they wore smooth. So I switched to Diamond Pacific's NOVA wheels and have never looked back.
Since it's been 15 years it's possible that 3M may have recovered their quality somewhat out of necessity. I used to be a furniture repairman and had a contractor's account with our local 3M distributor so could get them at a good price. But there is no way I would pay current retail prices for 3M diamond belts based on my past experiences with them.
If using expandable sanding drums again I would try Eastwind or Crystalite. As for your Crystalite belt that came apart at the seam, back in the day that seemed to only happen to old stock belts (of all brands) where the adhesive had deteriorated with age. And learning to do all of your shaping on your hard wheels will work out better for you than using your 220 and 400 grit belts for shaping.
|
|
QuailRiver
fully equipped rock polisher
Member since May 2008
Posts: 1,623
|
Post by QuailRiver on Apr 22, 2023 14:02:13 GMT -5
I know it's years later, but I am also building a saw, I am looking for OD 4" flanges. I could accommodate 5/8-1" bores using bushings. Thanks so much, totally understand if you don't have them anymore lol Unfortunately Don (Jakesrocks) passed away a few years ago. |
|
QuailRiver
fully equipped rock polisher
Member since May 2008
Posts: 1,623
|
Post by QuailRiver on Apr 2, 2023 16:00:03 GMT -5
NAPTHA will usually remove the sticky residue left behind from stickers. I used to be a furniture repairman and had to deal with this frequently with showroom furniture where they would use adhesive backed paper price tags instead of tie-on price tags. NAPTHA, which is the same chemical sold as cigarette lighter fluid (not the same as charcoal lighter fluid) is also sold in quart and gallon cans at hardware stores. NAPTHA would remove most sticker residues off of furniture without damaging the finish on nitro-celulose lacquer finished pieces.
|
|
QuailRiver
fully equipped rock polisher
Member since May 2008
Posts: 1,623
|
Post by QuailRiver on Apr 1, 2023 20:15:39 GMT -5
Hi, all. I am reassembling my old HP 6” combo unit after much yanking and cleaning, and have had the 1.25” spacer portion that was between the 2 wheels turned down to the same 1” as the rest of the arbor. The plan is to mount 1 or 2 more diamond wheels for a total of 3 or 4 to use before getting to the expando drum at the end. The question is—how close can the wheels be to each other before grit cross contamination is an issue, if it would be at all. I can get three 1.5” wheels on with 3/4” between or four 1” wheels or some combination. Thanks in advance for your input, Biggs (Larry) 3/4" spacing between the 6" wheels will be fine unless you plan on cabbing extra large monster sized cabs in which case you'll probably need a little more room. The DP Genie (older model) I have has 11/16" spacing between wheels. On the older model HP 8" unit I reconfigured I have approximately 1" spacing for grinding larger cabs of things like picture jasper. |
|
QuailRiver
fully equipped rock polisher
Member since May 2008
Posts: 1,623
|
Post by QuailRiver on Apr 1, 2023 20:08:45 GMT -5
I prefer lower domed lighter weight cabs so on average I slab mine at 5.5 to 6mm for producing medium to larger sized cabs. If a rock looks more suited to smaller cabs I may slice as thin as 4mm.
|
|
QuailRiver
fully equipped rock polisher
Member since May 2008
Posts: 1,623
|
Post by QuailRiver on Apr 1, 2023 19:49:04 GMT -5
I'm too impatient for all of that. I just squeegee off the oil from the slabs. Then wipe the slabs off with a paper towel and put them in a repurposed one gallon plastic ice cream tub with about 1/2" of lacquer thinner in the bottom. Let the slabs sit in the thinner until the next slabs are sawn. Then using neoprene coated gloves, remove the slabs from the thinner and wipe them down with a clean paper towel and wa-lah. The oil is gone. When the lacquer thinner gets so dirty it starts turning yellow I replace it.
(*Only use lacquer thinner in a well ventilated area away from sparks or flame and read the safety instructions on the label.)
|
|
QuailRiver
fully equipped rock polisher
Member since May 2008
Posts: 1,623
|
Post by QuailRiver on Mar 28, 2023 21:13:54 GMT -5
I'm old enough to remember when kit saws were still in vogue. A lot of folks who made the ones with plywood reservoirs lined them with fiberglass to prevent leaking.
|
|
QuailRiver
fully equipped rock polisher
Member since May 2008
Posts: 1,623
|
Post by QuailRiver on Mar 21, 2023 21:39:09 GMT -5
Does anyone else have a problem with buying things that ultimately they don’t really need? I can't answer that question right now...my wife is watching. |
|
QuailRiver
fully equipped rock polisher
Member since May 2008
Posts: 1,623
|
Post by QuailRiver on Mar 16, 2023 19:37:22 GMT -5
The Rock Rascal Model "T" is a good companion tool for tumbling. It has a 6" trim saw and room for one 6" diameter x 1.5" wide wheel on the side. So with a coarse wheel mounted on it you can trim saw and rough grind rocks to prepare for tumbling.
And if you would like to occasionally cut cabochons you can do that too simply by changing wheels. Years ago a rock shop in western NC used to sell a kit they put together that consisted of the Rock Rascal Model "T", a 100 grit SC Wheel, a 220 grit SC wheel, a 6" x 1.5" rubber Expando sanding drum, 400 and 600 grit SC belts to use with the Expando drum, and a 6" hard felt wheel for polishing. An inexpensive way to get into cabbing. Anyone could put together a similar accessory package to use with a model "T" or even better yet one with diamond wheels and belts or soft wheels. While it is a little more time consuming having to change wheels or belts between stages, some of this time loss can be offset by processing multiple cabochons at each grit stage.
The Rock Rascal models "T" and model "J" have been in production for over four decades. Some years back Johnson Brothers Lapidary bought the rights to produce and sell the Rock Rascal machines. They sell the model "T" on their site as the "6 inch combination saw - grinder" for $530 with motor and $332 without motor. The one with the motor already mounted has the motor mounted on a steel plate underneath the machine and is mounted very close to the machine. Which causes more vibration to be transferred to the machine. So IMO it's better to get the model "T" basic which comes without the motor, and then acquire and mount a motor yourself on a piece of plywood or fiberboard with a longer belt to keep the motor farther away from the machine so less vibration is transferred to the machine. The Rock Rascal machines use a common 1/3hp 1725rpm general purpose continuous duty motor which is one of the most common fractional motors available.
|
|
QuailRiver
fully equipped rock polisher
Member since May 2008
Posts: 1,623
|
Post by QuailRiver on Mar 9, 2023 1:56:36 GMT -5
|
|
QuailRiver
fully equipped rock polisher
Member since May 2008
Posts: 1,623
|
Post by QuailRiver on Mar 3, 2023 18:32:29 GMT -5
Thanks again QuailRiver. I just ordered the last available motor assembly from Rick. It wasn't cheap, but probably less than it should be. He said he's had the same price for the last 9 years or so. It's complete with the counterweight and everything so I just bolt it on and plug it in. It's more than I wanted to spend but I got the flat lap for practically nothing. I'm glad that Rick was able to help you with the new motor. Being able to get one that just bolts on will probably save you enough time and labor to offset the costs versus trying to attach an odd motor to the original mount. |
|
QuailRiver
fully equipped rock polisher
Member since May 2008
Posts: 1,623
|
Post by QuailRiver on Mar 3, 2023 14:56:45 GMT -5
|
|


 Al Falfa


