Tumbling in 6 inch Schedule 40 PVC Barrels
Dec 6, 2016 19:41:25 GMT -5
panamark, tims, and 4 more like this
Post by 1dave on Dec 6, 2016 19:41:25 GMT -5
Gleaned from his posts and Heavily Assisted by jamesp (The Simple Process Guy).

EDIT 2019 forum.rocktumblinghobby.com/post/1075689/thread
forum.rocktumblinghobby.com/post/1078064/thread
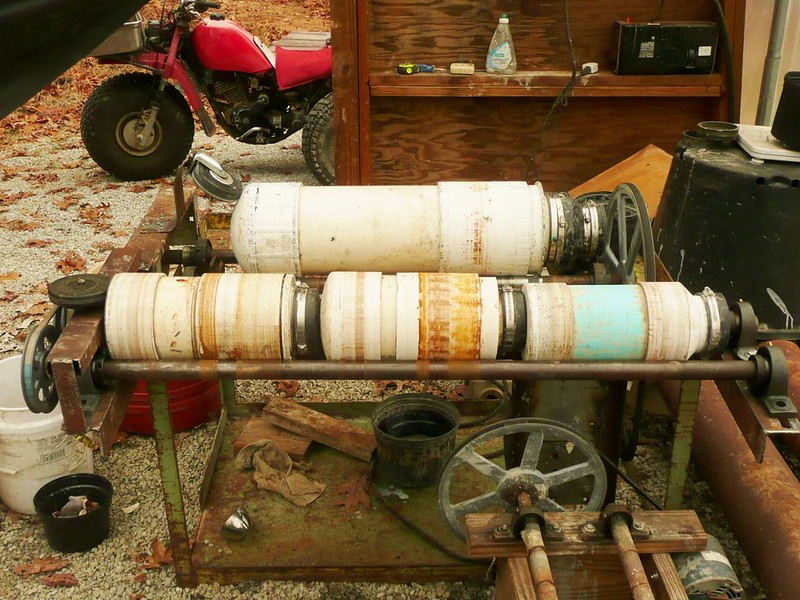
My Main Tumbler. Front rollers run at 30 RPM, the Back at 55 RPM.
"The 6 inch barrels represent 95% of my experience. They are User Friendly and Effective."
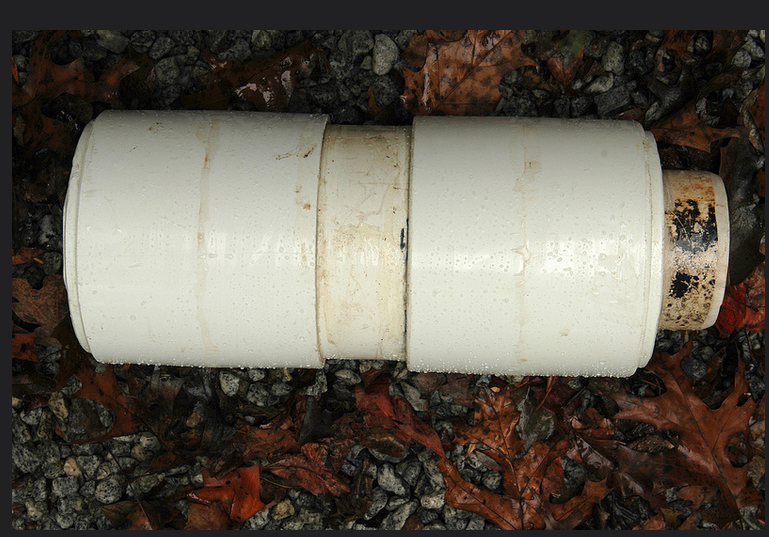
Back in October of 2012 James wrote that the PVC barrels he builds are "so easy to access and clean. Will never use another barrel. I threw away all my Lortone 6 and 12 barrels (before I found this forum.)"
I asked what was wrong with the Lortones?
"Lortone rubber barrel is awesome. It is the lid. Fast to open. But slow to close to seal.
You have to wash the seal and seal seat very well. The seat about requires a tooth brush. Then best to tap with a rubber mallet to seal.
Have you seen the design ? It is peculiar. And it is sensitive to pressure, will not hesitate to leak.
The Fernco caps are cat's meow. No comparison.
Wish some one would come up with a semi-hard solid rubber jar shaped just like the PVC that allows use of Fernco cap. Same rubber as Lortone."
A 6 inch diameter barrel 6 inches long will hold about 6 pounds of rock. It is in the "Goldilocks Zone" -
Big enough to do the job, yet small enough to be easily handled and not too costly.
Plus They are easy to build and comparatively inexpensive.
INSTRUCTIONS:
To build a 2-5 year lasting 6 inch Tumbler Barrel you will need:
1 - End Cap - reinforce the inside with Hard rubber, PVC or silicon calk to extend wear time
1 - Piece of 6 inch sch 40 PVC pipe as long as you want your barrel to be.
(I do bevel the inside of the pipe so small rocks will not jam on the inside at the joints and possibly trap grit.)
1 - 6 inch PVC Coupling - to attach reducing bushing. - grind out central ring to avoid trapped grit
1 - 4-6 inch reducing bushing fill gussets with silicon calk to extend wear
1 - Piece of 4 inch sch 40 PVC pipe about 5 inches long - for transition to 4" cap
1 - Fernco 4 inch rubber cap - Quick and easy clean outs
PVC cement
silicon caulk
Nut Driver

If you start with full lengths of pipe,
Approximate Cost for 12" = $44.31, 18" = $46.63, 24" = $48.95, 30" = $51.27, 36" = $53.59.
NOTES:
* I take pictures of problems and successes. I went back and reviewed all the photos I've added to this post.
I've given Lots of details and covered most of the weak areas.
IMO - My 6 pound 6 inch sch 40 PVC barrels show the best of the best construction for the least expense.
1. - There are flat end caps and round end caps. Various coupling lengths. Differently designed bushings.
@ Schedule 40 PVC Has much thicker walls and will give the best wear.
DWV (drainage) and other thinwall pipes wear out too fast and are not worth the effort.
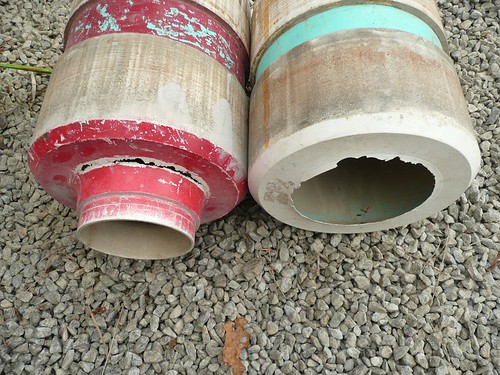
SDR 35 thin wall barrels after 3 months with SiC 30. People sell these on Ebay. Should be shot.

2. -Be Sure to Do the Internal Bevels - to prevent rocks and grit from wedging.
Avoid all pinch points, even in the coupling center ring!
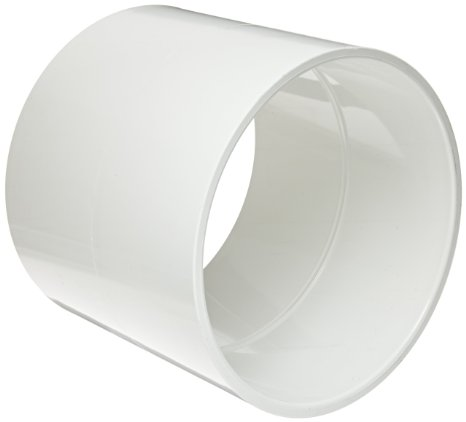
Tumbling is magical about trapping rocks and grit.
2A. - On Capped End - To reinforce the DWV End Cap, I Cut End Circles and place just before gluing end cap. Two 1/4" PVC sheets glued together and clamped. I Would prefer 1/2 " hard rubber stock. Butcher block nylon would work. No glue will hold 1/8" or any rubber for that matter. You could pour silicon caulk in and let it dry to fill end cap. Don't bother unless you do it often. Tumbling wears silicone fast. It does stick well though.
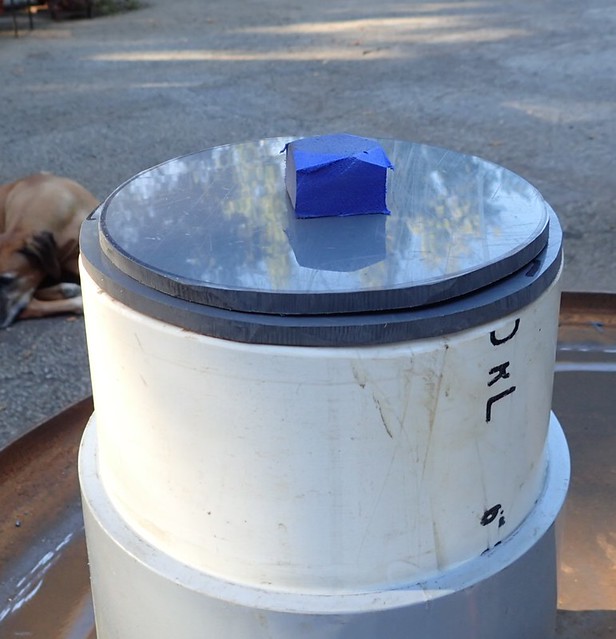
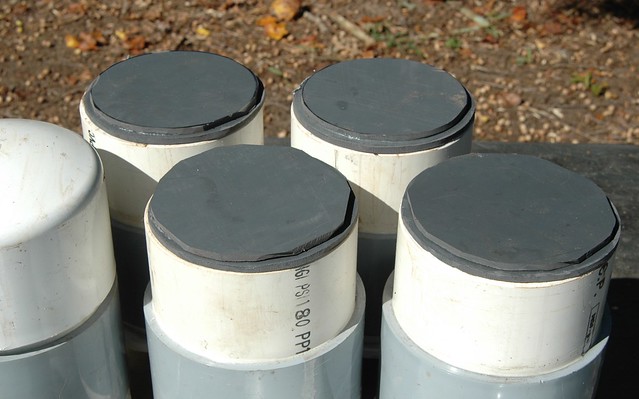
I have, with the barrel sitting vertical, squeezed out 1/3 of a caulk tube into the closed end.
Then I cut a paper plate to fit down in the barrel. Pushed it down to the bottom till it hit the caulk.
Gently pushed on the paper plate till the caulk worked it's way to the edge of the barrel to thicken and prevent trapping.
The silicone sticks well but the stuff wears fast. - A surprise!
I have actually poured cement in after gluing the end cap on to fill the gap of the 1/2 inch circle to avoid trapping grit.
It is better to trap in a circle of 1/2" thick plastic when gluing end cap on, than using silicone method.
I like the 1/2" thick plastic circle. Or even 1 inch thick.
The PVC pipe in the center also wears thru between the end cap and the coupling where the barrel is only a pipe's thickness. Once that wears thru it is trash.
Pipe Alternatives:
I sleeved a 6" schedule 40 pipe with another 6" schedule 40 pipe. I had to cut a ring gap in the inner sleeve pipe - like rings on a piston (ring gap), and boiled it in water. Worked on it till I formed it to fit tight in the outer pipe.
It maintains two pipe thicknesses for the full length of the barrel. Glued it in, PVC to PVC, it will stay, but you must do it before gluing the end cap on.
I never liked it. It only had a 5 inch inner diameter. The 6 inch inner diameters tumbled better.
The reduced inner diameter made a difference, but I made up for it by running it on the 55 RPM set of shafts.
I have done the same thing with SDR 35 pipe. It is thinner and smaller in diameter, fit perfect. But thin. But you still have to cut a ring gap to shrink it to fit inside. I am impressed with it on the 6 pound barrels.
A stick of schedule 80 pipe would be best. It would way increase life. And a 1/2" plate of rubber circle on the end when gluing end cap.
I think the I.D. of the schedule 80 is just over 5.7 inches which should be fine.
Sch 40- 6.06 ID, .280 wall
Sch 80-5.76 ID, .432 wall, perfect.
Both are 6.625 OD, schedule 40 fittings work on both. schedule 80 fittings too expensive.
Ebay schedule 80 6" PVC pipe. 3 feet for $20. Great investment.
www.ebay.com/itm/6-Inch-PVC-Pipe-6-in-x-3-ft-Schedule-80-S80-3-Foot-Sections-6-x-3-feet-/252511745493?hash=item3acadf75d5
2B. - On DWV Reducing Bushing End -
If NOT beveling the inside of the ends of the pipe and removing(grinding) the center ridge in the coupling -
Be damned if rocks do not get wedged tight in these end gaps. Wedged so hard you have to chisel the rocks out.
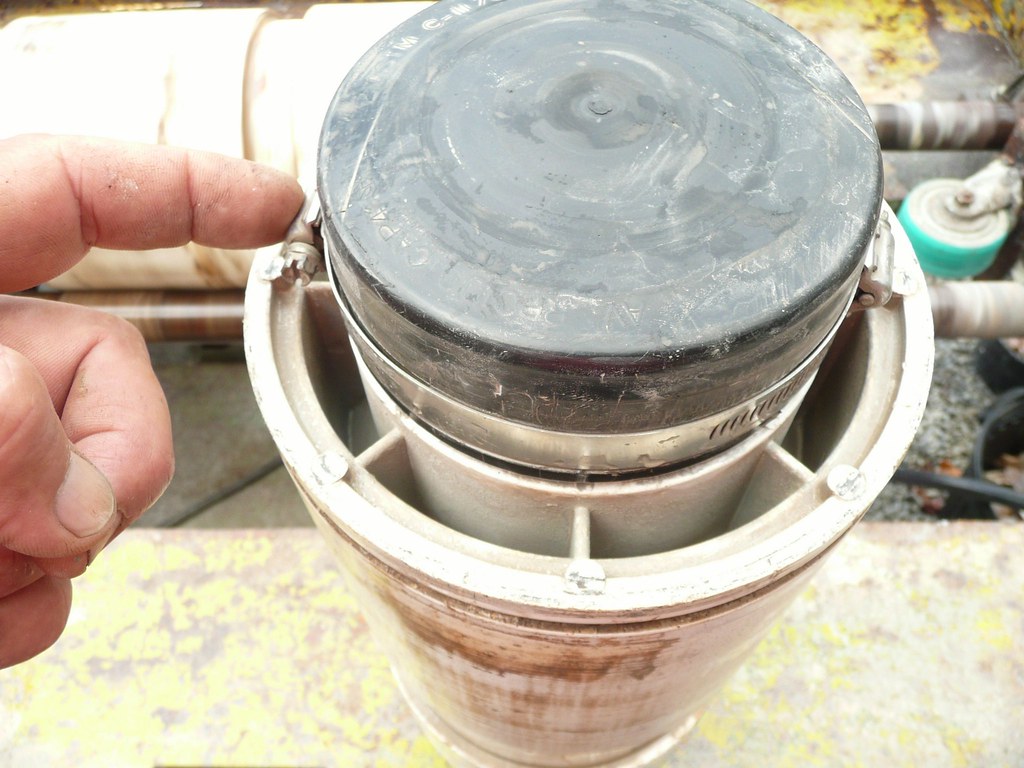
Bushing Gussets ready to fill with good caulk. Best done when dry, clean and brand new.
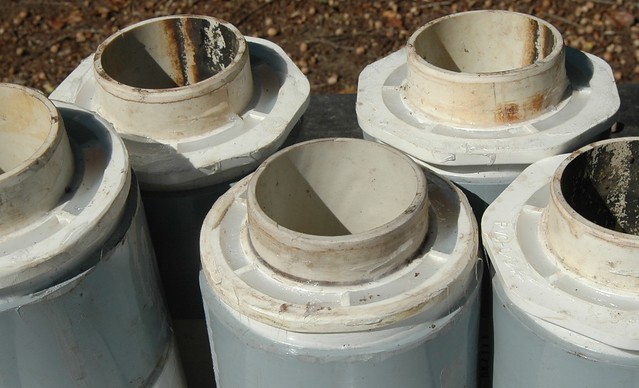
Caulked gussets
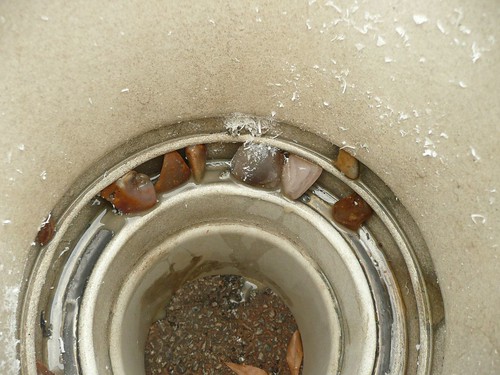
Wedged rocks from not removing pinch points with grinder. Very hard to remove. Can trap unused grit.
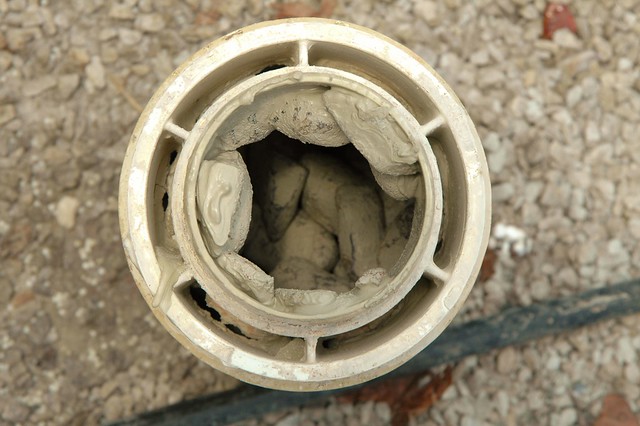
Shoulder in bushing failure due to not caulking. Leak allowed the Load to dry out.
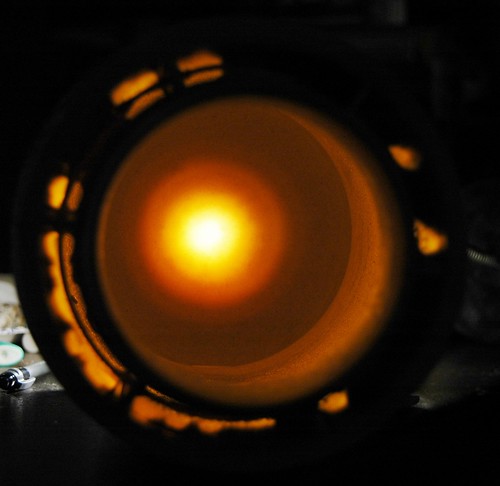
Back lit to expose Thinning of End Cap and Thinning Shoulders of Bushing (no caulk).
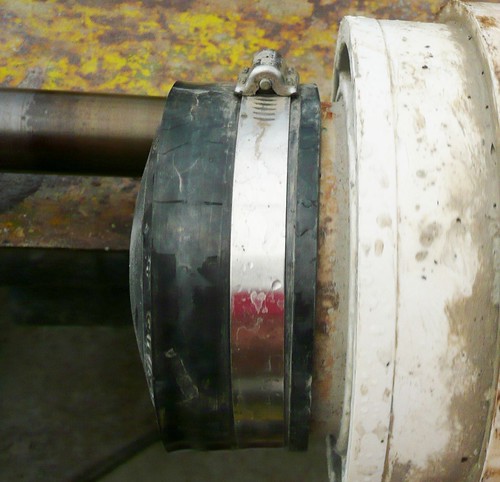
3. - The beauty of Fernco fittings, they start bulging to let you know you have pressure.
I have used two band clamps.
Gas so bad that when loosened in Greenhouse they launched and went thru 6 mil plastic cover.
Be careful and open standing to the side. One time it bruised my wrist.
About gas - Due to chemistry of rocks, water ph, slurry additives - good luck solving gas.
No telling what chemistry is going to do. Hard agates and quartz gems are pretty darn inert.
Softer rocks seem to be more chemically active.
Steel barrels make gas. Tumbling metals makes gas bad.
Concrete makes gas, tumbled concrete(slurry) burns hands.
I have not had a gas issue ever except when glass and obsidian is involved.
Maybe real organically coated coral.
Double band clamp on Fernco does wonders with gaseous materials. I put the band clamp screws opposite each other.
I have had them bulge 1.5 inches. When loosening bloated Fernco point it away from body, a true projectile.
I have used a vinyl type Fernco competitor's cap. Much harder.
Maintenance:
All schedule 40 6" barrels have a limited life of 3-5 years.
Possible closer to 2 years if you run SiC 30 24/7 - Which is the only grit I use in the rotary.
Barrels that only run 220 or finer grit never seem to wear out.
All parts of it wear out almost equally, except centers of end caps and shoulders of 4-6 inch reducing bushings.
As the end cap is the first to wear through, Again I suggest reinforcing inside, and silicone calk in the reducing bushing gussets.
Reinforcing the end cap may be a bit challenging for average person. Easier is to start out with longer pipe so you can just cut off the worn end cap and glue on a new one on, which makes the barrel 2.5 inches shorter each time.
I have a hole wear out in the center of the end cap about every year or two on the closed ends of the 6 and 8 inch PVC barrels.
I purchased a tube of high end silicon caulk, not the water soluble type. The 30-50 year stuff about $9/tube.
Heated the tube up by putting it in hot water to make it flow better.
This is best to do such an application to a used barrel that has a tumbled finish for best adhesion.
With the barrel sitting vertical I squeezed out 1/3 of the caulk tube into the closed end.
Then I cut a paper plate to fit down in the barrel. Pushed it down to the bottom till it hit the caulk.
Gently pushed on the paper plate till the caulk worked it's way to the edge of the barrel.
Pretty sure it will stay. I have applied such caulk to the inside of used tumbling PVC barrels before and had it stick well.
As the barrel is only used for the coarse grind, grit getting stuck in any pockets left is of little concern - until the last couple of rough runs.
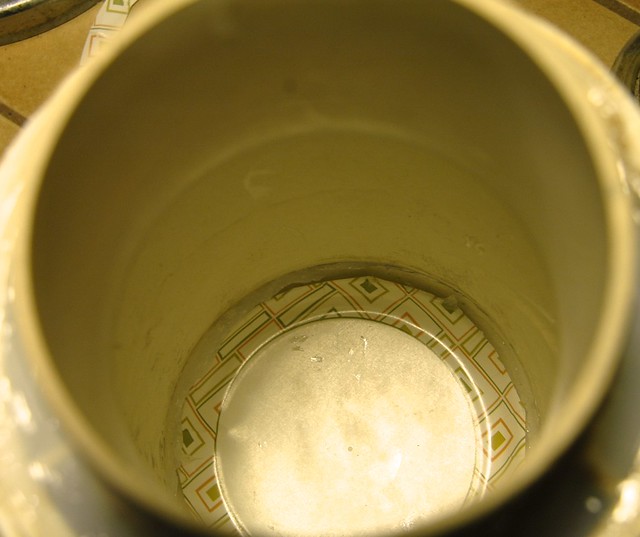
The paper plate will have a bad day.
About Grit
The KEY to a quick efficient tumble is the SLURRY !
Running 6 to 20 pound capacity barrels:
At 60 RPM, SiC 30 grit breaks down to around 10,000 grit in less than 12 hours.
By slowing to 30 RPM +/- 10 RPM I only need to attend to them once a day.
3 Tumbling Steps -
1 Coarse grind rocks - Faster turn around assisted by diamond grinder 1-2 hours for 3 barrels.
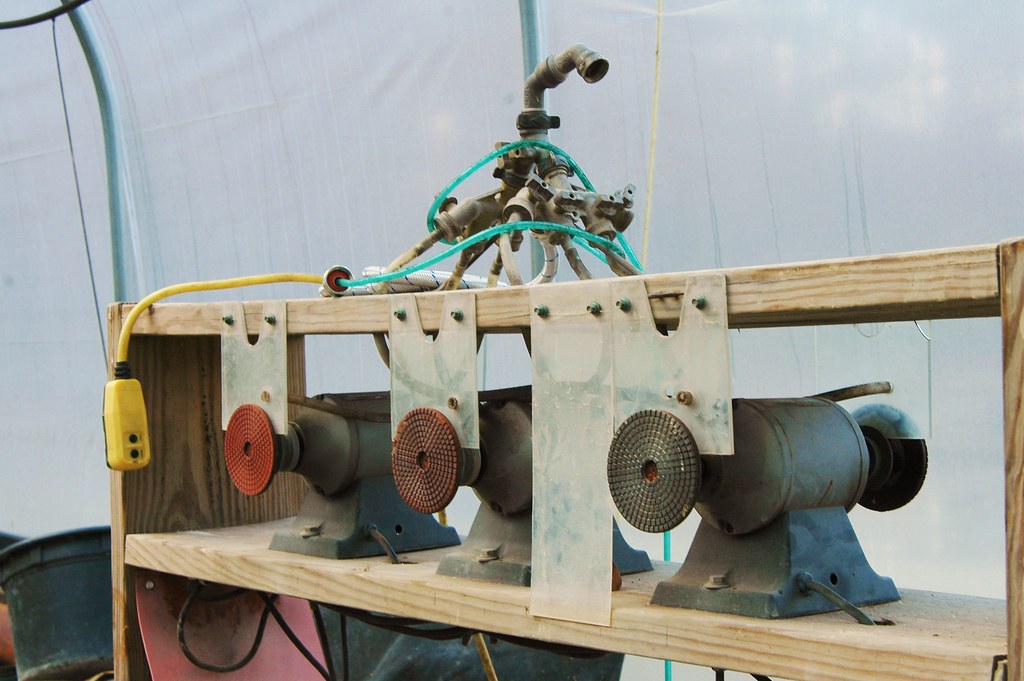
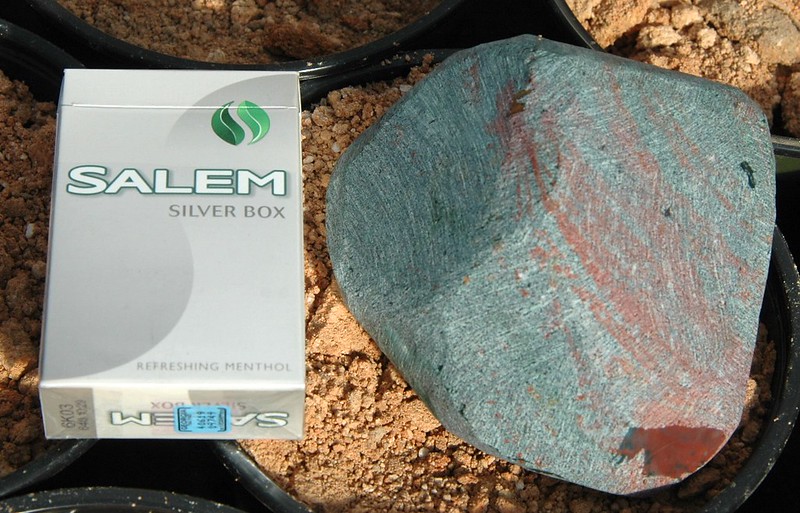
Load the barrel 60-70% with rock, 2-2.5 cups clay, add water to the bottom of top layer of rocks.
2 Add grit every day, clean outs only once every 4-7 days, then start a new load.
1 cup SiC 30 per 15 pounds rock added daily, check slurry. 1 cup clay at start after each clean out for each 15 pounds of rock - dose depending on clay quality.
Quick caps on PVC barrel saves a lot of time! It allows about 10 minutes to add grit to 3 barrels at a time. By doing multiple grit additions WITHOUT clean outs the grit sees a lot more time in the barrel on say 5 grit additions on an 8 day run with out clean outs. Day 2 grit sees 6 days. Day 3 grit sees 5 days. Day 4 grit sees 4 days. Day 5 grit sees 3 days. When adding grit, you can always pour some of the slurry off and add water to thin the slurry out as needed - say day 3 and day 6.
A concern - The SiC 30(or 45/70) is the coarsest grit in the shop. Usually No Worries about polluting it with any other grit since they will be finer. However, trapped grit in any barrel with any process is a problem if it lets loose during the final SiC 30 grit addition while you are breaking the grit down to 500-1000.
What happens when a couple of dozen trapped SiC 30 grit particles break loose during the final grit break down runs?
It leaves a random scratch here and there. You will have to work hard to find and fix those scratches.
For instance, after running the final 2 coarse grit break downs, I have to be extra careful when I remove the Fernco cap and be sure to wash all trapped grit out of the rubber cap as that is about the only place it usually gets caught.
Let the last grit addition run several days longer to break the grit to 500-1000 skipping at least 220 steps.
This method puts a lot of time on the breaking down grit, condenses coarse grind time. Rocks see a lot of time with 70, 45 and finer grit work.
7-8 days rough grind turnaround. Time depends on clay quality and quantity.
Let Last Coarse Run untill grit breaks way down.
- Personal Time spent per week is about 70 + 45 = about 2 hours.
3 Then Put in vibe for polish (best way) with AO 220 or AO 500.
This rate with three barrels running will keep the vibe going ~ 50% of the time.
On the final run I do not add grit for the final 3 days in a 6 pound barrel running 1.5-2.5 inch rocks. NO SMALLS.
Why waste grit on smalls and media if you don't want them?
If they were ready for the vibe I could put them in vibe with AO 1000 and get a wet shine. Yes, skip 220 500 and straight to 1000.
It would be a total waste of time to do 220 and 500. And that quality of grit breakdown could be my good clay.
And running only 30 RPM.
Big Rocks - ANOTHER GAME CHANGER! - but requires more attention.
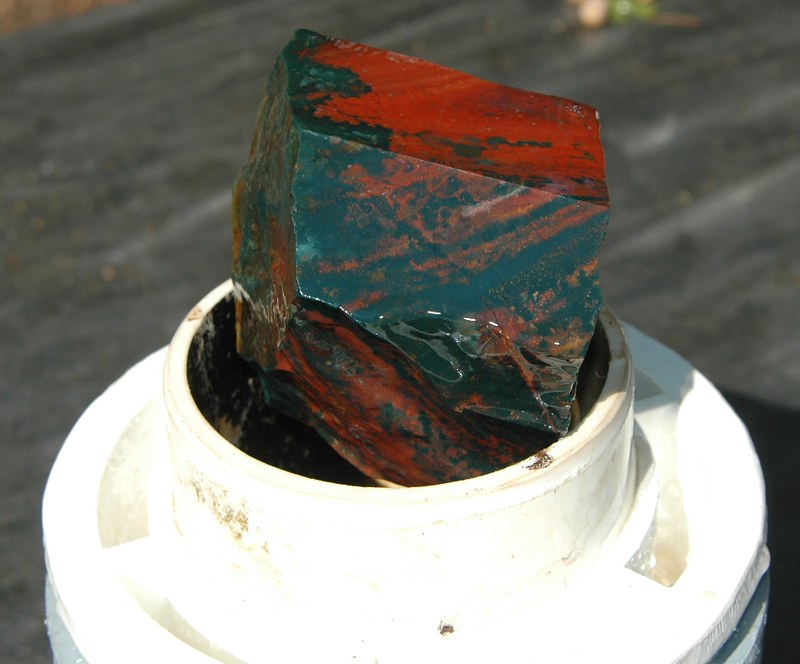
Big rocks(plus 12 ounces) are better for those experienced with rock type, slurry, slower rotation speed. They are tricky.
A one pound rock can break grit down on 4 hour intervals !! A 7 ounce with small rocks easily in 24 hours, a good target. A 16 ounce rock needs to be hard/tough and free of fractures, As do the rest of the rocks running with it.
The rest of the rocks should be small, 3/4 to 1.5 inches. Or media rocks, but not pea sized Or Grind Will Slow Way Down!
A bigger rock speeds things up. But can bruise if slurry is not maintained thick thru the whole process in rotary.
And only one 10-32 ounce rock per tumbler. And it must be a very tough/hard rock. Raises chance of bruises.
If you are tumbling average 1-1.5 inch rocks it is best to throw a 6-8 ounce rock in the load to help grind. Or 2-3 rocks about 4-5 ounces.
Smallish (1- 1.5 inch rocks) may have a problem breaking the coarse grit on 24 hour intervals. Probably not, but maybe.
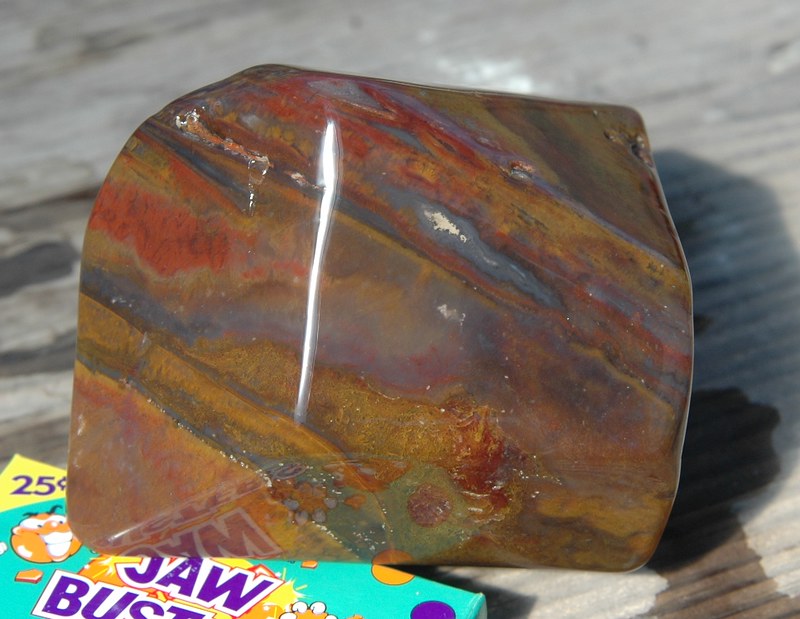
The big rock thing may be redundant or a special case. However, adding a 4-6 ounce "grinder" rock or two or three is suggested. "Grinder Rocks" have a big impact. Before the clay slurry thing I used to add a larger rock at start up to get a slurry started when using straight water. The big rock would speed things up till the rock mud started forming. I often removed it after slurry gets going. I don't remove them any more because they add to the speed of the grind.
Many vibes will not handle a 16 ounce rock. If it is finished in the rotary then you best do 500-1000-14,000 in the rotary with pea sized media/gravel.(gentle for finish).
Clean outs:
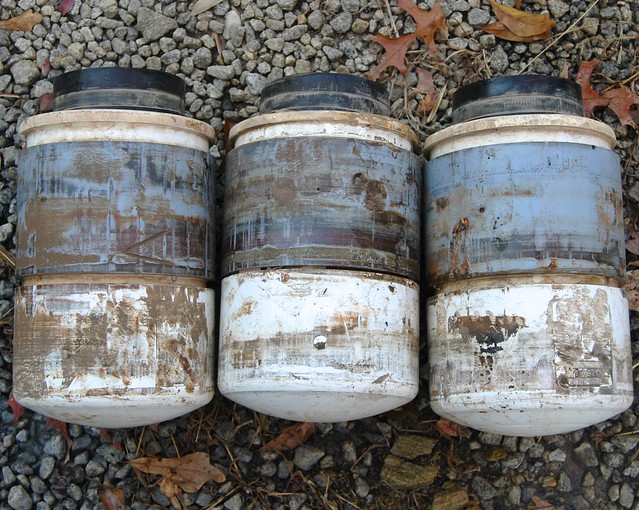
World's fastest barrels
Speedo barrels, 6 pound capacities for busy people. Note Roman numeral '5' engraved in left most barrel. They are numbered. Having them all the same size is handy for comparing performance and experiments.
It only takes 6-10 minutes to pop the caps to add grit on 3 barrels once every day.
Keep a 5 gallon bucket of water and a wash rag next to the tumbler to dip the caps in water to rinse them before reinstalling. Simple clean outs!
Barrel Clean outs about every 7-8 days.
Tools:
1 - (Wife's) wash rag to wipe slurry from mouth of barrel.
1 - Nut driver to remove and re-tighten band clamp.
3 - Old rubber caps to serve as barrel stands. Barrel stands sit on deck not 6 inches from shafts in a row immediately in front of each barrel's position on the shafts.
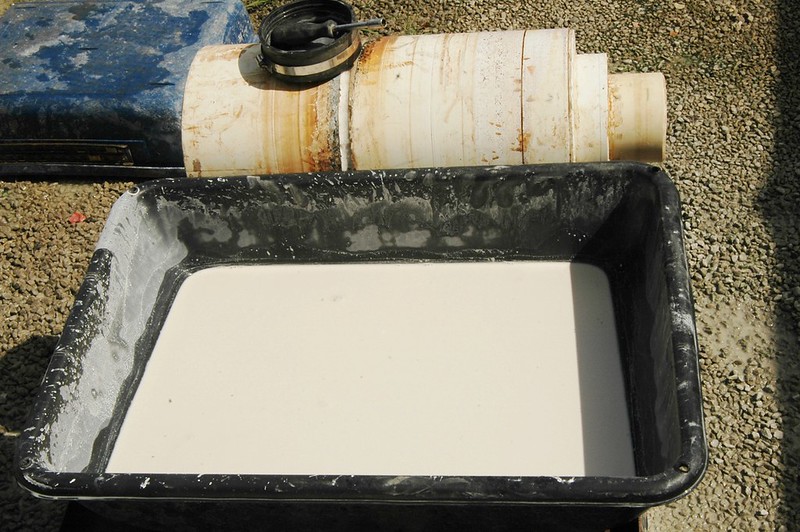
"Dump the entire contents into a screen over a 5 gallon bucket, wash rocks.
No need to scrub barrel, it's just going to get filled with SiC 30 and rocks again for the next run.
Let the bucket settle, pour or scoop clean water off next day or whenever barrel fills.
Dump settlement in yard/garden, clean water anywhere. Start over.
Never seen such a big deal about dumping slurry. Yes, Borax is an issue, but rock/clay slurry is natural and safe -
Maybe malachite or fluorite, but no one tumbles poisonous rocks. Agates and quartz is pretty darn safe."
Polish
Best done in a vibe. - This is a Viking.
Lot's of people love the Lott-O's!

I am very surprised by AO. Mainly in a vibe.
Any ceramic media is included as it is simply giant AO particles.
Yes, ceramic media = aluminum oxide, that is what it is made of. It is like Mohs 9 in hardness.
If you tumble with pea sized SiC it will break down to nothing in a tumbler. It is designed to break down to nothing.
It breaks down in a series of very sharp particles to cut rock fast.
Ceramic media is the exact opposite. You will play hell trying to break a piece of ceramic media with a hammer on an anvil. It will squeeze out like a water melon seed and become a projectile.
You can take AO 80 or probably better is AO 220 and it will polish rocks in a vibe right up to final polish finish!
Final polish = AO 14,000. It takes about 2 days in vibe.
The AO 220 is best, as it will remove the worst SiC 30 scratches if you remove the rocks out of the rotary with still unbroken SiC 30. It will do it in the vibe for sure, probably will do it in a rotary too.
So, no one even owns AO 220. Not common. I found a 5 gallon bucket for dollars at a junkyard. So I have used it over the years. It can be found cheap. It is often available cheap from sand blasting operations.
It is my golden grit for the vibe. It allows me to skip AO 500 and AO 1000 in the vibe with out any ill effects.
The aluminum oxide discovery blew my mind. total accident
I was out of SiC 220 for the vibe. Stepped out and tried AO 220 to replace it. Went back 15 hours later and pulled a rock. Presto, it had a 1000 finish!
Even 24 hours in AO 220 allows a move to polish.
Let it run 48 hours and presto, a 2000-3000 finish. Ready for 14,000 polish run.
No way SiC 220 would have had such results, maybe a 1000 finish after 4 days if lucky.
Example:
You can tumble ceramic media with SiC 80. Put a rough finish on it. Then take the rough surfaced ceramic media and put it in the vibe with rocks out of SiC 30 in the rotary.
As the Mohs 9 ceramics rub against the rocks and each other the whole batch will become polished.
Basically you are polishing rocks with pea sized grit. Add 2 tablespoons of Borax/14 pounds of rock.
In this case you would be polishing rocks with giant grit. What grit size is pea sized grit ? AO 00, AO 000
That is the nature of aluminum oxide. It does not shatter like SiC, it rounds. You just do not know that because AO 220-500-100-polish is too small to see this effect.
That concept you will have a hard time selling to tumbling folks.
Any man that owns a vibe really only needs AO 220 and AO 14,000.
The AO 220 will remove any deep scratches from SIC 30 and then take you to a super pre-polish.
2 jobs - Making AO 220 the most powerful tool aside from SiC 30.
A man w/rotary and a vibe needs 3 grits. SiC 30, AO 220, and AO 14,000.
No need for 500 and 1000. Those are totally redundant.
ADMIN EDIT - repaired broken images. Original code below:

jamesp - I enjoy experimenting. My thoughts about tumbling:
"Efficient grit breakdown = more daily Tumbling work done."
"The vibe is the ultimate finisher. Hands down. It's that coarse part that I try to perfect.
"Efficient grit breakdown = more daily Tumbling work done."
"The vibe is the ultimate finisher. Hands down. It's that coarse part that I try to perfect.
I know that those rocks have to rub against each other to wear.
If they bounce against each other you will get damage and little rubbing...
And then I thought about fast rubbing and slow rubbing.
Or heavy rubbing and light rubbing in terms of weight or pressure.
Or is the 'avalanche' within the small barrel active deeper in the barrel and the bigger barrel acting only on the very top layer of rocks?
Shallow water has tall peaky short waves that roll and break and deep water has low long waves that never break.
And a tumbler is basically a standing wave or avalanche I guess.
So I concluded that
the Main Question - IS big diameter and slow BETTER than small diameter and fast?
And doubt that manufacturers want to deal with a fast spinning tumbler for many reasons such as noise and wear.
So I am suspicious of a fast tumble being avoided period.
But my experience has been that smaller and faster is most efficient. And the sound in the fast,small diameter barrel sounds like fast rubbing. And maybe I think too much,ha. But thought it worthwhile to experiment with.
I wonder if long barrels are better too? The ends of my PVC barrels are about worn out after two years.
Makes me suspicious that the rocks are dragging on the ends, disturbing the roll of rocks?
Short vs long... Short may tumble faster, I do not know.
And is there an optimum speed and diameter? Certainly rock size and fill level would have some influence.
If the barrel was 3 inches in diameter I think you would not get much rubbing.
If the barrel was 120 inches in diameter I am not sure what all is going on.
And does the faster speed spread the grit more evenly?
EDIT 2019 forum.rocktumblinghobby.com/post/1075689/thread
PVC is fine for many applications.
6" and 8" would last 3 years full-time running down to SIC 46 which is fine for many.
They last much longer if running SiC 60 and finer abrasives.
The HPDE is just plain tough, wear resistant, impact and crush resistant.
You know it when you handle them.
Both have those quick remove and easy to clean Fernco caps.
Read more: forum.rocktumblinghobby.com/thread/76934/tumbling-inch-schedule-pvc-barrels?page=5#ixzz69Hs0T14P
forum.rocktumblinghobby.com/post/1078064/thread

My Main Tumbler. Front rollers run at 30 RPM, the Back at 55 RPM.
"The 6 inch barrels represent 95% of my experience. They are User Friendly and Effective."

Back in October of 2012 James wrote that the PVC barrels he builds are "so easy to access and clean. Will never use another barrel. I threw away all my Lortone 6 and 12 barrels (before I found this forum.)"
I asked what was wrong with the Lortones?
"Lortone rubber barrel is awesome. It is the lid. Fast to open. But slow to close to seal.
You have to wash the seal and seal seat very well. The seat about requires a tooth brush. Then best to tap with a rubber mallet to seal.
Have you seen the design ? It is peculiar. And it is sensitive to pressure, will not hesitate to leak.
The Fernco caps are cat's meow. No comparison.
Wish some one would come up with a semi-hard solid rubber jar shaped just like the PVC that allows use of Fernco cap. Same rubber as Lortone."
A 6 inch diameter barrel 6 inches long will hold about 6 pounds of rock. It is in the "Goldilocks Zone" -
Big enough to do the job, yet small enough to be easily handled and not too costly.
Plus They are easy to build and comparatively inexpensive.
INSTRUCTIONS:
To build a 2-5 year lasting 6 inch Tumbler Barrel you will need:
1 - End Cap - reinforce the inside with Hard rubber, PVC or silicon calk to extend wear time
1 - Piece of 6 inch sch 40 PVC pipe as long as you want your barrel to be.
(I do bevel the inside of the pipe so small rocks will not jam on the inside at the joints and possibly trap grit.)
1 - 6 inch PVC Coupling - to attach reducing bushing. - grind out central ring to avoid trapped grit
1 - 4-6 inch reducing bushing fill gussets with silicon calk to extend wear
1 - Piece of 4 inch sch 40 PVC pipe about 5 inches long - for transition to 4" cap
1 - Fernco 4 inch rubber cap - Quick and easy clean outs
PVC cement
silicon caulk
Nut Driver

If you start with full lengths of pipe,
Approximate Cost for 12" = $44.31, 18" = $46.63, 24" = $48.95, 30" = $51.27, 36" = $53.59.
NOTES:
* I take pictures of problems and successes. I went back and reviewed all the photos I've added to this post.
I've given Lots of details and covered most of the weak areas.
IMO - My 6 pound 6 inch sch 40 PVC barrels show the best of the best construction for the least expense.
1. - There are flat end caps and round end caps. Various coupling lengths. Differently designed bushings.
@ Schedule 40 PVC Has much thicker walls and will give the best wear.
DWV (drainage) and other thinwall pipes wear out too fast and are not worth the effort.

SDR 35 thin wall barrels after 3 months with SiC 30. People sell these on Ebay. Should be shot.

2. -Be Sure to Do the Internal Bevels - to prevent rocks and grit from wedging.
Avoid all pinch points, even in the coupling center ring!

Tumbling is magical about trapping rocks and grit.
2A. - On Capped End - To reinforce the DWV End Cap, I Cut End Circles and place just before gluing end cap. Two 1/4" PVC sheets glued together and clamped. I Would prefer 1/2 " hard rubber stock. Butcher block nylon would work. No glue will hold 1/8" or any rubber for that matter. You could pour silicon caulk in and let it dry to fill end cap. Don't bother unless you do it often. Tumbling wears silicone fast. It does stick well though.


I have, with the barrel sitting vertical, squeezed out 1/3 of a caulk tube into the closed end.
Then I cut a paper plate to fit down in the barrel. Pushed it down to the bottom till it hit the caulk.
Gently pushed on the paper plate till the caulk worked it's way to the edge of the barrel to thicken and prevent trapping.
The silicone sticks well but the stuff wears fast. - A surprise!
I have actually poured cement in after gluing the end cap on to fill the gap of the 1/2 inch circle to avoid trapping grit.
It is better to trap in a circle of 1/2" thick plastic when gluing end cap on, than using silicone method.
I like the 1/2" thick plastic circle. Or even 1 inch thick.
The PVC pipe in the center also wears thru between the end cap and the coupling where the barrel is only a pipe's thickness. Once that wears thru it is trash.
Pipe Alternatives:
I sleeved a 6" schedule 40 pipe with another 6" schedule 40 pipe. I had to cut a ring gap in the inner sleeve pipe - like rings on a piston (ring gap), and boiled it in water. Worked on it till I formed it to fit tight in the outer pipe.
It maintains two pipe thicknesses for the full length of the barrel. Glued it in, PVC to PVC, it will stay, but you must do it before gluing the end cap on.
I never liked it. It only had a 5 inch inner diameter. The 6 inch inner diameters tumbled better.
The reduced inner diameter made a difference, but I made up for it by running it on the 55 RPM set of shafts.
I have done the same thing with SDR 35 pipe. It is thinner and smaller in diameter, fit perfect. But thin. But you still have to cut a ring gap to shrink it to fit inside. I am impressed with it on the 6 pound barrels.
A stick of schedule 80 pipe would be best. It would way increase life. And a 1/2" plate of rubber circle on the end when gluing end cap.
I think the I.D. of the schedule 80 is just over 5.7 inches which should be fine.
Sch 40- 6.06 ID, .280 wall
Sch 80-5.76 ID, .432 wall, perfect.
Both are 6.625 OD, schedule 40 fittings work on both. schedule 80 fittings too expensive.
Ebay schedule 80 6" PVC pipe. 3 feet for $20. Great investment.
www.ebay.com/itm/6-Inch-PVC-Pipe-6-in-x-3-ft-Schedule-80-S80-3-Foot-Sections-6-x-3-feet-/252511745493?hash=item3acadf75d5
2B. - On DWV Reducing Bushing End -
If NOT beveling the inside of the ends of the pipe and removing(grinding) the center ridge in the coupling -
Be damned if rocks do not get wedged tight in these end gaps. Wedged so hard you have to chisel the rocks out.

Bushing Gussets ready to fill with good caulk. Best done when dry, clean and brand new.

Caulked gussets

Wedged rocks from not removing pinch points with grinder. Very hard to remove. Can trap unused grit.

Shoulder in bushing failure due to not caulking. Leak allowed the Load to dry out.

Back lit to expose Thinning of End Cap and Thinning Shoulders of Bushing (no caulk).

3. - The beauty of Fernco fittings, they start bulging to let you know you have pressure.
I have used two band clamps.
Gas so bad that when loosened in Greenhouse they launched and went thru 6 mil plastic cover.
Be careful and open standing to the side. One time it bruised my wrist.
About gas - Due to chemistry of rocks, water ph, slurry additives - good luck solving gas.
No telling what chemistry is going to do. Hard agates and quartz gems are pretty darn inert.
Softer rocks seem to be more chemically active.
Steel barrels make gas. Tumbling metals makes gas bad.
Concrete makes gas, tumbled concrete(slurry) burns hands.
I have not had a gas issue ever except when glass and obsidian is involved.
Maybe real organically coated coral.
Double band clamp on Fernco does wonders with gaseous materials. I put the band clamp screws opposite each other.
I have had them bulge 1.5 inches. When loosening bloated Fernco point it away from body, a true projectile.
I have used a vinyl type Fernco competitor's cap. Much harder.
Maintenance:
All schedule 40 6" barrels have a limited life of 3-5 years.
Possible closer to 2 years if you run SiC 30 24/7 - Which is the only grit I use in the rotary.
Barrels that only run 220 or finer grit never seem to wear out.
All parts of it wear out almost equally, except centers of end caps and shoulders of 4-6 inch reducing bushings.
As the end cap is the first to wear through, Again I suggest reinforcing inside, and silicone calk in the reducing bushing gussets.
Reinforcing the end cap may be a bit challenging for average person. Easier is to start out with longer pipe so you can just cut off the worn end cap and glue on a new one on, which makes the barrel 2.5 inches shorter each time.
I have a hole wear out in the center of the end cap about every year or two on the closed ends of the 6 and 8 inch PVC barrels.
I purchased a tube of high end silicon caulk, not the water soluble type. The 30-50 year stuff about $9/tube.
Heated the tube up by putting it in hot water to make it flow better.
This is best to do such an application to a used barrel that has a tumbled finish for best adhesion.
With the barrel sitting vertical I squeezed out 1/3 of the caulk tube into the closed end.
Then I cut a paper plate to fit down in the barrel. Pushed it down to the bottom till it hit the caulk.
Gently pushed on the paper plate till the caulk worked it's way to the edge of the barrel.
Pretty sure it will stay. I have applied such caulk to the inside of used tumbling PVC barrels before and had it stick well.
As the barrel is only used for the coarse grind, grit getting stuck in any pockets left is of little concern - until the last couple of rough runs.

The paper plate will have a bad day.
About Grit
An abrasive expert told me:
"For hard materials like agate, Sic 30 to SiC 46 is the most efficient. Smaller particles decrease cutting rate and do not last long. Larger than SiC 30 breaks on crystal lattices to flat shapes that reduce cutting rate. SiC 30 to 46 are structurally strongest and break into more efficient cutting shapes."
I tried it and he is right. That is why I use SiC 30.
The KEY to a quick efficient tumble is the SLURRY !
I got TIRED of wasting 12-16 weeks just shaping rocks!
All this clay saga got started trying to get coarser grits to suspend in slurry and create attraction forces to
speed up the slowest part of tumbling-the shaping process.
START OFF WITH A GOOD SLURRY instead of waiting for the tumbler to generate one.
THIS IS A GAME CHANGER!
The SLURRY 1. keeps rocks from bumping and bruising each other,
and 2. suspends the grit so it makes better contact with the rocks!
I've found my Georgia Red Clay somehow works best.
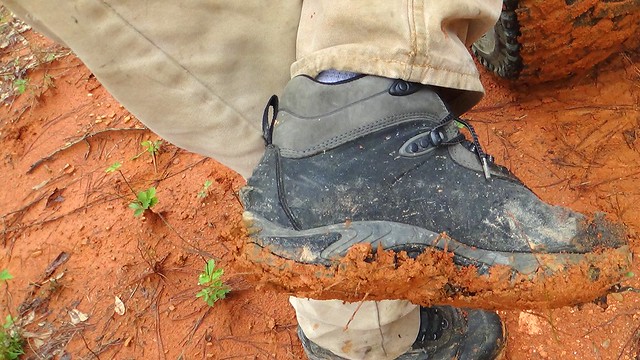
How thick should a slurry be? Viscosity is hard to put in words. NOT watery - Think Milk shake.
If you can move the barrel and can see the slurry moves freely you are close.
If you hear the rocks not rubbing/bumping then likely too thick. Pour some off and add water to thin.
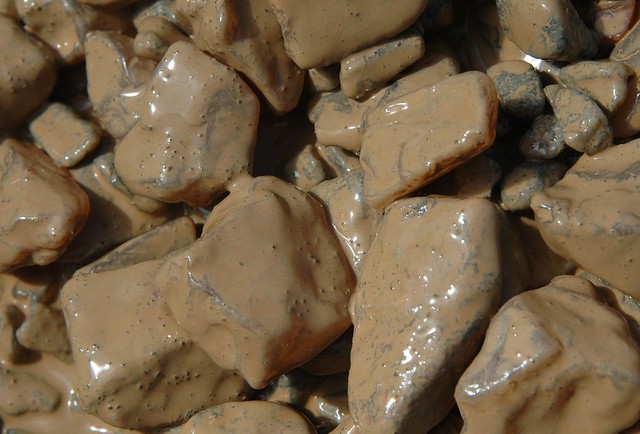
SiC 30 in clay slurry after one hour. Note particles are spread out evenly. That is target.
That's it in a nut shell.
With a high suction thicker slurry the bouncing and rolling action is converted to a rubbing action.
Rocks that were bouncing in a watery slurry are not rubbing so much. Rocks that roll over themselves in a watery slurry are not rubbing so much.
The motor has to work harder to move the rocks in a thick slurry because there is more friction.
The friction caused by the slurry results in more drag on the barrel and the rocks.
That drag increases grind pressure on the rocks.(a lot with a high suction slurry)
At 30 RPM - that works out to 43,200 avalanches per day.
At 55 RPM - 79,200 per day.
With a 60% rock fill arrangement and thicker slurry, grinding is greatly increased.
Not only is the grind zone longer but a higher percentage of the rocks are in the grind zone.
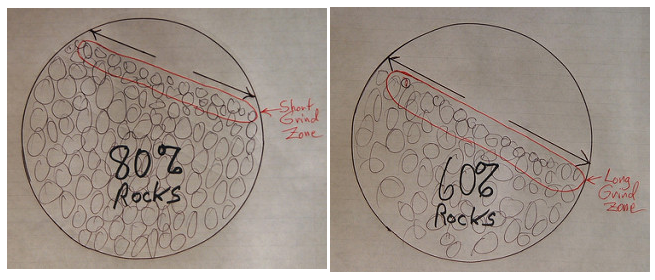
The way I see it, if you can have a full barrel width avalanche and benefits of protective slurry you are getting the most out of every rotation.
All this clay saga got started trying to get coarser grits to suspend in slurry and create attraction forces to
speed up the slowest part of tumbling-the shaping process.
START OFF WITH A GOOD SLURRY instead of waiting for the tumbler to generate one.
THIS IS A GAME CHANGER!
The SLURRY 1. keeps rocks from bumping and bruising each other,
and 2. suspends the grit so it makes better contact with the rocks!
I've found my Georgia Red Clay somehow works best.

How thick should a slurry be? Viscosity is hard to put in words. NOT watery - Think Milk shake.
If you can move the barrel and can see the slurry moves freely you are close.
If you hear the rocks not rubbing/bumping then likely too thick. Pour some off and add water to thin.

SiC 30 in clay slurry after one hour. Note particles are spread out evenly. That is target.
That's it in a nut shell.
With a high suction thicker slurry the bouncing and rolling action is converted to a rubbing action.
Rocks that were bouncing in a watery slurry are not rubbing so much. Rocks that roll over themselves in a watery slurry are not rubbing so much.
The motor has to work harder to move the rocks in a thick slurry because there is more friction.
The friction caused by the slurry results in more drag on the barrel and the rocks.
That drag increases grind pressure on the rocks.(a lot with a high suction slurry)
At 30 RPM - that works out to 43,200 avalanches per day.
At 55 RPM - 79,200 per day.
With a 60% rock fill arrangement and thicker slurry, grinding is greatly increased.
Not only is the grind zone longer but a higher percentage of the rocks are in the grind zone.

The way I see it, if you can have a full barrel width avalanche and benefits of protective slurry you are getting the most out of every rotation.
Running 6 to 20 pound capacity barrels:
At 60 RPM, SiC 30 grit breaks down to around 10,000 grit in less than 12 hours.
By slowing to 30 RPM +/- 10 RPM I only need to attend to them once a day.
3 Tumbling Steps -
1 Coarse grind rocks - Faster turn around assisted by diamond grinder 1-2 hours for 3 barrels.


Load the barrel 60-70% with rock, 2-2.5 cups clay, add water to the bottom of top layer of rocks.
2 Add grit every day, clean outs only once every 4-7 days, then start a new load.
1 cup SiC 30 per 15 pounds rock added daily, check slurry. 1 cup clay at start after each clean out for each 15 pounds of rock - dose depending on clay quality.
Quick caps on PVC barrel saves a lot of time! It allows about 10 minutes to add grit to 3 barrels at a time. By doing multiple grit additions WITHOUT clean outs the grit sees a lot more time in the barrel on say 5 grit additions on an 8 day run with out clean outs. Day 2 grit sees 6 days. Day 3 grit sees 5 days. Day 4 grit sees 4 days. Day 5 grit sees 3 days. When adding grit, you can always pour some of the slurry off and add water to thin the slurry out as needed - say day 3 and day 6.
A concern - The SiC 30(or 45/70) is the coarsest grit in the shop. Usually No Worries about polluting it with any other grit since they will be finer. However, trapped grit in any barrel with any process is a problem if it lets loose during the final SiC 30 grit addition while you are breaking the grit down to 500-1000.
What happens when a couple of dozen trapped SiC 30 grit particles break loose during the final grit break down runs?
It leaves a random scratch here and there. You will have to work hard to find and fix those scratches.
For instance, after running the final 2 coarse grit break downs, I have to be extra careful when I remove the Fernco cap and be sure to wash all trapped grit out of the rubber cap as that is about the only place it usually gets caught.
Let the last grit addition run several days longer to break the grit to 500-1000 skipping at least 220 steps.
This method puts a lot of time on the breaking down grit, condenses coarse grind time. Rocks see a lot of time with 70, 45 and finer grit work.
7-8 days rough grind turnaround. Time depends on clay quality and quantity.
Let Last Coarse Run untill grit breaks way down.
- Personal Time spent per week is about 70 + 45 = about 2 hours.
3 Then Put in vibe for polish (best way) with AO 220 or AO 500.
This rate with three barrels running will keep the vibe going ~ 50% of the time.
On the final run I do not add grit for the final 3 days in a 6 pound barrel running 1.5-2.5 inch rocks. NO SMALLS.
Why waste grit on smalls and media if you don't want them?
If they were ready for the vibe I could put them in vibe with AO 1000 and get a wet shine. Yes, skip 220 500 and straight to 1000.
It would be a total waste of time to do 220 and 500. And that quality of grit breakdown could be my good clay.
And running only 30 RPM.
Big Rocks - ANOTHER GAME CHANGER! - but requires more attention.

Big rocks(plus 12 ounces) are better for those experienced with rock type, slurry, slower rotation speed. They are tricky.
A one pound rock can break grit down on 4 hour intervals !! A 7 ounce with small rocks easily in 24 hours, a good target. A 16 ounce rock needs to be hard/tough and free of fractures, As do the rest of the rocks running with it.
The rest of the rocks should be small, 3/4 to 1.5 inches. Or media rocks, but not pea sized Or Grind Will Slow Way Down!
A bigger rock speeds things up. But can bruise if slurry is not maintained thick thru the whole process in rotary.
And only one 10-32 ounce rock per tumbler. And it must be a very tough/hard rock. Raises chance of bruises.
If you are tumbling average 1-1.5 inch rocks it is best to throw a 6-8 ounce rock in the load to help grind. Or 2-3 rocks about 4-5 ounces.
Smallish (1- 1.5 inch rocks) may have a problem breaking the coarse grit on 24 hour intervals. Probably not, but maybe.

The big rock thing may be redundant or a special case. However, adding a 4-6 ounce "grinder" rock or two or three is suggested. "Grinder Rocks" have a big impact. Before the clay slurry thing I used to add a larger rock at start up to get a slurry started when using straight water. The big rock would speed things up till the rock mud started forming. I often removed it after slurry gets going. I don't remove them any more because they add to the speed of the grind.
Many vibes will not handle a 16 ounce rock. If it is finished in the rotary then you best do 500-1000-14,000 in the rotary with pea sized media/gravel.(gentle for finish).
Clean outs:

World's fastest barrels
Speedo barrels, 6 pound capacities for busy people. Note Roman numeral '5' engraved in left most barrel. They are numbered. Having them all the same size is handy for comparing performance and experiments.
It only takes 6-10 minutes to pop the caps to add grit on 3 barrels once every day.
Keep a 5 gallon bucket of water and a wash rag next to the tumbler to dip the caps in water to rinse them before reinstalling. Simple clean outs!
Barrel Clean outs about every 7-8 days.
Tools:
1 - (Wife's) wash rag to wipe slurry from mouth of barrel.
1 - Nut driver to remove and re-tighten band clamp.
3 - Old rubber caps to serve as barrel stands. Barrel stands sit on deck not 6 inches from shafts in a row immediately in front of each barrel's position on the shafts.

"Dump the entire contents into a screen over a 5 gallon bucket, wash rocks.
No need to scrub barrel, it's just going to get filled with SiC 30 and rocks again for the next run.
Let the bucket settle, pour or scoop clean water off next day or whenever barrel fills.
Dump settlement in yard/garden, clean water anywhere. Start over.
Never seen such a big deal about dumping slurry. Yes, Borax is an issue, but rock/clay slurry is natural and safe -
Maybe malachite or fluorite, but no one tumbles poisonous rocks. Agates and quartz is pretty darn safe."
Polish
Best done in a vibe. - This is a Viking.
Lot's of people love the Lott-O's!

I am very surprised by AO. Mainly in a vibe.
Any ceramic media is included as it is simply giant AO particles.
Yes, ceramic media = aluminum oxide, that is what it is made of. It is like Mohs 9 in hardness.
If you tumble with pea sized SiC it will break down to nothing in a tumbler. It is designed to break down to nothing.
It breaks down in a series of very sharp particles to cut rock fast.
Ceramic media is the exact opposite. You will play hell trying to break a piece of ceramic media with a hammer on an anvil. It will squeeze out like a water melon seed and become a projectile.
You can take AO 80 or probably better is AO 220 and it will polish rocks in a vibe right up to final polish finish!
Final polish = AO 14,000. It takes about 2 days in vibe.
The AO 220 is best, as it will remove the worst SiC 30 scratches if you remove the rocks out of the rotary with still unbroken SiC 30. It will do it in the vibe for sure, probably will do it in a rotary too.
So, no one even owns AO 220. Not common. I found a 5 gallon bucket for dollars at a junkyard. So I have used it over the years. It can be found cheap. It is often available cheap from sand blasting operations.
It is my golden grit for the vibe. It allows me to skip AO 500 and AO 1000 in the vibe with out any ill effects.
The aluminum oxide discovery blew my mind. total accident
I was out of SiC 220 for the vibe. Stepped out and tried AO 220 to replace it. Went back 15 hours later and pulled a rock. Presto, it had a 1000 finish!
Even 24 hours in AO 220 allows a move to polish.
Let it run 48 hours and presto, a 2000-3000 finish. Ready for 14,000 polish run.
No way SiC 220 would have had such results, maybe a 1000 finish after 4 days if lucky.
Example:
You can tumble ceramic media with SiC 80. Put a rough finish on it. Then take the rough surfaced ceramic media and put it in the vibe with rocks out of SiC 30 in the rotary.
As the Mohs 9 ceramics rub against the rocks and each other the whole batch will become polished.
Basically you are polishing rocks with pea sized grit. Add 2 tablespoons of Borax/14 pounds of rock.
In this case you would be polishing rocks with giant grit. What grit size is pea sized grit ? AO 00, AO 000
That is the nature of aluminum oxide. It does not shatter like SiC, it rounds. You just do not know that because AO 220-500-100-polish is too small to see this effect.
That concept you will have a hard time selling to tumbling folks.
Any man that owns a vibe really only needs AO 220 and AO 14,000.
The AO 220 will remove any deep scratches from SIC 30 and then take you to a super pre-polish.
2 jobs - Making AO 220 the most powerful tool aside from SiC 30.
A man w/rotary and a vibe needs 3 grits. SiC 30, AO 220, and AO 14,000.
No need for 500 and 1000. Those are totally redundant.
ADMIN EDIT - repaired broken images. Original code below:
[img style="max-width:100%;" src="http://i1298.photobucket.com/albums/ag56/DaveCrosby/Lapidary/1-JamesPrice_zps6fhzn9yw.jpg?t=1480857958"]
[img style="max-width:100%;" src="http://i1298.photobucket.com/albums/ag56/DaveCrosby/Lapidary/1-6X6Barrel_zpsxqiolkdn.png"]
[img src="http://i1298.photobucket.com/albums/ag56/DaveCrosby/Lapidary/6inchparts_zps9f9sn5to.png?t=1480519631" style="max-width:100%;"]
[img style="max-width:100%;" src="http://i1298.photobucket.com/albums/ag56/DaveCrosby/Lapidary/1-Coupling_zpsdsfvamq7.png?t=1480753401"]
[img style="max-width:100%;" src="http://i1298.photobucket.com/albums/ag56/DaveCrosby/Lapidary/Lott-Os_zpsjgwu94dg.png?t=1480775262"]


 ... to the New Guys from The ChatBox V.2 Crew